
Related Manuals for Reliable BRIO PRO 1000CC


Summary of Contents for Reliable BRIO PRO 1000CC
- Page 1 BRIO PRO 1000CC STEAM CLEANING SYSTEM INSTRUCTION MANUAL GUIDE D’UTILISATION SYSTÈME DE NETTOYAGE À VAPEUR MANUAL DE INSTRUCCIONES SISTEMA DE LIMPIEZA A VAPOR...
- Page 3 ENGLISH FRANÇAIS ESPAÑOL...
- Page 4 BRIO PRO 1000CC STEAM CLEANING SYSTEM INSTRUCTION MANUAL ENGLISH...
- Page 5 RELIABLE. RIGHT THERE WITH YOU. At Reliable, we do what we love, and take pride in doing it right. You want what’s best for the people, places and things that matter in your life – from where you live to what you wear. So do we. From the start, we approach every product with a craftsman’s attention...
-
Page 6: Important Safety Instructions
IMPORTANT SAFETY INSTRUCTIONS • When using your Reliable steam cleaner, basic safety precautions should always be followed. Please read the following instructions carefully as they provide important information concerning how to install, use and care for this steam cleaner. •... -
Page 7: Electrical Instructions
ELECTRICAL INSTRUCTIONS To avoid a circuit overload, do not operate another high-wattage appliance on the same circuit simultaneously with the steam cleaner. If an extension cord is necessary, a 15-amp rated cord with a polarized plug should be used. Cords rated for less may overheat and cause damage. -
Page 8: How To Use Your Steam Cleaner
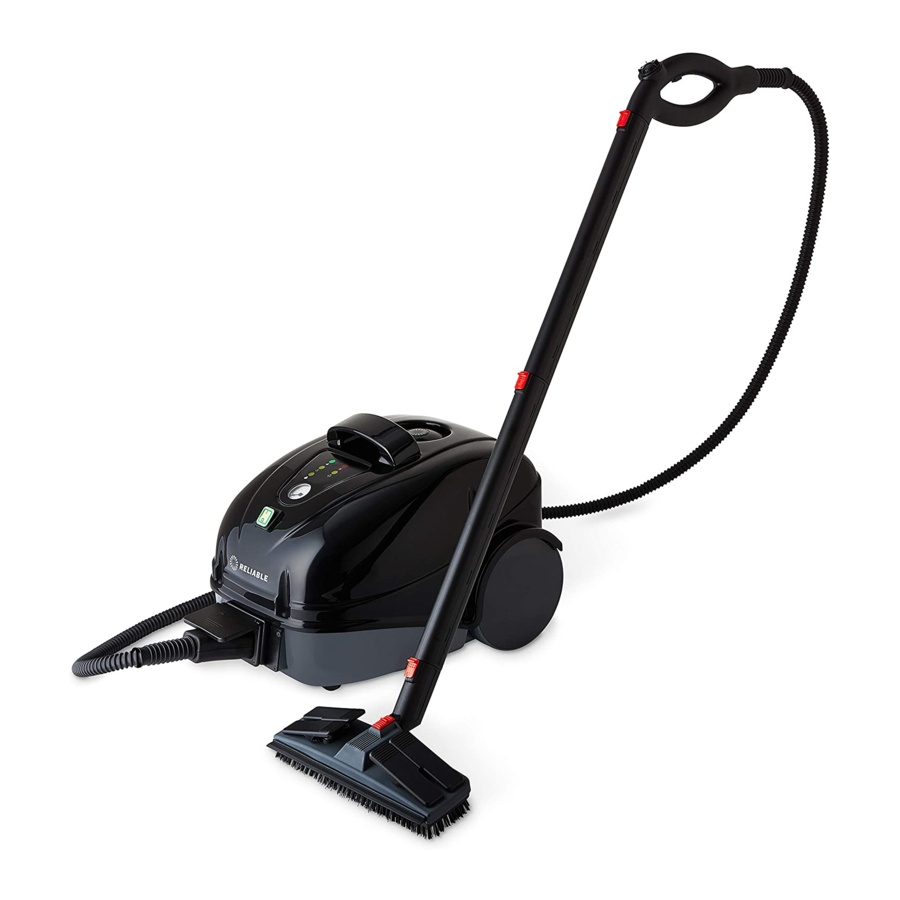
ACCESSORIES WITH STEAM CLEANER Rectangular floor brush Triangular brush with black polyester bristles Black upholstery scraper Funnel (2) 30 mm small brush with black polyester bristles 30 mm small brush with brass bristles 30 mm small brush with stainless steel bristles Extension pipes Nozzle with brass tip 2,45m flexible hose... - Page 9 Note: The steam volume being used may be regulated from a dial on the hose handle - See the following Features section on HOW TO CHANGE STEAM VOLUME. HANDLE CONTROL When the water level is low in the water tank, a red low water light (B) will light up. Remove the tank cap (4) and refill the water tank at this time.
-
Page 10: Using The Accessories
STEAM REGULATIONS LIGHTS AND HANDLE CONTROL The two yellow lights signal the three possible regulations of steam quantity/strength. The first steam regulation on-light (C) corresponds to the minimum steam quantity, position 1 on the handle (G). The second regulation on- light (D) corresponds to a medium steam quantity, position 2 on the handle (H). -
Page 11: Filling The Tank
HIGH PRESSURE NOZZLE WITH SMALL ROUND BRUSH ( NYLON, BRASS, STAINLESS STEEL ) The high-pressure nozzle can be used with or without one of the small round brushes sup- plied with the steam cleaner. For items that are particularly prone to scratches, it is best to use the nozzle without a brush. -
Page 12: Maintenance Of The Boiler
MAINTENANCE OF THE BOILER To maintain your steam cleaner in good condition and to ensure consistent performance, we rec- ommend that you clean the boiler once or twice a year depending on the hardness of the water. CLEANING INSTRUCTIONS ATTENTION: Before draining the boiler, please make sure that the machine is depressurized and cool. -
Page 13: Troubleshooting
Do not operate the steam cleaner with a damaged electrical cord, plug or if the steam cleaner has been dropped or damaged. To avoid risk of electric shock, do not disassemble or attempt to repair the unit on your own. Return the unit to Reliable Corporation (see warranty) for examination repair. - Page 14 1. Turn the trolley upside down in order to easily screw the rotating back wheels into the threaded holes (fi g. 1). Fig. 1 2. Assemble the wheel in the following order: washer, chrome back wheel cover, back wheel, brass wheel cover, chrome back wheel cover, washer and fi x them with a self-locking nut on the shaft (fi g.
- Page 15 5. The fi xing caps should be tightened until the trolley structure is secure (fi g. 5). Fig. 5 6. Screw the cap to the steam cleaner tank. (fi g. 6) Fig. 6 7. Put the water tank on the accessory tray and connect the silicone hose to the machine valve cap, ensuring that it is well connected to avoid water leakage.
-
Page 16: Additional Information
ADDITIONAL INFORMATION THE WATER TROLLEY SYSTEM DOES NOT REQUIRE THE BOTTLE TO BE REMOVED FOR FILLING. During use do NOT pull the steam hose with force, it could move the machine on the trolley. If you need to put the WATER BOTTLE on a FLAT surface, rotate the tap to a horizontal position (fig.8). - Page 17 Steam cleaning is a proven method of disinfection. The Reliable Brio Pro 1000CC (EnviroMate PRO EP1000), and the Reliable Tandem Pro 2000CV (EnviroMate FLEX EF700) have been certified to kill the following microorganisms: Organism Organism Type Exposure Time Percentage of...
- Page 18 Reliable on an exchange basis, and will be either new or refurbished to be functionally equivalent to new. If Reliable is unable to repair or replace a Reliable Boiler Tank, it will refund the current value of that Reliable Boiler Tank at the time the warranty claim is made.
- Page 19 Reliable on an exchange basis, and will be either new or refurbished to be functionally equivalent to new. If Reliable is unable to repair or replace a Reliable Product, it will refund the current value of that Reliable Product at the time the warranty claim is made.
- Page 20 BRIO PRO 1000CC SYSTÈME DE NETTOYAGE À VAPEUR GUIDE D'UTILISATION FRANÇAIS...
- Page 21 à la clientèle jouent des rôles également importants dans notre mission de vous fournir ce qui vous correspond. Le Brio Pro 1000CC prend en charge en toute facilité les travaux de nettoyage et d’assainissement les plus difficiles.
- Page 22 RELATIVES À LA SÉCURITÉ • Lors de l'utilisation de votre nettoyeur à vapeur Reliable, des précautions basiques de sécurité doivent toujours être observées. Veuillez lire attentivement les instructions suivantes car elles donnent des renseignements importants sur comment installer, utiliser et effectuer l'entretien de ce nettoyeur à...
- Page 23 • À chaque fois que le générateur de vapeur monte en température à froid, l'air à l'intérieur de l'appareil évite que la vapeur soit évacuée immédiatement. Après une minute de mise en température, réglez le bouton de régulation de la vapeur sur la position maximale et appuyez sur le bouton sous la poignée du pistolet pour expulser l'air.
- Page 24 ACCESSOIRES AVEC LE NETTOYEUR À VAPEUR 8. Brosse à plancher rectangulaire 9. Brosse triangulaire avec poils en polyester noir 10. Grattoir de rembourrage noir 11. Entonnoir 12. (2) Petite brosse de 30 mm avec des poils en polyester noir 13. Petite brosse de 30 mm avec des poils en laiton 14.
- Page 25 Remarque : Le volume de vapeur utilisé peut être régulé depuis un cadran situé sur la poignée du tuyau - Voir la section Fonctions ci-dessous dans COMMENT CHANGER LE VOLUME DE VAPEUR. Lorsque le niveau de l’eau dans le réservoir d’eau est bas, un témoin lumineux rouge de niveau d’eau bas (B) s’allume.
-
Page 26: Utilisation Des Accessoires
réservoir d'eau (4) et remplissez le réservoir. TÉMOINS DE RÉGULATIONS DE LA VAPEUR ET COMMANDES DE LA POIGNÉE Les deux témoins lumineux jaunes signalent les trois possibles régulations de la quantité/ puissance de la vapeur. Le premier témoin allumé de régulation de la vapeur (C) correspond à... -
Page 27: Remplissage Du Réservoir
BUSE HAUTE PRESSION AVEC PETITE BROSSE RONDE ( NYLON, LAITON, ACIER INOXYDABLE ) La buse haute pression peut être utilisée avec ou sans l'une des petites brosses rondes fournies avec le nettoyeur à vapeur. Pour les éléments qui sont particulièrement sensibles aux rayures, il est préférable d'utiliser la buse sans brosse. -
Page 28: Description Technique
à vapeur est tombé ou est endommagé. Pour éviter tout risque de choc électrique, ne démontez pas ou ne tentez pas de réparer l'unité par vous-même. Renvoyez l'unité à Reliable Corporation (voir garantie) pour une révision, une réparation ou un remplacement. - Page 29 (CAUSES POSSIBLES) 1. Vous utilisez trop de vapeur (pos. 4). 2. La pompe à eau est cassée. (SOLUTION) 1. Coupez l'interrupteur principal (1) attendez 1 minute puis allumez de nouveau et attendez que la lumière verte (A) s'allume. 2) Contactez Reliable Corporation pour une révision. INSTRUCTIONS D'ASSEMBLAGE DU CHARIOT 1000CC...
- Page 30 1. Retournez le chariot à l'envers afi n de visser facilement les roues arrières pivotantes dans les trous fi letés (Fig. 1). Fig. 1 2. Assemblez la roue dans l'ordre suivant : rondelle, protection de roue en chrome, roue arrière, protection de roue en laiton, protection de roue en chrome, rondelle et fi xez-les avec un écrou de sécurité...
- Page 31 5. Les capuchons de fi xation doivent être serrés jusqu'à ce que la structure du chariot soit sûre (fi g. 5). Fig. 5 6. Vissez le bouchon sur le réservoir du nettoyeur à vapeur. (fi g. 6) Fig. 6 7. Mettez le réservoir d'eau sur le plateau d'accessoires et de connecter le tuyau de silicone pour le capuchon de valve de la machine , assurant qu'il est bien...
-
Page 32: Informations Supplémentaires
INFORMATIONS SUPPLÉMENTAIRES LE CIRCUIT D'EAU DU CHARIOT NE REQUIERT PAS DE RETIRER LA BONBONNE LORS DU REMPLISSAGE. Lors de l'utilisation, NE tirez PAS sur le tuyau à vapeur avec FORCE, cela pourrait déplacer la machine sur le chariot. Si vous devez mettre la BONBONNE D'EAU sur une surface PLANE, tournez le robinet en position horizontale (fig. - Page 33 équivalente ou supérieure. Les pièces réparées ou les produits remplacés seront fournis par Reliable sur la base d'un échange, et seront soit neufs ou remis à neuf pour être fonctionnellement équivalents aux neufs. Si Reliable n'est pas en mesure de réparer ou de remplacer un réservoir de chauffe-eau Reliable, elle remboursera la valeur actuelle dudit réservoir de chauffe-eau Reliable au...
- Page 34 équivalente ou supérieure. Les pièces réparées ou les produits remplacés seront fournis par Reliable sur la base d'un échange, et seront ou neufs ou remis à neuf pour être fonctionnellement équivalents aux neufs. Si Reliable n'est pas en mesure de réparer ou de remplacer le Produit Reliable, elle remboursera la valeur actuelle du Produit Reliable au moment où...
- Page 36 BRIO PRO 1000CC SISTEMA DE LIMPIEZA A VAPOR MANUAL DE INSTRUCCIONES ESPAÑOL...
- Page 37 RELIABLE. JUNTO A USTED. En Reliable, hacemos lo que nos encanta hacer y nos enorgullecemos de hacerlo bien. Quiere lo mejor para las personas, los lugares y las cosas que importan en la vida: desde dónde vive a la ropa que viste. Nosotros también. Desde el inicio, abordamos cada producto con la atención al detalle de un...
-
Page 38: Instrucciones De Seguridad Importantes
INSTRUCCIONES DE SEGURIDAD IMPORTANTES • Cuando utilice su limpiadora a vapor Reliable, siempre siga las precauciones básicas de seguridad. Lea atentamente estas instrucciones porque en ellas se ofrece información importante en materia de instalación, uso y cuidado del equipo. •... - Page 39 • Cada vez que la temperatura en el generador de vapor aumenta, el aire que se encuentra dentro del aparato evita la salida inmediata del vapor. Una vez transcurrido un minuto del calentamiento, lleve la perilla reguladora de vapor a la posición máxima y presione el botón ubicado debajo del mango de la pistola para expulsar el aire.
- Page 40 ACCESORIOS SUMINISTRADOS CON LA LIMPIADORA A VAPOR 8. Cepillo de piso rectangular 9. Cepillo triangular con cerdas negras de poliéster 10. Raspador de tapicería negro 11. Embudo 12. (2) Cepillo pequeño de 30 mm con cerdas negras de poliéster 13. Cepillo pequeño de 30 mm con cerdas de latón 14.
- Page 41 caída de la presión de la unidad. Esto se debe a que se elimina el aire de la unidad, y solo debería ocurrir por un breve instante al comienzo de cada uso. Nota: Puede regularse el volumen de vapor en uso mediante el selector ubicado en el mango de la manguera.
-
Page 42: Uso De Los Accesorios
de agua (4) y complete el nivel de agua en el depósito. LUCES INDICADORAS DE LA REGULACIÓN DEL VAPOR Y CONTROL EN EL ASA Las dos luces amarillas indican las tres posibles regulaciones en cuanto a cantidad y potencia del vapor. La primera luz encendida que señala la regulación del vapor (C) corresponde a la cantidad mínima de vapor, posición 1 en el asa (G). -
Page 43: Llenado Del Depósito
BOQUILLA DE ALTA PRESIÓN CON CEPILLO REDONDO PEQUEÑO ( NYLON, BRONCE, ACERO INOXIDABLE ) La boquilla para alta presión puede utilizarse con o sin uno de los pequeños cepillos redondos que se proporcionan con la limpiadora a vapor. Para piezas que puedan rayarse fácilmente, lo mejor es usar la boquilla sin cepillo. -
Page 44: Instrucciones De Limpieza
más detalles). Volver a colocar el tapón en el depósito (4). Si usted está utilizando el carro con el tubo de agua externo conectado al tapón del depósito de agua, siga los mismos pasos enumerados arriba pero en el tubo de agua. MANTENIMIENTO DE LA CALDERA Para mantener en buenas condiciones su limpiadora a vapor y con el propósito de asegurar un rendimiento constante, le recomendamos limpiar la caldera una o dos veces al año,... -
Page 45: Detección Y Resolución De Problemas
(SOLUCIÓN) 1. Apague el interruptor principal (1), aguarde 1 minuto; luego, vuelva a encender el equipo y espere a que se encienda la luz verde (A). 2) Comuníquese con Reliable Corporation para solicitar un servicio de mantenimiento. INSTRUCCIONES DE MONTAJE DEL CARRO 1000CC... - Page 46 1. Coloque el carro cabeza abajo para atornillar con facilidad las ruedas giratorias traseras dentro de los orifi cios roscados (fi g. 1). Fig. 1 2. Arme la rueda respetando el siguiente orden: arandela, tapa cromada trasera, rueda trasera, tapa de bronce, tapa cromada trasera, arandela;...
- Page 47 5. Ajuste los dispositivos de fi jación hasta que la estructura del carro quede fi rme (fi g. 5). 6. Atornille la sujeción al depósito de la limpiadora a vapor. (fi g. 6) Fig. 6 7. Coloque el depósito de agua en la bandeja de accesorios y conectar la manguera de silicona a la tapa de la válvula de la máquina, asegurándose...
-
Page 48: Información Adicional
INFORMACIÓN ADICIONAL EL SISTEMA DE CARRO DE AGUA NO EXIGE RETIRAR EL TUBO PARA LLENARLO. Durante su uso, NO jale con FUERZA de la manguera de vapor; esto podría mover la máquina sobre el carro. Si necesita colocar el TUBO DE AGUA sobre una superficie PLANA, gire el grifo a una posición horizontal (fig. - Page 49 Reliable o a través de un vendedor autorizado por Reliable para comerciar la Caldera Reliable.
- Page 50 Productos Reliable. Esta garantía limitada es la única que se aplica a todos los Productos Reliable, reemplaza todos los términos que puedan estar contenidos en cualquier otro documento u orden de compra, y no puede ser alterada ni modificada excepto que Reliable así...
- Page 53 1 800 268 1649 www.reliablecorporation.com...
Need help?
Do you have a question about the BRIO PRO 1000CC and is the answer not in the manual?
Questions and answers