Table of Contents
Advertisement
Quick Links
Advertisement
Table of Contents

Subscribe to Our Youtube Channel
Related Manuals for BEMIS bioBidet FLOW SPRING NECK


Summary of Contents for BEMIS bioBidet FLOW SPRING NECK
- Page 1 SPRING NECK OWNER’S MANUAL INSPIRED BY...
-
Page 2: Table Of Contents
TABLE OF CONTENTS Product Information........4 Product Diagram..........5 Parts..............6 Recommended Tools........7 Installation Types..........8 Note Before Installing.........9 Installation............10 Troubleshooting Guide......22 5 Year Warranty.........30 Table des Matières Informations sur le produit......4 Schéma du produit........5 Les pièces............6 Outils recommandés........7 Types d’installation........8 Remarque avant l’installation....9 Installation............10 Guide de dépannage........26 Garantie de 5 ans........32... -
Page 3: Product Information
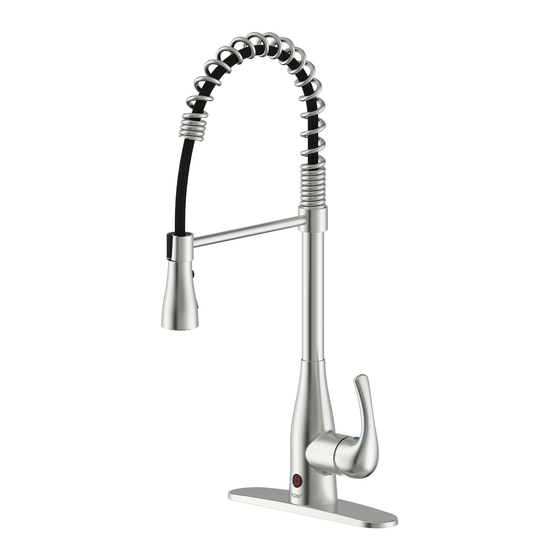
PRODUCT INFORMATION PRODUCT DIAGRAM Information produit Diagramme de produit Product Features Caractéristiques du produit • Metal lever handle • Poignée à levier en métal • 2 function spray head • Tête de pulvérisation • Single-hole or 3-hole installation à 2 fonctions •... -
Page 4: Parts
PARTS RECOMMENDED TOOLS (NOT INCLUDED) Les Pièces OUTILS RECOMMANDÉS (Non Inclus) • Adjustable Wrench • Clé à molette • Safety Goggles • Lunettes de sécurité Spray Head • Screwdriver • Tournevis Tête de pulvérisation • Silicone Sealant • Mastic silicone •... -
Page 5: Installation Types
INSTALLATION TYPES NOTE BEFORE INSTALLING Types d’installation Remarque Avant L’installation SINGLE HOLE INSTALLATION This product includes a safety clip. The safety plug must be removed Installer Avec Un Orifice when switching between motion activated and manual operation. Normal Operating Condition Ce produit comprend un clip de sécurité. -
Page 6: Installation
INSTALLATION Installation NOTE: Flush water lines before installation to release built up impurities in water supply. REMARQUE: Rincez les conduites d’eau avant l’installation pour libérer les impuretés accumulées dans l’alimentation en eau. Step 1 for 1-hole sink Step 1 for 3-hole sink Step 2.1 Step 2.2 Insert the O-ring over the hoses,... - Page 7 INSTALLATION (CONT.) Installation (suite) 250mm(9.8in) Outle t connection Raccor t de sortie Step 3 Step 4 Step 5.1 Step 5.2 The preferred mounting distance Mount the control box under the Connect the outlet hose to the Connect the spray hose to the between the spray hose and the sink using a philips head screwdriver control box with our innovative...
- Page 8 INSTALLATION (CONT.) Installation (suite) Weight location label Étiquette d'emplacement de poids Step 6.1 Step 6.2 Step 7 Step 8 Connect the data cables and secure Tie the data cables together with the Install the counterweight on the pull Remove the battery pack cover them tightly by hand.
- Page 9 INSTALLATION (CONT.) Installation (suite) Étape 9 Step 10 Step 9 Étape 10 Branchez les lignes d’alimentation Turn on the water supply. Connect the hot and cold supply Ouvrez l’alimentation en eau. chaude et froide sur le robinets lines onto the matching water valves d’eau correspondants et sécuriser and secure the connection with an la connexion avec une clé...
- Page 10 INSTALLATION (CONT.) Installation (suite) CAUTION: RISK OF PROPERTY DAMAGE! Do not over tighten connections. This will prevent water leakage. NOTICE: Uses care to avoid cross threading or over tightening the connections. Unless otherwise indicated, use an adjustable wrench to tighten one-quarter turn past hand-tight.
- Page 11 INSTALLATION (CONT.) Installation (suite) Step 12 Étape 12 Step 13 Step 14 Open the faucet handle and Ouvrez la poignée du robinet et Pull out the spray head and release For manual operation, turn the wave your hand over the sensor. agitez votre main sur le capteur.
- Page 12 INSTALLATION (CONT.) Installation (suite) Screen filter Filtre d'écran Step 15.1 Étape 15.1 Step 15.2 Étape 15.2 If the water flow rate is lower Si le débit d’eau est inférieur à To check the faucet head, remove Pour vérifier la tête du robinet, than normal, there may be build la normale, il peut s’accumuler the aerator using the blue aerator...
-
Page 13: Troubleshooting Guide
TROUBLESHOOTING GUIDE Guide de dépannage Condition Possible Cause Solution Condition Possible Cause Solution Water doesn’t flow Connections my not be Use the instruction document to verify Water doesn’t Faucet Handspray Make sure the handle is in the open position from the faucet when properly made. - Page 14 TROUBLESHOOTING GUIDE Guide de dépannage État Cause possible Solution État Cause possible Solution L’eau ne coule pas Les connexions ne Utilisez le document d’instructions L’eau ne coule La fonction de Gardez le tuyau sorti pendant 1 à 3 minutes du robinet lorsqu’elle peuvent pas être pour vérifier que toutes les connexions pas lorsque le...
- Page 15 TROUBLESHOOTING GUIDE Guide de dépannage État Cause possible Solution Le débit d’eau Les piles sont épuisées. Vérifiez que les batteries sont chargées / s’arrête pendant bonnes et dans la bonne polarité +/-. Changer l’utilisation (ce qui ou réorienter les piles. ne s’arrête pas par Vérifiez s’il y a Assurez-vous que le capteur est propre (même...
-
Page 16: Garantie De 5 Ans
5 YEAR WARRANTY GARANTIE 5 ANS 100% Coverage on all parts and labor for the entire This written warranty is the only warranty made by BBC Innovation LLC. Repair or replacement as provided under product for all five years from original date of purchase. this warranty shall be the exclusive remedy available to the purchaser. - Page 17 5 YEAR WARRANTY GARANTIE 5 ANS Couverture à 100% sur toutes les pièces et main-d’œu- Cette garantie écrite est la seule garantie offerte par BBC. La réparation ou le remplacement tel que prévu dans le cadre vre pour l’ensemble du produit pendant les cinq années de cette garantie sera le recours exclusif à...
- Page 18 Thank You BBC Innovation LLC 7900 S Route 31 Crystal Lake, IL 60014 T. 847.458.2334 support@biobidet.com biobidet.com...
Need help?
Do you have a question about the bioBidet FLOW SPRING NECK and is the answer not in the manual?
Questions and answers