
Related Manuals for Sunjoy B120007902


Summary of Contents for Sunjoy B120007902
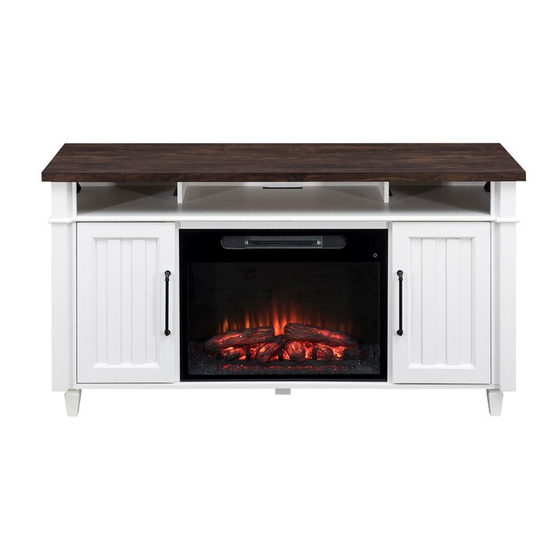
- Page 1 1 / 30 ASSEMBLY INSTRUCTIONS Item No.: B120007902 WE HAVE YOU IN MIND, LET US SERVE YOU! Questions? Issues? CONTACT US 24 hours / 7 days a week ONE YEAR WARRANTY customer.care@sunjoygroup.com 1-(866)-578-6569 Country of Origin: China...
-
Page 2: Important Safety Instructions
2 / 30 Important Safety Instructions Warning! Please read and understand this entire manual before attempting to assemble or operate this product. • Choking hazard – This product contains small parts. Keep all hardware out of reach of children. • Two people are recommended for assembly. -
Page 3: Exploded Drawing
3 / 30 Exploded Drawing Parts List Label Part Number Description Part Image P00210044201 Table Top P00400031901 Back Panel 2 Upper Middle P00380053001 Panel Country of Origin: China... - Page 4 4 / 30 Back Horizontal P00050155301 Beam P00380053101 Upper Side Panel P00400031801 Back Panel 1 P00420033001 Shelf 1 P00230002101 Shelf 2 Lower Side P00380053201 Panel(Right) P00010003401 Base P00540055201 Leg 1 Lower Middle P00380053301 Panel(Right) Front Middle P00380053401 Panel P00540055301 Leg 2 Country of Origin: China...
-
Page 5: Hardware Pack
5 / 30 P00410015201 Door 26” Electric Fireplace P005200025 Insert( Packed In a Separate Box) Bottom Horizontal P00420033201 Beam Lower Middle P00380053501 Panel(Left) Lower Side P00380053601 Panel(Left) Front Panel P00390012301 (Upper Side Panel) Adjust Foot Pad P005300069 (preassembled) Hardware Pack Label Part Number Description... - Page 6 6 / 30 Label Part Number Description Part Image H100020003 Cam Lock Ø15*12 H010030522 Bolt M6*10 H030050005 Screw ST4.2*25 H030040043 Screw ST3.5*12 P00050155401 Connection P00510023401 Handle P005100181 Soft Close Hinge P00050155501 Plastic Connector H060030007 Shelf Support Wall Anchor Kit H100030004 H060030003 Dowel Ø8*30 H090030002...
- Page 7 7 / 30 Cam Bolt + Cam Lock Hidden Connector System Assembly Technique Screw the cam bolt into the threaded inserts on the panel. Connect both panels together, making sure the cam bolt goes into the pre-drilled hole on the end of panel and is visible so the cam lock can be attached. Insert the cam lock into the pre-drilled large hole on the panel, making sure the arrow on the face of the cam lock faces out and points toward to cam bolt.
- Page 8 8 / 30 STEP 1 Country of Origin: China...
- Page 9 9 / 30 STEP 2 Country of Origin: China...
- Page 10 10 / 30 STEP 3 Country of Origin: China...
- Page 11 11 / 30 STEP 4 Country of Origin: China...
- Page 12 12 / 30 STEP 5 Country of Origin: China...
- Page 13 13 / 30 STEP 6 Country of Origin: China...
- Page 14 14 / 30 STEP 7 Country of Origin: China...
- Page 15 15 / 30 STEP 8 Country of Origin: China...
- Page 16 16 / 30 STEP 9 Country of Origin: China...
- Page 17 17 / 30 STEP 10 Country of Origin: China...
- Page 18 18 / 30 STEP 11 Country of Origin: China...
- Page 19 19 / 30 STEP 12 Country of Origin: China...
- Page 20 20 / 30 STEP 13 Country of Origin: China...
- Page 21 21 / 30 STEP 14 Country of Origin: China...
- Page 22 22 / 30 STEP 15 Country of Origin: China...
- Page 23 23 / 30 STEP 16 Country of Origin: China...
- Page 24 24 / 30 STEP 17 Country of Origin: China...
- Page 25 25 / 30 STEP 18 Country of Origin: China...
- Page 26 26 / 30 STEP 19 Country of Origin: China...
- Page 27 27 / 30 STEP 20 Country of Origin: China...
- Page 28 28 / 30 STEP 21 Country of Origin: China...
- Page 29 29 / 30 STEP 22 · Country of Origin: China...
-
Page 30: Care And Maintenance
30 / 30 CARE AND MAINTENANCE Make sure the unit is turned OFF, unplugged and the heating elements of heater are cool whenever • you are cleaning the heater or mantel. Use a soft, clean cloth that will not scratch the surface when dusting. •...
Need help?
Do you have a question about the B120007902 and is the answer not in the manual?
Questions and answers