
Summary of Contents for LXE Thor CE
- Page 1 Thor CE User Guide Microsoft® Windows® Embedded CE 6 Operating System E-EQ-THORCEOGWW-A 2010 Copyright© by LXE®, Inc, An EMS Technologies Company. All Rights Reserved.
- Page 2 Summit Data Communications, Inc. Summit Data Communications, the Summit logo, and “The Pinnacle of Performance” are trademarks of Summit Data Communications, Inc. The Bluetooth® word mark and logos are owned by the Bluetooth SIG, Inc. and any use of such marks by LXE, Inc. is under license.
-
Page 3: Table Of Contents
Using the Keypad Using the Control Panel Set Date and Time Zone Grab Time Utility Autolaunch Time-Sync Using the Input Panel / Virtual Keyboard Touchscreen Calibrating the Touchscreen Adjusting the Display Backlight Timer E-EQ-THORCEOGWW-A [ i ] Thor CE User Guide... - Page 4 Using the Keypad Using the Touchscreen Reboot Troubleshooting Regulatory Notices and Safety Information Class A Digital Device RF Safety Notice Lithium Battery Safety Statement Vehicle Power Supply Connection Safety Statement Revision History Index E-EQ-THORCEOGWW-A [ ii ] Thor CE User Guide...
-
Page 5: Set Up A New Thor
Set Up A New Thor Note: LXE recommends that installation or removal of accessories be performed on a clean, well-lit surface. When necessary, protect the work surface, the Thor, and components from electrostatic discharge. While the Thor is in a Hazardous Location DO NOT: Connect an external power source to the Thor. -
Page 6: Components
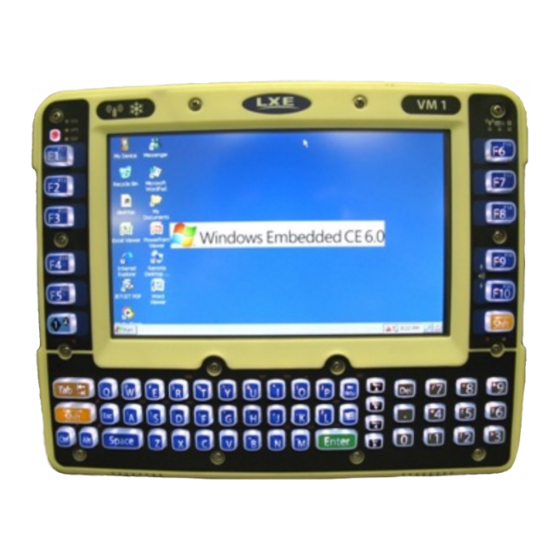
Components Components Front View 1. LEDs 2. Volume Control (2nd function) 3. Power Button 4. Speakers 5. Microphone? 6. Ambient light sensor? E-EQ-THORCEOGWW-A [ 2 ] Thor CE User Guide... -
Page 7: Back View
4. Strain relief clamps (on Quick Mount) 5. Fuse (on Quick Mount) 6. Power connector (on Quick Mount) 7. COM1 (on Quick Mount) 8. COM2 (on Quick Mount) 9. USB (on Quick Mount) 10. CANbus/Audio (on Quick Mount) E-EQ-THORCEOGWW-A [ 3 ] Thor CE User Guide... -
Page 8: Access Panel
External WWAN antenna connectors, when the Thor is equipped with WWAN. Using the Quick Mount Attach RAM mount to vehicle (see Cradle Guide). Attach accessories to Quick Mount. Attach power cable. Power on the Quick Mount. E-EQ-THORCEOGWW-A [ 4 ] Thor CE User Guide... - Page 9 Using the Quick Mount Place Thor in the Quick Mount. E-EQ-THORCEOGWW-A [ 5 ] Thor CE User Guide...
-
Page 10: Removing Thor From Quick Mount
The UPS battery inside the Thor powers a fully functional Thor for a minimum of 30 minutes. To remove the Thor from the Quick Mount, pull the release latch downward on the back of the Thor. E-EQ-THORCEOGWW-A [ 6 ] Thor CE User Guide... -
Page 11: Tapping The Touchscreen With A Stylus
Place the cursor in a text box prior to typing in data Place the cursor in a text box prior to retrieving data using the scanner/imager or an input/output device connected to the serial port. A stylus replacement kit is available. E-EQ-THORCEOGWW-A [ 7 ] Thor CE User Guide... -
Page 12: Backlights And Indicators
Suspend mode is entered when (1) the unit is inactive for a predetermined period of time, (2) the user taps the Power key, or (3) Start | Suspend is chosen. Inactivity means that internal devices that reset the power state are not active. E-EQ-THORCEOGWW-A [ 8 ] Thor CE User Guide... -
Page 13: Connecting Cables To The Thor
1. Seat the cable end connector (connector 1) firmly over the on the Thor Quick Mount. 2. Tighten the thumbscrews in a clockwise direction. Do not over tighten. 3. Connecter on the cable provides a USB-Host con- nection. E-EQ-THORCEOGWW-A [ 9 ] Thor CE User Guide... -
Page 14: Connect Cable - Serial
1. Seat the cable end connector firmly over the serial COM port on the Thor Quick Mount. 2. Turn the thumbscrews in a clockwise direction. Do not over tighten. 3. Connect the other cable end to the desired serial device. E-EQ-THORCEOGWW-A [ 10 ] Thor CE User Guide... -
Page 15: Connecting Vehicle Power
Properly sized “crimp” type electrical terminals are an accepted method of termination. Please select electrical connectors sized for use with 18AWG (1mm conductors. Wiring color codes for LXE supplied DC input power cabling: E-EQ-THORCEOGWW-A [ 11 ] Thor CE User Guide... -
Page 16: Vx6 / Vx7 Adapter Cable
15 Amp overcurrent protection (10 Amp for 230V circuits). 1. Turn the Thor off. 2. Connect the detachable cordset provided by LXE (US only, all others must provide their own cable) to the external power supply (IEC 320 connector). -
Page 17: Connecting The Headset Cable
CANbus/Audio port on the Thor. The Thor internal microphone and speaker are automatically disabled. Slide the cable ends together until they click shut. Do not twist or bend the connectors. The Thor is ready for voice-enabled applications. E-EQ-THORCEOGWW-A [ 13 ] Thor CE User Guide... -
Page 18: Adjust Headset / Microphone And Secure Cable
Over Clothing Use clothing clips to hold the cable close to your body. Tuck the cable under the belt, but leave a small loop E-EQ-THORCEOGWW-A [ 14 ] Thor CE User Guide... -
Page 19: Set Date And Time Zone
3. Copy the modified GrabTime.ini file to the My Device | System folder on the Thor. The System/GrabTime.ini file takes precedence over the Windows/GrabTime.ini file. System/Grabtime.ini also persists after a cold- boot; Windows/Grabtime.ini does not persist. E-EQ-THORCEOGWW-A [ 15 ] Thor CE User Guide... -
Page 20: Using The Input Panel / Virtual Keyboard
Move the cursor into the text entry field when you want to enter data using the Input Panel. When finished entering data, tap the icon in the Taskbar again.Select Hide Input Panel. E-EQ-THORCEOGWW-A [ 16 ] Thor CE User Guide... -
Page 21: Touchscreen
If you are connecting over wire- less LAN (802.11x), make sure your mobile client is communicating with the Access Point. 2. From Start | Program, run LXE RFTerm or tap the RFTerm icon on the desktop. 3. Select Session | Configure from the application menu and select the "host type"... -
Page 22: Using The Applock Switchpad
Stylus taps affect the application in focus only. When the user needs to use the Input Panel, they tap the Keyboard option. Input Panel taps affect the application in focus only. E-EQ-THORCEOGWW-A [ 18 ] Thor CE User Guide... -
Page 23: Reboot
Thor seems to lockup as soon and Bluetooth as it is rebooted. relationships establish or re-establish. When an application begins, the Thor is ready for use. E-EQ-THORCEOGWW-A [ 19 ] Thor CE User Guide... -
Page 24: Regulatory Notices And Safety Information
(the label NOTICE contains the LXE part number of the installed radio card). The labels shown below and affixed to the Changes or modifications made to this equipment not device, identify where the device may be used and expressly approved by LXE, Inc., may void the FCC... -
Page 25: Rf Safety Notice
20 cm (7.8 in.) is maintained between the antenna and the general population. This device is not to be co- located with other transmitters. E-EQ-THORCEOGWW-A [ 21 ] Thor CE User Guide... -
Page 26: Lithium Battery Safety Statement
Reemplace solamente con el mismo tipo o equivalente recomendado por el fabricante. (ES) Oppassen: Bevat Lithium-batterij. Incorrrecte plaatsing van batterij kan leiden tot explosiegevaar. Alleen vervangen door hetzelfde of door fabrikant aanbevolen gelijkwaardig type. (NL) E-EQ-THORCEOGWW-A [ 22 ] Thor CE User Guide... -
Page 27: Vehicle Power Supply Connection Safety Statement
10A en el conductor positivo, como máximo a 12,7 cm (5 pulgadas) del terminal positivo (+). (ES) E-EQ-THORCEOGWW-A [ 23 ] Thor CE User Guide... -
Page 28: Index
Synchronize with a Local Time Server Daylight Savings location Touchscreen Grab Time Utility and the stylus Troubleshooting Hardware Setup Headset Using the AppLock Switchpad Adjusting the microphone Mouthpiece Talk label quick connect cable Vehicle Power Connection Cable E-EQ-THORCEOGWW-A [ 24 ] Thor CE User Guide... - Page 29 Index virtual keyboard Volume adjust WEEE E-EQ-THORCEOGWW-A [ 25 ] Thor CE User Guide...