Table of Contents
Advertisement
Quick Links
MARK-B™ 1 ANALYZER
USER MANUAL
The MARK-B™ 1 analyzer detects specific biomarkers via
immunoassay (MESIA; Magnetic Electrochemical Sandwich
ImmunoAssay) from a small amount of the test sample. The
MARK-B™ 1 analyzer is intended to be used as an in vitro
diagnostic medical device. Please read this user manual
thoroughly for correct use and keep it for future reference. For
use under an Emergency Use Authorization (EUA) only.
* MARK-B™ 1 analyzer
(immunoassay analyzer)
Advertisement
Table of Contents

Related Manuals for BBB MARK-B 1


Summary of Contents for BBB MARK-B 1
- Page 1 MARK-B™ 1 ANALYZER USER MANUAL The MARK-B™ 1 analyzer detects specific biomarkers via immunoassay (MESIA; Magnetic Electrochemical Sandwich ImmunoAssay) from a small amount of the test sample. The MARK-B™ 1 analyzer is intended to be used as an in vitro diagnostic medical device.
-
Page 2: Table Of Contents
Table of contents 1. Product Introduction 1-1. Intended Use 1-2. Principle 1-3. Precautions & Warnings 1-4. Components 1-5. Symbol Guide 2. Product Description 2-1. MARK-B™ 1 analyzer 2-2. Check Cartridge 3. Screen Description 3-1. Home Screen 4. Initial Setup 5. Running a Test 5-1. - Page 3 7. Function Settings 7-1. Setup Screen 7-2. Administrator Settings 7-3. Wi-Fi Settings 7-4. Printer Settings 7-5. Date & Time Settings 7-6. Lock Settings 8. Maintenance 8-1. System Check 8-2. Version Information and Update 8-3. Power Off Settings 8-4. Cleaning 8-5. Storage Requirements 9.
-
Page 4: Product Introduction
1. Product Introduction 1-1. Intended Use The MARK-B™ 1 analyzer is an instrument that performs immunoassay on test cartridges. It reads specific biomarkers within the test sample. 1-2. Principle The MARK-B™ 1 analyzer is an instrument based on an immunoassay technique called MESIA (Magnetic Electrochemical Sandwich Immunoassay). The MARK-B™ 1 analyzer can be used to analyze a single or multiple analyte(s) by detecting electrochemical signals on the test cartridge, which is for a one-time in vitro diagnostic (IVD). -
Page 5: Components
This test has not been FDA-cleared or approved; This test has been validated internally by BBB and shall not be changed without prior concurrence from the FDA. This test has been authorized only for the detection of antigens from SARS-CoV-2, not for any other viruses or pathogens. -
Page 6: Symbol Guide
1-5. Symbol Guide Please refer to the following symbols that can be found on the external package, package descriptions, enclosed papers, etc. To indicate the temperature Caution, please refer to Manufacturer limitation in which the transport accompanying documents package has to be kept and handled Date of Manufacture Control Biological risks... -
Page 7: Product Description
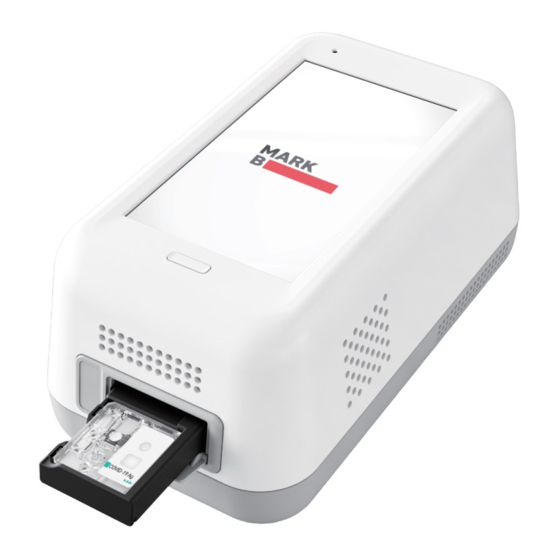
2. Product Description 2-1. MARK-B™ 1 analyzer Screen Interface that the user can touch to operate the analyzer and check the results. Power button Buttons to turn the device on or off. Tray (closed) A component to insert the test cartridge. Opening and closing of the tray are controlled by the software. - Page 8 Electrode connector for test cartridge A connector for cartridge reading. Cartridge recognition switch A switch to check cartridge insertion. Tray (open) The tray is open with the cartridge inserted. (Component as closed status shown in Product Description...
-
Page 9: Check Cartridge
2-2. Check Cartridge The check cartridge is used to evaluate instrumental and electronic operations of the analyzer. An alignment sensor is embedded in the check cartridge to check the alignment of magnets at the top and bottom of the analyzer. Product Description... -
Page 10: Screen Description
3. Screen Description 3-1. Home Screen Status bar Indicates the MARK-B™ 1 analyzer’s network connection, battery level and time. Status indicating icon is displayed when QC test result shows “Fail” or no analyses have been run within the set QC interval. is displayed when the battery level is lower than 15%. -
Page 11: Initial Setup
4. Initial Setup Step 1 Step 2 Connect the power adapter. Touch the ‘power’ button to start. *The power adapter is not provided. Initial Setup... - Page 12 Step 3 Time Zone setting Touch the ‘Select Time Zone’ Select the time zone where the user is located. When setting is completed, touch the ‘DONE’ button. Initial Setup...
- Page 13 Step 4 Wireless network (Wi-Fi) setting Connect Wi-Fi Select the Wi-Fi to connect to. After selecting the ‘ ’ button, the ‘DONE’ button is activated. Touch the ‘DONE’ button. Icon Connection Status Description Connected Wi-Fi is connected and active. Requesting connection Please wait as the Wi-Fi signal is being acquired.
- Page 14 Step 5 Create Admin Password Enter admin password → Touch the ‘OK’ button • Administrator ID is automatically set as ‘Admin’. • Please set your own admin password. • Password is case-sensitive and must be a combination of letters and numbers. •...
- Page 15 Step 6 Connect accessories Barcode Scanner Connection Printer Connection a. Connect the barcode scanner to the USB port on the back of the a. Turn the printer on. MARK-B™ 1 analyzer. b. USB connection: The printer is automatically recognized once the USB b.
-
Page 16: Running A Test
5. Running a Test 5-1. How to Perform RUN TEST Step 1 Touch the ‘RUN TEST’ button to start test Step 2 Scan the operator ID • Run the test at a temperature range of 15℃ - 30℃ (59 - 86°F). Scan the operator ID with the barcode scanner or manually enter the •... - Page 17 Step 3 Scan the patient code Step 4 Scan the QR code scan of the test cartridge Scan the patient code with a barcode scanner or manually enter a. The operator ID and the patient code are displayed on the screen. The screen subsequently resumes to cartridge QR code scan.
- Page 18 Step 5 Test cartridge insertion a. Remove the aluminium tape attached on top of the cartridge. b. Insert the test cartridge to the tray according to the instructions on the screen. c. When the test cartridge is inserted in the correct position, the screen automatically proceeds to the sample injection stage. •...
- Page 19 Step 6 Test sample injection and starting test a. Prepare a test sample. b. Before injecting the sample, check the injection location of the test sample and whether a sufficient amount of test sample is prepared. c. Inject the test sample within 5 minutes after inserting a cartridge. d.
- Page 20 Step 7 Check the result of the test a. When the test is completed, the result of the test is displayed on the screen. b. Check the result and remove the cartridge from the tray. c. Touch the ‘DONE’ button → Return to the home screen. TEST RESULT : Positive or Negative - Normal operation of the test cartridge Running a Test...
- Page 21 Step 8 Discard the used cartridge a. Refer to the images below to eject the cartridge from the tray. b. Discard the MARK-B™ COVID-19 Ag test cartridge after use as required by internal quality control procedures and in accordance with local regulations or accreditation requirements. Running a Test...
-
Page 22: Result Management
5-2. Result Management Check the results of the test. The results can be checked by touching the ‘TEST RESULTS’ button on the home screen. 12:00 12:00 Test Results Test Results Set Cut-off Set Cut-off 2020/04/19 12:00 2020/04/19 12:00 2020/04/19 12:00 Operator ID 1203020 Operator ID... - Page 23 Running a Test...
-
Page 24: Running A Qc Test (Control Solution Test)
6. Running a QC Test (Control Solution Test) Step 1 Touch the ‘Run QC Test’ button. Step 2 Scan the operator ID • Run the test at a temperature range of 15 - 30°C (59 - 86°F). Scan the operator ID with a barcode scanner or manually enter the •... - Page 25 Step 3 Scan the test cartridge QR code Step 4 Insert the test cartridge a. Scan the QR code on the cartridge pouch with the barcode scanner. • Scan the QR code of the cartridge to be inserted. • Double check whether you are using the test cartridge for the correct b.
- Page 26 Step 5 Inject the positive control solution a. Prepare the positive control solution of the cartridge type shown on the touch-screen. b. Add the positive control solution into the sample inlet of the test cartridge within 5 minutes. c. Touch the ‘OK’ button. * The volume to be inserted into the sample inlet should be decided in accordance to the relevant manual of the test cartridge Running a QC Test (Control Solution Test)
- Page 27 Step 6 Check the result of the positive QC test a. If the QC test result is a ‘Pass’, then select the ‘NEXT’ button to proceed to ‘QR Code Scan’. b. If the QC test result is a ‘Fail’, then either select ‘RE-TEST’ to conduct the test again, or ‘NEXT’ to progress to the negative QC test. Running a QC Test (Control Solution Test)
- Page 28 Step 7 Discard the used cartridge. Refer to the images below to eject the cartridge from the tray. Discard the MARK-B™ COVID-19 Ag test cartridge after use as required by internal quality control procedures and in accordance with local regulations or accreditation requirements. Running a QC Test (Control Solution Test)
- Page 29 Step 8 Test cartridge QR code scan Step 9 Insert the test cartridge a. Scan the QR code on the cartridge pouch with the barcode scanner. • Check that you scanned the QR code of the cartridge to be inserted. b.
- Page 30 Step 10 Negative control solution injection a. Prepare the negative control solution of the same cartridge type as the previously inserted test cartridge shown on the touch-screen. b. Add the negative control solution into the sample inlet within 5 minutes. c.
- Page 31 Step 11 Check the result of the negative QC test a. If the QC test result is a ‘Pass’, then select the ‘NEXT’ button to proceed to the ‘QC Test Result’. b. If the QC test result is a ‘Fail’, then either select ‘RE-TEST’ to conduct the test again, or ‘NEXT’. Running a QC Test (Control Solution Test)
- Page 32 Step 12 Step 12 Discard the used cartridge Discard the used cartridge Refer to the images below to eject the cartridge from the tray. Discard the MARK-B™ COVID-19 Ag test cartridge after use as required by internal quality control procedures and in accordance with local regulations or accreditation requirements.
- Page 33 Step 13 Check the results of the QC Test Step 14 Check the QC Test Result a. When the test is completed, the results of the QC test are displayed on The results can be checked by touching ‘QC TEST’ → ‘QC Test Results’ from the screen.
-
Page 34: Function Settings
7. Function Settings 7-1. Setup Screen Settings → Settings Menu Setting menu • Administrator Settings • Wi-Fi Settings • Printer Settings • Date & Time Settings • Lock Settings • System Check • Version Information • Power Off Settings Function Settings... -
Page 35: Administrator Settings
7-2. Administrator Settings Administrator Information a. Enter the admin password to proceed to administrator settings. b. Touch the ‘Administrator Information’ button to check the administrator information. Function Settings... - Page 36 Change Administrator Password a. Touch the ‘Reset Password’ button. → Enter the current password. b. Enter a new password in ‘New password’ and ‘Re-enter password’. → Touch the ‘OK’ button. • Password is case-sensitive and must be a combination of letters and numbers. •...
- Page 37 Forgot Password a. If you forgot the admin password, touch ‘Forgot password?’. b. If the pop-up message appears, contact the system administrator according to the message. Function Settings...
-
Page 38: Wi-Fi Settings
7-3. Wi-Fi Settings Turn Wi-Fi On or Off & Connect to a Wi-Fi. [Wi-Fi Setting → On/Off] : Turn Wi-Fi network on or off. Select ‘On’ : Select Wi-Fi to connect to. Function Settings... -
Page 39: Printer Settings
7-4. Printer Settings Print Setting Select ‘Auto’ or ‘Manual’ in Print Setting. Function Settings... - Page 40 Printer Connection a. Find a printer model to link from the ‘Connectable Devices’ list. b. Select the model. c. The printer is connected and displayed in ‘Connected Device’. d. To disconnect, touch the ‘Disconnect’ button. Function Settings...
- Page 41 • The printer is automatically linked when you connect the USB port. • To find the model number of a printer, remove the battery of the printer. Then, check the product label. • If you connect with another printer via USB while Bluetooth is connected, the Bluetooth will be unpaired and the device will be connected to the USB printer.
-
Page 42: Date & Time Settings
7-5. Date & Time Settings Date & Time Settings Step 1 Step 2 Touch ‘Date & Time Settings’. → Touch ‘Select Time Zone’. Enter the admin password to access ‘Date & Time Settings’. → Select the location. Function Settings... - Page 43 Step 3 Adjust ‘Set Date & Time’. → Touch the ‘OK’ button. Function Settings...
-
Page 44: Lock Settings
7-6. Lock Settings Step 1 Lock Settings Step 2 Lock Settings QC Test Enter the admin password to access Lock Settings. [ON] The QC test result must be a ‘Pass’ to be able to run test [OFF] A test can be run regardless of the QC Test result •... - Page 45 Step 3 QC Test Interval Setting Step 4 Day Interval Setting [ON] A sample test is available after conducting the QC test at the intervals a. Touch the input box and then select using the numeric keypad shown you set up. on the screen.
-
Page 46: Maintenance
8. Maintenance 8-1. System Check Step 2 Scan the QR code of the check cartridge Step 1 Touch the ‘Run System Check’ button a. Scan the QR code on the check cartridge with a barcode scanner. • Run the test at a temperature range of 15 - 30°C (59 - 86°F) b. - Page 47 Step 3 Insertion of check cartridge tray Step 4 Confirm the system check results a. Insert a check cartridge to the tray according to instructions on a. The test results are displayed upon completion. the screen. b. After checking the results, remove the used cartridge from the tray. b.
- Page 48 System Check → System Check Results The System Check Results are displayed in order from from newest to oldest. Maintenance...
- Page 49 Maintenance...
-
Page 50: Version Information And Update
8-2. Version Information and Update Step 1 Check the Version Information a. Type the admin password and access the version information. b. Confirm the latest version. Maintenance... - Page 51 Step 2 Update to a new version Option 1. Software update by USB connection a. Connect the USB containing the updated version to the USB port on the back of the analyzer. b. Select ‘USB Update’. (A message to update to a new version will be displayed if the software needs to be updated.) c.
- Page 52 Option 2.Wireless update of software a. Select ‘WI-FI Network update’. (A message to update to a new version will be displayed if the software needs to be updated.) b. Touch the ‘OK’ button to update to the latest software. • The update starts when the MARK-B™ 1 analyzer’s battery level is 15% or higher. •...
- Page 53 Maintenance...
-
Page 54: Power Off Settings
8-3. Power Off Settings a. Select the ‘Power Off Settings’ button. b. Input the admin password. • Default auto power off time is 10 hours when the function is enabled ‘On’. • Auto power off time can be changed by selecting ‘Auto Power Off Time’. Maintenance... - Page 55 • It is recommended to turn the MARK-B™ 1 analyzer off, if the instrument is not used for a long period of time. • If you turn off the analyzer for a long time, time settings of the device may be initialized.
-
Page 56: Cleaning
8-4. Cleaning Clean the analyzer periodically with a soft and dry cloth. Test Tray Cleaning Clean the device periodically with a soft and dry cloth. Any sample, moisture or dust that enters the tray may lead to failure of Do not use highly corrosive cleaning solutions or chemicals, or a the MARK-B™... -
Page 57: Storage Requirements
8-5. Storage Requirements • Protect the device from dust and do not expose it to direct sunlight. • Recommended temperature and humidity for storage condition are as follows: [Temperature] -10 ~ 45℃ (14 - 113℉) [Humidity] 10 ~ 80% • Avoid storage places prone to tremors or that could cause falling. Maintenance... -
Page 58: Error Messages
9. Error Messages 9-1. Notifications Error Notifications Descriptions and Solutions Please input the admin password. Admin password is not inputted. Displayed when touching the ‘OK’ button without having entered the admin password. Solution: Input the admin password and then touch the ‘OK’ button. Failed to connect to network. - Page 59 Error Notifications Descriptions and Solutions Please perform the system check and the System check and QC test not performed QC test prior to sample tests as instructed Displayed when touching ‘RUN TEST’ without having performed system check and QC test. in the manual.
- Page 60 Error Notifications Descriptions and Solutions Incorrect password. Password input error Please input the master password again. Displayed when the wrong password has not been entered. Solution: Enter the correct password. The fan is activated due to increased Fan activated internal temperature of the analyzer. Displayed when the fan is activated by the MARK-B™...
- Page 61 Error Notifications Descriptions and Solutions The new password and re-entered New password mismatch password do not match. Displayed on the Change Administrator Password screen when newly entered password Please input the passwords again. does not match with the one typed in the new password confirm box. Solution: Ensure both passwords entered are the same.
-
Page 62: Error Pop-Ups
9-2. Error pop-ups Error Pop-ups Descriptions and Solutions Inappropriate temperature Case1. Pops up when the ‘RUN TEST’ button is touched on the home screen, or the ‘RUN QC TEST’ button is touched. Case2. Pops up when the temperature is out of test range. Solution: Move the device to the recommended operating temperature (15 - 30°C, 59 - 86°F) and wait until device temperature decreases to below 30°C (86°F). - Page 63 Error Pop-ups Descriptions and Solutions QC Test error Pops up when the ‘RUN TEST’ button is touched on the home screen under the condition that QC lock settings are turned ‘ON’, and/or the QC TEST result is ‘Fail’. Solution: Conduct the test again. If the QC test is a fail, then contact the system administrator. System Check Error Pops up when the ‘RUN TEST’...
- Page 64 Error Pop-ups Descriptions and Solutions Invalid cartridge QR code Pops up when an invalid QR code is scanned. Solution: Scan a valid QR code. Expired cartridge QR code Pops up when expired cartridge QR code is scanned. Solution: Scan a new cartridge of valid expiry date. The QR code of the check cartridge is scanned.
- Page 65 Error Pop-ups Descriptions and Solutions Pops up when a used cartridge is inserted. Solution: Remove used cartridge and insert a new unused cartridge. Insufficient sample Pops up when a sample test fails due to errors associated with timeout, insufficient test sample injection, etc. Solution: Ensure that a total of 100 µL of the control solution has been inserted into the inlet.
- Page 66 Error Pop-ups Descriptions and Solutions Printer disconnection Pops up when the printer is not connected and the user touches the ‘Print’ button. Solution: Ensure that the printer is connected. Analysis failure Pops up when analysis is failed. Solution: Either try the analysis again or contact the administrator. Analysis failure Pops up when analysis is failed.
- Page 67 Error Pop-ups Descriptions and Solutions The QR code of the test cartridge is scanned. Pops up when the QR code of the test cartridge is scanned during the System Check process. Solution: Scan the QR code of a check cartridge. New version installation failure Pops up upon new version installation failure during software update.
- Page 68 Error Pop-ups Descriptions and Solutions Repetitive update failure Pops up when the firmware update fails more than 3 times. Solution: Contact the system administrator. Low battery during software update Pops up upon touching ‘Update’ when battery level is lower than 15%. Solution: Connect the device to a charger.
-
Page 69: Technical Information
10. Technical Information Model Name MB-100 MT8163B (Quad core) Display type 5.5” HD display, Touch screen Memory capacity 8GB ROM / 1GB RAM Battery Main battery : 2,700mAh 3.8V Sub battery : 2,500mAh 14.4V (3.7V 18650 4cell) Power rating : 12VDC, 1.5A plug interface : 5.5mm * 2.5mm Dimension/weight 114 x 206 x 86mm / 1,300g... - Page 70 11. Product Warranty Product Warranty BBB Inc. offers product warranty in accordance with “Regulations on Consumer Dispute Resolution” as follows. Within the warranty period, if the product fails due to manufacturing defect(s) or spontaneous failure, it will be replaced without any charges.
- Page 71 Manufacturer Information BBB Inc. Manufacturing site 7F, 22, Teheran-ro 81-gil, Gangnam-gu, Seoul, Republic of Korea Contact email: Support@bbbtech.com Website: https://www.bbbech.com BMD006CMUS-R.0A Issue date:2021.01 Product Warranty...
Need help?
Do you have a question about the MARK-B 1 and is the answer not in the manual?
Questions and answers