Table of Contents
Advertisement
Quick Links
IVD
MARK-B™ 1 analyzer
User Manual
MARK-B™ 1 analyzer (Immunoassay analyzer)
*Model: MB-100
MARK-B™ 1 analyzer detects specific biomarkers via immunoassay (MESIA;
Magnetic Electrochemical Sandwich ImmunoAssay) from a small amount of test
sample (e.g. whole blood). MARK-B™ 1 analyzer is intended to be used as an in
vitro diagnostic medical device. Please read this user manual thoroughly for
correct use and keep it for future reference.
Advertisement
Table of Contents

Related Manuals for BBB MARK-B 1


Summary of Contents for BBB MARK-B 1
- Page 1 MARK-B™ 1 analyzer User Manual MARK-B™ 1 analyzer (Immunoassay analyzer) *Model: MB-100 MARK-B™ 1 analyzer detects specific biomarkers via immunoassay (MESIA; Magnetic Electrochemical Sandwich ImmunoAssay) from a small amount of test sample (e.g. whole blood). MARK-B™ 1 analyzer is intended to be used as an in vitro diagnostic medical device.
-
Page 3: Table Of Contents
Table of Content Product Introduction ﹒﹒﹒﹒﹒ ﹒﹒﹒﹒﹒﹒﹒﹒﹒﹒﹒﹒﹒﹒﹒﹒﹒﹒﹒﹒﹒﹒﹒﹒﹒﹒﹒ 4 ﹒﹒﹒﹒﹒﹒﹒﹒﹒﹒﹒﹒﹒﹒﹒﹒﹒﹒﹒﹒﹒﹒﹒﹒﹒﹒﹒﹒﹒﹒ ﹒ 1-1. Intended Use 1-2. Principle﹒﹒﹒﹒﹒﹒﹒﹒﹒﹒﹒﹒﹒﹒﹒﹒﹒﹒﹒﹒﹒﹒﹒﹒﹒﹒﹒﹒﹒﹒﹒﹒﹒﹒4 ﹒﹒﹒﹒﹒﹒﹒﹒﹒﹒﹒﹒﹒﹒﹒﹒﹒﹒﹒﹒﹒﹒﹒﹒﹒﹒ 1-3. Precautions & Warnings 1-4. Components﹒﹒﹒﹒﹒﹒﹒﹒﹒﹒﹒﹒﹒﹒﹒﹒﹒﹒﹒﹒﹒﹒﹒﹒﹒﹒﹒﹒﹒﹒﹒﹒ 1-5. Symbol Guide﹒﹒﹒﹒﹒﹒﹒﹒﹒﹒﹒﹒﹒﹒﹒﹒﹒﹒﹒﹒﹒﹒﹒﹒﹒﹒﹒﹒﹒﹒﹒ Product Description ﹒﹒﹒﹒﹒﹒﹒﹒﹒﹒﹒﹒﹒﹒﹒﹒﹒﹒﹒﹒﹒﹒﹒﹒﹒﹒﹒﹒﹒﹒﹒﹒﹒7 2-1. MARK-B™ 1 analyzer ﹒﹒﹒﹒﹒﹒﹒﹒﹒﹒﹒﹒﹒﹒﹒﹒﹒﹒﹒﹒﹒﹒﹒﹒﹒﹒﹒﹒7 ﹒﹒﹒﹒﹒﹒﹒﹒﹒﹒﹒﹒﹒﹒﹒﹒﹒﹒﹒﹒﹒﹒﹒﹒﹒﹒﹒﹒﹒﹒ 2-2. Check Cartridge Screen Description ﹒﹒﹒﹒﹒﹒﹒﹒﹒﹒﹒﹒﹒﹒﹒﹒﹒﹒﹒﹒﹒﹒﹒﹒﹒﹒﹒﹒﹒﹒﹒﹒﹒9 ﹒﹒﹒﹒﹒﹒﹒﹒﹒﹒﹒﹒﹒﹒﹒﹒﹒﹒﹒﹒﹒﹒﹒﹒﹒﹒﹒... -
Page 4: Product Introduction
1. Product Introduction 1-1. Intended Use The MARK-B™ 1 analyzer is an instrument that performs immunoassay on test cartridges. It reads specific biomarkers within the test sample. 1-2. Principle MARK-B™ 1 analyzer is an instrument based on an immunoassay technique called MESIA (Magnetic Electrochemical Sandwich Immunoassay). -
Page 5: Components
1. Product Introduction 1-4. Components The following are the components you should check upon opening the package of MARK-B™ 1 analyzer. Please check that all components are included in the box. Please contact the purchase location if any of the following components are not included or damaged. - Page 6 1. Product Introduction...
-
Page 7: Product Description ﹒﹒﹒﹒﹒﹒﹒﹒﹒﹒﹒﹒﹒﹒﹒﹒﹒﹒﹒﹒﹒﹒﹒﹒﹒﹒﹒﹒﹒﹒﹒﹒﹒7
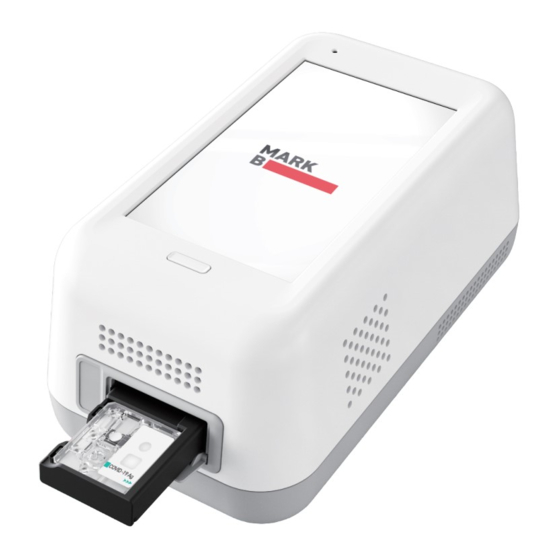
2. Product Description 2-1. MARK-B™ 1 analyzer Screen Interface that the user can touch to operate the analyzer and check the results. Power button Buttons to turn the device on or off. Tray (closed) A component to insert the test cartridge. Opening and closing of the tray are controlled by the software. -
Page 8: Check Cartridge
2. Product Description 2-2. Check Cartridge The check cartridge is used to evaluate instrumental and electronic operations of the analyzer. An alignment sensor is embedded in the check cartridge to check the alignment of magnets at the top and bottom of the analyzer. Cartridge contact pad Contact pad for the operation check of MARK-B™... -
Page 9: Screen Description ﹒﹒﹒﹒﹒﹒﹒﹒﹒﹒﹒﹒﹒﹒﹒﹒﹒﹒﹒﹒﹒﹒﹒﹒﹒﹒﹒﹒﹒﹒﹒﹒﹒9
3. Screen Description 3-1. Home Screen Status bar Indicates MARK-B™ 1 analyzer’s network connection, battery level and time. Status indicating icon is displayed when QC test result shows “fail” or the QC test is not carried out. is displayed when battery level is 15% or lower. -
Page 10: Initial Setup ﹒﹒﹒﹒﹒﹒﹒﹒﹒﹒﹒﹒﹒﹒﹒﹒﹒﹒﹒﹒﹒﹒﹒﹒﹒﹒﹒﹒﹒﹒﹒﹒﹒ ﹒﹒10
4. Initial Setup STEP 1. STEP 2. Connect the power adapter. Touch the ‘power’ button to start. STEP 3. Time Zone setting Touch the ‘Select Time Zone’ → Select the time zone where the user is located. → When setting is completed, touch the ‘DONE’ button. - Page 11 4. Initial Setup STEP 4. Wireless network (Wi-Fi) setting Connect Wi-Fi → Select the Wi-Fi to connect to. → When connected, the ‘DONE’ button is activated.→ Touch the ‘DONE’ button. Icon Connection Status Description Connected Wi-Fi is connected and active. Requesting Please wait as the Wi-Fi signal is being acquired.
- Page 12 4. Initial Setup STEP 5. Create Admin Password Enter admin password → Touch the ‘OK’ button • Administrator ID is automatically set as ‘Admin’. • Please set your own admin password. • Password is case-sensitive and must be a combination of letters and numbers.
- Page 13 4. Initial Setup STEP 7. Device registration a. Enter hospital code in the window. b. After entering hospital code, touch the ‘DONE’ button to connect to hospital server. c. Once connected to server, initial setup is completed and the home screen will be displayed. •...
- Page 14 4. Initial Setup Barcode Scanner Connection a. Connect the barcode scanner to the USB Port on the back of MARK-B™ 1 analyzer. b. Barcode scanner automatically starts operation when connected to the USB port. Barcode scanner is sold separately. Printer Connection a.
-
Page 15: Running A Test ﹒﹒﹒﹒﹒﹒﹒﹒﹒﹒﹒﹒﹒﹒﹒﹒﹒﹒﹒﹒﹒﹒﹒﹒﹒﹒﹒﹒﹒﹒﹒﹒ ﹒﹒15
5. Running a Test 5-1. How to Perform RUN TEST STEP 1. Touch the ‘RUN TEST’ button to start test (Device without a cartridge) • Operating temperature is -10 ~ 45°C (14 ~ 113°F). • Run test within the specified range of temperature. •... - Page 16 5. Running a Test 5-1. How to Perform RUN TEST STEP 3. Patient code scan a. Scan the patient code with a barcode scanner. b. When the code is inputted, proceed to the cartridge insertion. If you do not have a barcode scanner, touch the ‘Input patient code manually’...
- Page 17 5. Running a Test 5-1. How to Perform RUN TEST STEP 5. Test cartridge insertion a. Insert a test cartridge to the tray according to the instructions on the screen. b. When the cartridge is inserted in the correct position, the screen automatically instructs to inject test sample.
- Page 18 5. Running a Test 5-1. How to Perform RUN TEST STEP 6. Test sample injection and starting test Prepare a test sample. Before injecting the sample, check injection location of the test sample and whether a sufficient amount of test sample is prepared. Inject the test sample within 2 minutes after inserting a cartridge.
- Page 19 5. Running a Test 5-1. How to Perform RUN TEST STEP 7. Check the result of the test. a. When test is completed, the result of the test is displayed on the same screen. b. Check the result and remove the cartridge from the tray. c.
-
Page 20: Result Management ﹒﹒﹒﹒﹒﹒﹒﹒﹒﹒﹒﹒﹒﹒﹒﹒﹒﹒﹒﹒﹒﹒﹒﹒﹒﹒﹒﹒20
5. Running a Test 5-2. Result Management Check the results of the test. - The results can be checked by touching the ‘TEST RESULTS’ button on the home screen. -
Page 21: Running A Qc Test (Control Solution Test)
6. Running a QC Test (Control Solution Test) STEP 1. Touch the ‘Run QC Test’ button. STEP 2. Operator code scan a. Scan the code with a barcode scanner or type it using the keypad. button b. Touch the ‘OK’ If you do not have a barcode scanner, touch ‘Input operator ID manually’... - Page 22 6. Running a QC Test (Control Solution Test) STEP 3. Test cartridge QR code scan a. Scan the QR code on the cartridge pouch with a barcode scanner. b. After scanning the QR code, test level, cartridge type and LOT code are displayed on the screen. •...
- Page 23 6. Running a QC Test (Control Solution Test) STEP 5. Positive control solution injection a. Prepare positive control solution of the same marker as the inserted test cartridge. b. Draw control solution to inject it into the cartridge within 2 minutes. c.
- Page 24 6. Running a QC Test (Control Solution Test) STEP 6. Discard the used cartridge. (continued) b. When touching the ‘OK’ button, the screen will proceed to the ‘QR Code Scan’ screen. STEP 7. Test cartridge QR code scan a. Scan the QR code on the cartridge pouch with a barcode scanner.
- Page 25 6. Running a QC Test (Control Solution Test) STEP 8. Test cartridge insertion • Ensure the correct operator and test sample code are entered before inserting a cartridge. • Check that you scanned the QR code of the cartridge to be inserted.
- Page 26 6. Running a QC Test (Control Solution Test) STEP 10. Check the result of QC Test a. When test is completed, result of QC test is displayed on the same screen. b. Check the result and remove the cartridge from the tray. c.
-
Page 27: Function Setting
7. Function Settings 7-1. Setup Screen Settings → Settings Menu Setting menu • Administrator Settings • Wi-Fi Settings • Printer Settings • Date & Time Settings • Lock Settings • System Check • Version Information • Device Registration • Power Off Settings... -
Page 28: Administrator Settings
7. Function Settings 7-2. Administrator Settings Administrator Information a.Enter admin password to proceed to administrator settings. b.Touch the ‘Administrator Information’ button to check the administrator information. Change Administrator Password a. Touch the ‘Reset Password’ button. → Enter the current password. b. - Page 29 7. Function Settings 7-2. Administrator Settings Forgot Password If you forgot admin password, touch ‘Forgot password?’. Master password input screen will be displayed. Input the Master Password Type the master password. → Enter the new admin password. → Touch the ‘OK’ button. •...
-
Page 30: Wi-Fi Settings
7. Function Settings 7-3. Wi-Fi Settings Turn Wi-Fi On or Off & Connect to a Wi-Fi. [Wi-Fi Setting → On/Off] : Turn Wi-Fi network on or off. Select ‘On’ : Select Wi-Fi to connect to. -
Page 31: Printer Settings
7. Function Settings 7.4. Printer Settings Print Setting Select ‘Auto’ or ‘Manual’ button in Print Setting. Printer Connection a. Find a printer model to link from the ‘Connectable Devices’ list. b. Select the model. c. The printer is connected and displayed in Connected Device. -
Page 32: Date & Time Settings
7. Function Settings 7-5. Date & Time Settings STEP 1. Date & Time Settings Enter the admin password to access ‘Date & Time Settings’. ● Touch ‘Date & Time Settings’. → Touch ‘Select Time Zone’. → Select the location. - Page 33 7. Function Settings 7-5. Date & Time Settings ● Adjust ‘Set Date & Time’. → Touch the ‘OK’ button.
-
Page 34: Lock Settings
• When all settings of QC Lock are turned OFF, a test can be run even if QC Test result is ‘fail’. • BBB is not responsible for the test results run under settings with all QC Lock Settings turned OFF. - Page 35 7. Function Settings 7-6. Lock Settings STEP 3. QC Test interval setting [ON] A sample test is available after conducting QC test at the intervals you set up. [OFF] You can continue QC test without setting up intervals. • You can set the intervals for QC test. •...
-
Page 36: Maintenance
8. Maintenance 8-1. System Check System Check : The purpose of the check cartridge test is to verify proper operation of MARK-B™ 1 analyzer. STEP 1. Touch the ‘Run System Check’ button STEP 2. Scan QR code of the check cartridge a. - Page 37 8. Maintenance 8-1. System Check STEP 3. Insertion of check cartridge tray a. Insert a check cartridge to the tray according to instructions on the screen. b. Insert the check cartridge in the correct position. c. Touch the ‘OK’ button. STEP 4.
- Page 38 8. Maintenance 8-1. System Check STEP 5. Confirm the check cartridge test results a. The test results are displayed upon completion. b. After checking the results, remove the used cartridge from the tray. c. Touch the ‘DONE’ button to move to the home screen. ✓...
- Page 39 8. Maintenance 8-1. System Check System Check → System Check Result The System Check Result is displayed in order from latest to earliest.
-
Page 40: Version Information And Update
8. Maintenance 8-2. View Version Information and Update STEP 1. Check the Version Information a. Type the admin password and access device registration menu. b. Confirm the latest version. - Page 41 8. Maintenance 8-2. Version Information and Update STEP 2. Update new version Software update by USB connection Option 1. Connect the USB containing the updated version to the USB port on the back of the analyzer. Select ‘USB Update’. (A message to update to new version will be displayed if the software needs to be updated.) Touch the ‘OK’...
- Page 42 8. Maintenance 8-2. Version Information and Update STEP 2. Update new version Option 2.Wireless update of software Select ‘WI-FI Network update’. (A message to update to new version will be displayed if the software needs to be updated.) Touch the ‘OK’ button to update to the latest software •...
-
Page 43: Device Registration﹒﹒﹒﹒﹒﹒﹒﹒﹒﹒﹒﹒﹒﹒﹒﹒﹒﹒﹒﹒﹒﹒﹒﹒﹒﹒﹒﹒﹒43
8. Maintenance 8-3. Device Registration STEP 1. Settings → Device Registration a. Input the admin password to access device registration menu. b. Enter the hospital code on the device registration screen. c. Type the hospital code and touch the ‘DONE’ button. The device will try to access the hospital server. - Page 44 8. Maintenance 8-4. Auto Power Off Settings Select the ‘Power Off Settings’ button. Input the admin password. Select ‘Power Off’ Option 1. On/Off Setting of Auto Power Off Select on or off by touching [Auto Power Off Settings → On/Off] to enable or disable the function.
-
Page 45: Auto Power Off Settings
8. Maintenance 8-4. Auto Power Off Settings On/Off setting → Select the ‘On’ button →Select the ‘Auto power off time’ After selecting the duration time for the screen to be displayed, the device will be automatically turned off after that duration time. Option 2. -
Page 46: Cleaning
8. Maintenance 8-5. Cleaning Clean the analyzer periodically with a soft and dry cloth. Clean the analyzer periodically with a soft and dry cloth. Do not use highly corrosive cleaning solution or chemicals, or a cleaning tissue contains chemical substances that may damage the device. -
Page 47: Error Messages ﹒﹒﹒﹒﹒﹒﹒﹒﹒﹒﹒﹒﹒﹒﹒﹒﹒﹒﹒﹒﹒﹒﹒﹒﹒﹒﹒﹒﹒﹒﹒﹒﹒﹒47
9. Error Messages 9-1. Notifications Notifications Description and Measure Admin password is not inputted. Displayed when touching the ‘DONE’ button without entering the admin password. Please input the admin password. ▶Input the admin password and then touch the ‘DONE’ button. Hospital code is not inputted. - Page 48 9. Error Messages 9-1. Notifications Notifications Description and Measure System Check is not performed. The system check was failed or has an Displayed when system check is not performed. error. [Setting screen → System Check → Run System Please check the results again. Contact the system administrator.
- Page 49 9. Error Messages 9-1. Notifications Notifications Description and Measure Fan activated The fan is activated due to increased Displayed when the fan is activated by MARK-B™ 1 internal temperature of the analyzer. analyzer’s temperature sensor operation. Wrong operator code Invalid ID. Please check the ID again. Displayed when wrong operator code is entered.
- Page 50 9. Error Messages 9-1. Notifications Notifications Description and Measure Current password mismatch Displayed when you do not enter currently set Incorrect password. password. Please input the password correctly. New password mismatch The new password and re-entered Displayed on the Change Administrator Password screen when newly entered password does not match password do not match.
-
Page 51: Error Pop-Ups﹒﹒﹒﹒﹒﹒﹒﹒﹒﹒﹒﹒﹒﹒﹒﹒﹒﹒﹒﹒﹒﹒﹒﹒﹒﹒﹒﹒﹒﹒﹒51
9. Error Messages 9-2. Error pop-ups Error Pop-ups Description and Measure Inappropriate temperature Case1. Pops up when the ‘RUN TEST’ button is touched on the home screen, or the ‘RUN QC TEST’ button is touched. Case2. Pops up when the temperature is out of test range. Low battery Case1. - Page 52 9. Error Messages 9-2. Error pop-ups Error Pop-ups Description and Measure QC Test error Pops up when the ‘RUN TEST’ button is touched on the home screen under the condition that QC lock settings are turned ‘ON’, and/or QC TEST result is ‘Fail’.
- Page 53 9. Error Messages 9-2. Error pop-ups Error Pop-ups Description and Measure Invalid cartridge QR code Pops up when an invalid QR code is scanned. Expired cartridge QR code Pops up when expired cartridge QR code is scanned. QR code of check cartridge is scanned. Pops up when the check cartridge’s QR code is scanned instead of the test cartridge.
- Page 54 9. Error Messages 9-2. Error pop-ups Error Pop-ups Description and Measure Pops up when used cartridge is inserted. Failure of plasma separation or test sample test Pops up when test sample test fails due to errors in sample separation including timeout, insufficient test sample injection, etc.
- Page 55 9. Error Messages 9-2. Error pop-ups Error Pop-ups Description and Measure Printer disconnection Pops up when the printer is not connected and the user touched the ‘Print’ button. Solution separation error or insufficient solution Pops up when solution separation fails due to either timeout, insufficient solution injection, or solution reading failure.
- Page 56 9. Error Messages 9-2. Error pop-ups Error Pop-ups Description and Measure USB Device Connection Error The alert pops up when USB is removed or disconnected during software update. Pops up when firmware update failed. Repetitive update failure Pops up when firmware update failed more than 3 times.
-
Page 57: Technical Information
10. Technical Information Model Name MB-100 MT8163B (Quad core) Display type 5.5” HD display, Touch screen Memory capacity 8GB ROM / 1GB RAM Main battery : 2,700mAh 3.8V Battery Sub battery : 2,500mAh 14.4V (3.7V 18650 4cell) rating : 12VDC, 1.5A Power plug interface : 5.5mm * 2.5mm Dimension/weight... -
Page 58: Product Warranty
11. Product Warranty Product Warranty BBB Inc. offers product warranty in accordance with “Regulations on Consumer Dispute Resolution” as follows. Within the warranty period, if the product fails due to manufacturing defect(s) or spontaneous failure, it will be replaced without any charges. - Page 59 FCC Compliance Information : This device complies with Part 15 of the FCC Rules. Operation is subject to the following two conditions: (1) This device may not cause harmful interference, and (2) this device must accept any interference received, including interference that may cause undesired operation.
- Page 61 (+82) 70-4407-8808 . Fax. (+82) 2-565-9654 . www.bbbtech.com BMD006AMEU-0A Issue date:2020.05...
Need help?
Do you have a question about the MARK-B 1 and is the answer not in the manual?
Questions and answers