Advertisement
Quick Links
markB Analyzer(Model No.: MB-100) User Manual
Analyzer
Immunoassay Analyzer
Thank you for purchasing markB Analyzer.
Please read the user manual carefully for adequate use. Please keep this manual carefully.
markB Analyzer is an in-vitro diagnostic medical device that can perform biomarker immunoassay with a
small amount of blood.
[Contents]
markB Analyzer
Advertisement

Related Manuals for BBB markB


Summary of Contents for BBB markB
- Page 1 Thank you for purchasing markB Analyzer. Please read the user manual carefully for adequate use. Please keep this manual carefully. markB Analyzer is an in-vitro diagnostic medical device that can perform biomarker immunoassay with a small amount of blood. [Contents]...
- Page 2 1.3. Precautions before use 1.4. Components 1.5. Symbols Chapter 2. Introduce of markB Analyzer 2.1. Product Description Chapter 3. How to use markB Analyzer 3.1. Initial Settings 3.2. How to measure 3.3. QC test 3.3.1 Control Solution Test 3.4. Test result management 3.5.
- Page 3 If you need a detailed description of the markB test cartridge, please read the instruction manual of the test cartridge. ● If you do not intend to use markB Analyzer for a long period of time, turn off the power and disconnect the adapter. ●...
- Page 4 Analyzer, 1EA ● Check cartridge, 1EA ● markB User manual ● markB Quick manual To use markB Analyzer, you need to purchase consumables and accessories sold separately. Please contact the place of purchase. ● Power adaptor ● markB Test cartridge ●...
- Page 5 1.5. Symbol markB for details of the symbol mark included in the PSA’s outer packaging, external description, attachments, etc., please refer to the explanation below. markB Analyzer Page...
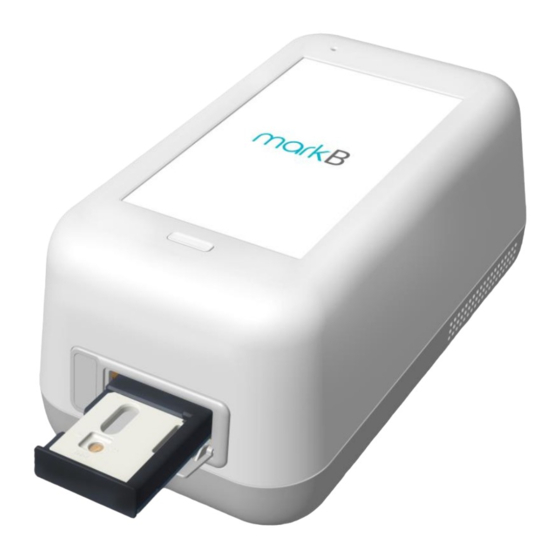
- Page 6 Chapter 2. markB products 2.1. Product Description 2.1.1 markB Analyzer Name Description ① Power button It turns the device on or off. ② Tray (closed) It holds a test cartridge. Opening and closing of the tray are controlled by application.
- Page 7 USB-A port for connection of Barcode Reader and Mobile Printer. 2.1.2 Check cartridge MarkB check cartridge is used to assess analyzer’s mechanical and electronic malfunction. Check cartridge contains alignment sensor for checking position of the top and bottom magnet in the analyzer.
- Page 8 3.1. Initial Setting (1) Connect the markB Analyzer’s power adaptor. (2) Power on the markB Analyzer in the direction shown in the picture. The first time you turn on markB, the Wi-Fi settings screen appears. First, tap the Connect Wi-Fi button to turn on Wi-Fi and connect it to the Wi-Fi you want to connect to.
- Page 9 The icon appears when Wi-Fi can not be connected. Press the ‘Reconnect Wi-Fi’ button to connect to the Wi-Fi connection. Connected *Referance - markB Analyzer requires Wi-Fi connection for initial setup. 3.2 How to measure (1) Start measurement by tap the start button. markB Analyzer...
- Page 10 If the Battery remaining less than 15%, measurement can not be started. Please fully charge the battery and start measurement. Scan the patient code using the barcode reader or enter it directly using the keypad and press the OK button. markB Analyzer Page...
- Page 11 - If you do not have a barcode reader, tap the field and enter the patient code directly on the keypad. (3) When the patient code entry is completed, the tray at the bottom of the device will automatically. markB Analyzer Page...
- Page 12 At this time, the name of the measurement biomarker and the LOT number read from the NFC of the test cartridge are displayed on the screen. (This screen is an example of output when the markB PSA test cartridge is inserted.) Prepare the sample for measurement.
- Page 13 - Before drawing blood, wipe hands and blood with warm water and soap, and let it dry before proceeding. - The lancet is disposable. Do not reuse. - Dispose of used lancet in a safe place in accordance with applicable regulations. (7) Please collect blood to the capillary tube until the line. markB Analyzer Page...
- Page 14 - Make sure that the cartridge is filled with the correct amount of blood before injecting the blood and enough blood (up to the marking of the eyedropper). - Please inject blood within 2 minutes after inserting the cartridge. After injecting blood, press the “OK” button to start measurement. markB Analyzer Page...
- Page 15 (9) When preparation for measurement is completed, start blood analysis. Please wait for up to 10 minutes. Caution! - If there is an error during measurement or blood analysis, remove the cartridge, insert a new cartridge, and try the measurement again. markB Analyzer Page...
- Page 16 (10) When the blood analysis is completed, the result is displayed on the screen together with the patient code and the LOT number, and the tray at the bottom of the device comes out. Please remove the used cartridge from the tray. (11) Moves to measurement start screen when tap the DONE button. markB Analyzer Page...
- Page 17 Checking the control solution can check that the meter and the measurement cartridge are working properly. The low / high test will proceed in order when checking the markers to be measured. (1) From the measurement start screen, tap the ‘QC test’ button in the upper right corner. markB Analyzer Page...
- Page 18 (2) Tap the control solution button. markB Analyzer Page...
- Page 19 - Before proceeding with the test, check the low and high control solution test sections for each parameter. If you use an invalid control solution, an error screen is displayed. (3) Insert the markB Test cartridge. (4) When the validity check of the cartridge is completed normally, the screen of low control solution injection step occurs automatically.
- Page 20 - Please confirm that the marker of the cartridge you want to inspect is inserted correctly. (5) Insert 1 ~ 2 drops of low control solution of the same marker as the inserted test cartridge into the cartridge. (ex. "PSA" low solution solution injection when inserting "PSA" test cartridge) markB Analyzer Page...
- Page 21 (6) After injecting solution, press OK button to start measurement. Caution! markB Analyzer Page...
- Page 22 (8) Low When the control solution is completed normally, a screen appears that the analysis is completed. Then press the NEXT button to proceed with the high control solution test. At this time, remove the used cartridge from the tray and insert a new test cartridge. markB Analyzer Page...
- Page 23 (9) Insert the same Test cartridge as in the low solution test. markB Analyzer Page...
- Page 24 (10) When the check of the validity of the cartridge is completed normally, the screen for injecting the high control solution is automatically generated. Insert a high control solution of the same marker as the inserted test cartridge into the cartridge for 1 to 2 drops. markB Analyzer Page...
- Page 25 (11) When the analysis is completed, the Low and High test result screen will be displayed on the screen. The whole test result is displayed as “PASS”, “FAIL”. After removing the cartridge from the tray, Press the “Done” button to move to the measurement start screen. markB Analyzer Page...
- Page 26 3.4. Measurement results 3.4.1. measurement results (1) Tap the test results button on the main screen. markB Analyzer Page...
- Page 27 (2) All measured results are recorded and displayed in order of recent measurement. markB Analyzer Page...
- Page 28 (3) Tap the result in the measurement list to see the detailed screen and print the result. 3.5. Printer (1) Tap the print icon on the upper right of the screen and the results are printed by connected mobile printer. markB Analyzer Page...
- Page 29 - Please refer to 3.6.3. For connection method of mobile printer. Notice! - Mobile printers that are incompatible with markB may not print. - If the printer is out of paper, replace it with a new paper and then use the printer.
- Page 30 3.6.2. Bluetooth Settings (1)This screen allows Bluetooth to be connected to an on/off Bluetooth enabled device. markB Analyzer Page...
- Page 31 (2) Tap Printer Setting in setting menu and change to USB mode. If the connection is successful, a “Printer Connected” toast will appear at the bottom of the screen. 4.6.3.2. Bluetooth connection (1) Turn on the mobile printer device and prepare it for Bluetooth connection. markB Analyzer Page...
- Page 32 Pairing password: 0000 or 1234 (3) When pairing is complete, go to the Printer Setting menu of the setting and set it to Bluetooth mode. When the setting is completed, “Printer Connected” toast occurs at the bottom of the screen. markB Analyzer Page...
- Page 33 Enter the hospital code you want to register by tapping the input field. (2) When the registration is completed, the message “Registered Successfully” will be displayed and the main screen will be displayed when the “Done” button is tapped. markB Analyzer Page...
- Page 34 (1) You can find the latest version the Version Information menu. (2) If there is a version to update, the Update button is enabled. The update button will be updated when the Update button is clicked. Chapter 4. Maintenance and management of markB Analyzer markB Analyzer Page...
- Page 35 4.1 Check cartridge test Check Cartridge Inspection allows you to check that the markB meter is functioning normally. (1) Tap the QC test button. (2) Tap the Check Cartridge test button. markB Analyzer Page...
- Page 36 - Be sure to insert the check cartridge. - Check cartridge test is not possible when inserting test cartridge. - If the information is not recognized even after inserting the cartridge correctly, please contact the administrator. (4) Check cartridge test for 1 minute. markB Analyzer Page...
- Page 37 (5) When the device is operating normally, a message is displayed on the screen that the check image is working properly. (6) When an error occurs during check cartridge test, an exclamation point image and message appear on the screen. markB Analyzer Page...
- Page 38 Please contact the administrator. 4.2. Cleaning of markB Analyzer 4.2.1 Cleaning of analyzer ● Clean the markB Analyzer periodically using a soft, dry cloth. ● Do not clean with strong cleansing agents, chemicals, or cleansing tissues containing chemicals that can damage the equipment.
- Page 39 The lower temperature and humidity storage conditions are recommended when storing Analyzer. ○ Temperature: -10 to 45 ° C (14 to 113 ° F) ○ Humidity: 10 to 80% ● When storing the Analyzer, avoid swinging or risk of falling. Chapter.5 Error message description and action markB Analyzer Page...
- Page 40 If the tray at the bottom does not come out even after 10 seconds elapses from Content: Please the cartridge insertion guide screen, a corresponding message will be generated. Please contact the administrator. contact the system administrator. Button: OK markB Analyzer Page...
- Page 41 It is a popup that occurs when inserting Check Cartridge on blood screen or cartridge has been inserting Test Cartridge in Check Cartridge test of QC test. Please insert the inserted. Please correct type cartridge and proceed. insert the test cartridge. Button: OK markB Analyzer Page...
- Page 42 Button: OK (Pop-up) Plasma separation error (firmware error) Title: Error Blood analysis Discard used cartridges and try again with new cartridges to inject Restart with a new enough blood. cartridge containing sufficient blood sample Button: OK markB Analyzer Page...
- Page 43 The measurement is possible when the remaining battery level is over 15% at the start of the measurement. We recommend that you use the battery fully after It must be 15% or charging. higher to measure. Please connect the power adapter. Button: OK markB Analyzer Page...
- Page 44 ‘OK’ button in the popup is activated. Remove the cartridge Please throw it away safely. Button:OK (Toast) Cartridge remove Error pop-up when the pop-up ‘OK’ button without removing the cartridge is a Please remove the cartridge. toast that occurs when tap. markB Analyzer Page...
- Page 45 Please insert the Title: Confirm test cartridge of the same marker. Please remove the cartridge from the tray. Then insert the correct test cartridge that matches the test parameter. Button: OK markB Analyzer Page...
- Page 46 Title: Printer If the printer is not connected and the printer button is tapped, the corresponding Disconnected error message will be displayed. Check the printer connection and print again. Please check the connection and try again. Button:OK markB Analyzer Page...
- Page 47 22.(Toast) If there is no response from the hospital server. Registration failed If there is no response from hospital server, error message about connection because there was failure. no response from the server. Please try again. markB Analyzer Page...
- Page 48 (Pop-up) If the version installation fails, the popup will occur. Click the Retry button tab again to proceed with the update. Title: Installation Failed New version installation failed. Would you like to try again? Button: Try again markB Analyzer Page...
- Page 49 If you try to update when your Wi-Fi connection is lost Title: Connect Wi-Fi If WiFi is disconnected before pressing Update button, WiFi connection guide popup will occur when tap Update button. The Wi-Fi Connection is untable. Please check your Wi-Fi and try again. markB Analyzer Page...
-
Page 50: Chapter 6. Technical Information
Chapter 6. Technical information Model Name MB-100 MT8163B(Quad core) 5.5” HD display, Touch screen Display type Sound Speaker Memory capacity 8GB ROM / 1GB RAM Battery Main battery : 2,500mAh 14.4V (3.7V 18650 4cell) Sub battery : 2,700mAh 3.8V markB Analyzer Page... -
Page 51: Chapter 7. Warranty Information
Product hardware has the capability to operate microphone and FM. Howerver, these will be disabled via software and will not be accessible to user. Chapter 7. Warranty Information In BBB, we guarantee the following products according to consumer dispute resolution standards. If a malfunction occurs, please contact us. - Product Service Criteria You can receive free service only if the manufacturer’s fault or natural failure occurs within the warranty... - Page 52 -Warranty 1 year from date of purchase. - Warranty contents -Contact BBB Service center (070-4047-8282 / cs@bbbtech.com) BBB Inc. 28, Yatap-ro, Bundang-gu, Seongnam-si, Gyeonggi-do, Republic of Korea TEL: 070-4047-8282 | FAX: 02-565-9654 www.bbbtech.com BMD006AMEU-0B Issue date:2019.05 markB Analyzer Page...
- Page 53 (1) This device may not cause harmful interference, and (2) this device must accept any interference received, including interference that may cause undesired operation. This equipment complies with FCC radiation exposure limits set forth for an uncontrolled environment. markB Analyzer Page...
Need help?
Do you have a question about the markB and is the answer not in the manual?
Questions and answers