Advertisement
Quick Links
Advertisement

Related Manuals for Teradek RT


Summary of Contents for Teradek RT
- Page 1 ACI/MDR-ACI Quick Start Guide...
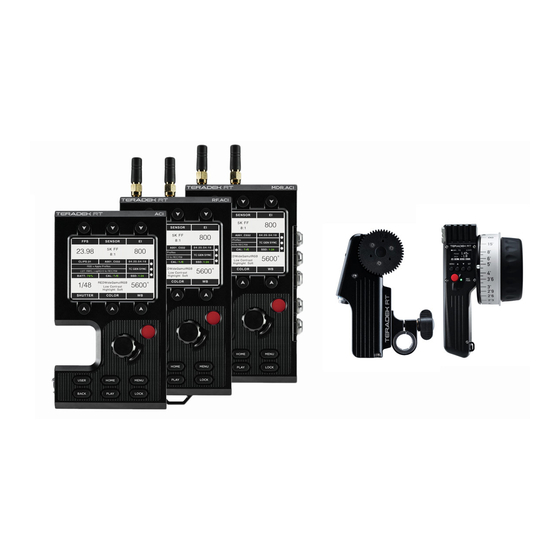
- Page 2 WHAT’S INCLUDED ACI/MDR-ACI Assembly ACI Control + Power Cable 3’ USB-A to USB-B Male Cable Hex L-key 2mm 3-3/8” Hex L-key 2.5mm 3-5/8” (4) M3 x 4mm Socket Headcap Screws (4) M4 x 8mm Screws AC UI Bottom Bracket AC UI Top Bracket (2) FHSS 2.4GHz WiFi antennas (MDR.ACI...
- Page 3 PHYSICAL PROPERTIES RF antenna (MDR.ACI) BLE 5.0 Bluetooth antenna (MDR.ACI) Home screen/User menu buttons LCD display Record button Menu navigation wheel ACI Control/Power input USB-C ports Control/Menu buttons AUX input-1 (MDR.ACI AUX input-2 (MDR.ACI) Motor inputs (MDR.ACI)
-
Page 4: Table Of Contents
TABLE OF CONTENTS Mounting Instructions ......2 Power and Connect ......3 Button Operation ........4 Home Screen Operation ...... 5 User Menu Configuration ....6 Pair MDR-ACI and Controller ....7... -
Page 5: Mounting Instructions
MOUNTING INSTRUCTIONS Remove the Sidekick cover from the DSMC2 camera body and any I/O and/or battery modules. Attach the top and bottom brackets (A) to the side of the camera using the included M3 screws (B). -
Page 6: Power And Connect
MOUNTING INSTRUCTIONS (CONT.) Insert the four set screws (C) on the ACI unit so that they do not interfere with the notched areas. Attach the ACI unit firmly against the side of the DSMC2 camera using the alignment guides in the attachment brackets, then tighten the four screws (C) with the Hex L key. -
Page 7: Button Operation
BUTTON OPERATION Home Screen Buttons Access primary camera capture parameters. Record Button Start or stop recording. Menu Jog Wheel Navigate the menus and configure the user menu options. Push the jog wheel to confirm or open selection. Control/Menu Buttons USER: Access or configure the user menu options BACK: Return to the previous screen... -
Page 8: Home Screen Operation
HOME SCREEN OPERATION The Home screen allows the user to access and configure the most critical camera parameters. Press any of the six arrow buttons to display its corresponding menu, then use the jog wheel to select and configure the settings. Home Screen Buttons FPS (Frame Rate): Configure the number of frames per second being recorded. -
Page 9: User Menu Configuration
USER MENU CONFIGURATION ACI is equipped with a configurable user menu interface. Press the USER button to display the user menu, then use the Jog wheel to assign camera functions to any of the six menu buttons. To configure the User menu: Press the USER button to open the user menu. -
Page 10: Pair Mdr-Aci And Controller
PAIR MDR-ACI AND CONTROLLER Wireless Pairing via Controller Press the MENU button on the controller. Navigate to WIRELESS>FIND RECV to scan for active receivers and automatically pair. The LED on the controller will turn green once paired. Wireless Pairing via MDR-ACI Press the Menu button on MDR-ACI, then navigate to MDR Settings>Channel. - Page 11 Teradek regularly releases new firmware versions to improve performance, add new features, or to fix vulnerabilities. Visit teradek.com to update your device with the latest firmware. NEED MORE HELP? SUPPORT: http://support.teradek.com → Contains tips, information and all the latest firmware & software updates.
- Page 12 © 2019 Teradek, LLC. All rights reserved.
Need help?
Do you have a question about the RT and is the answer not in the manual?
Questions and answers