Table of Contents
Advertisement
Available languages
Available languages
Quick Links
Advertisement
Table of Contents

Subscribe to Our Youtube Channel
Related Manuals for Metrica BRAVO LASER SQ 2.0


Summary of Contents for Metrica BRAVO LASER SQ 2.0
- Page 1 B R AV O L A S E R SQ 2.0 GREEN Ref. 60803...
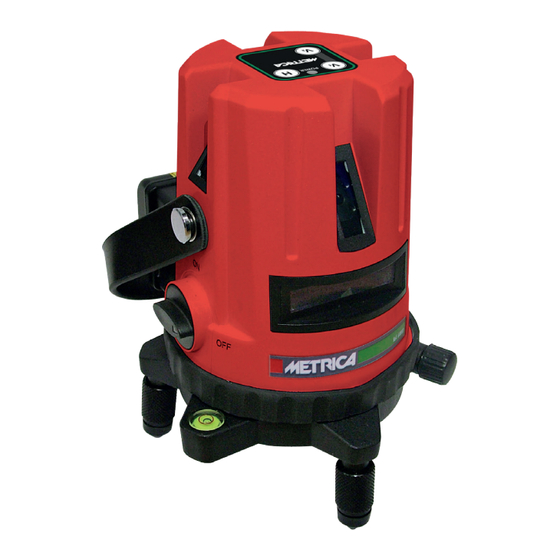
- Page 3 • Per accendere, RUOTARE l’interruttore su ON. Il led verde BRAVO LASER SQ 2.0 GREEN POWER della tastiera si illumina. ISTRUZIONI • Sganciare e ruotare il coperchio del vano batterie • Inserire 4 batterie Alcaline tipo AA (1.5 V) nel supporto ed inse- rire lo stesso nel vano porta batterie •...
- Page 4 • Per accendere o spegnere il raggio ORIZZONTALE premere Con tutti i laser accesi si ottengono uno squadro completo (2 tasto H. linee verticali + 1 linea orizzontale) • Per proiettare o spegnere il primo raggio VERTICALE premere successivamente il tasto V1. •...
- Page 5 • Se i raggi lampeggiano, lo strumento è fuori dal campo di auto- livellamento. Riposizionare lo strumento come sopra indicato. • Per spegnere, riportare l’interruttore su OFF ed il pendolo rima- ne bloccato per il trasporto • Per spostamenti micrometrici di rotazione, ruotare le due viti “V”...
- Page 6 • Pour allumer, mettez l’interrupteur sur ON. La LED POWER BRAVO LASER SQ 2.0 GREEN verte du clavier s’allume INSTRUCTIONS • Desserrez et tournez le couvercle du compartiment des piles • Placez 4 piles alcalines AA (1,5 V) dans le support et insérez- les dans le compartiment des piles •...
- Page 7 • Pour activer ou désactiver le faisceau HORIZONTAL, appuyez Lorsque tous les rayons sont activés, vous obtenez quatre an- sur la touche H. gles droits (4 lignes verticales + 1 ligne horizontale) • Pour activer ou désactiver le premier faisceau VERTICAL, ap- puyez sur la touche V1.
-
Page 8: Caractéristiques Techniques
• Lorsque les faisceaux lumineux clignotent, l’instrument se trouve à l’extérieur de la zone d’auto-nivellement. Alignez l’ap- pareil à nouveau. • Pour éteindre, mettre l’interrupteur sur OFF ; le pendule reste verrouillé pour le transport • Pour les mouvements rotatifs micrométriques, tournez les deux vis V (photo) sur la face inférieure de l’appareil CARACTÉRISTIQUES TECHNIQUES Portée (en fonction de l’éclairage) 10 m... - Page 9 • To switch on, turn the to ON. The green POWER LED on the BRAVO LASER SQ 2.0 GREEN keyboard lights up MANUAL • Loosen and turn the battery compartment lid • Place 4 AA alkaline batteries (1.5V) in the holder and insert it into the battery compartment •...
- Page 10 • To turn the HORIZONTAL beam on or off, press the H button. • To switch the first vertical beam on or off, press the V1 button. • To turn the second vertical beam on or off, press the V2 button •...
-
Page 11: Technical Data
• When the beams are flashing, the instrument is outside the self-leveling area. Align the device again. • To switch off, set the switch to OFF; the pendulum remains locked for transport • For micrometric rotary movements, turn both screws V (pictu- re) on the underside of the device TECHNICAL DATA Portata... - Page 12 • Zum Einschalten schalten Sie den Schalter auf ON. Die grüne BRAVO LASER SQ 2.0 GREEN POWER-LED auf der Tastatur leuchtet auf ANLEITUNG • Lösen und drehen Sie den Batteriefachdeckel • Legen Sie 4 Alkalien AA-Batterien (1,5 V) in die Halterung und stecken Sie sie in das Batteriefach •...
- Page 13 • Um den HORIZONTAL-Strahl ein- oder auszuschalten, drücken • Wenn alle Strahlen aktiviert sind, erhalten Sie vier vollständige Sie die H-Taste. rechte Winkel (4 vertikale Linien + 1 horizontale Linie) • Um den ersten vertikalen Strahl ein- oder auszuschalten, drü- cken Sie die Taste V1.
-
Page 14: Technische Eigenschaften
• Wenn die Strahlen blinken, befindet sich das Instrument außerhalb des selbstnivellierenden Bereichs. Richten Sie das Gerät erneut aus. • Zum Ausschalten den Schalter auf OFF stellen; so bleibt das Pendel für den Transport gesperrt • Drehen Sie für mikrometrische Drehbewegungen die beiden Schrauben V (Foto) an der Unterseite des Gerätes TECHNISCHE EIGENSCHAFTEN Reichweite... - Page 15 Importiert und vertrieben von Metrica S.p.A - Via Grandi, 18 - 20097 San Donato Mil.se (MI) - Italy...
Need help?
Do you have a question about the BRAVO LASER SQ 2.0 and is the answer not in the manual?
Questions and answers