Table of Contents
Advertisement
Quick Links
Advertisement
Table of Contents

Subscribe to Our Youtube Channel
Related Manuals for BenQ M1 Series


Summary of Contents for BenQ M1 Series
- Page 1 M1 Series - Camcorder User Manual Welcome...
-
Page 2: About This Manual
Copyright Copyright 2009 by BenQ Corporation. All rights reserved. No part of this publication may be reproduced, transmitted, transcribed, stored in a retrieval system or translated into any language or computer language, in any form or by any means, electronic, mechanical, magnetic, optical, chemical, manual or otherwise, without the prior written permission of this company. -
Page 3: For Your Safety
For your safety The Li-ion Battery Charger shall be operated at open side ambient. Do not install this equipment in a confined space such as book case or similar unit. Do not attempt to charge any other battery with this charger. This battery charger is not intended for use by children or persons with reduced physical, sensory, or mental capabilities. -
Page 4: Warranty
14. Some camcorder models accept non-rechargeable batteries. When using these batteries, do not charge them. Otherwise, dangers such as explosion and fire may occur. Warranty Warranty is void if damage or system failure occurred due to outside factors such as collision, fire, flood, dirt, sewage, earthquake, and other force majeure events as well as incorrect usage of electricity or use of non-original accessories. -
Page 5: Operating Environment
taking pictures or recording videos. You should also clean the camcorder lens on a regular basis. 10. If the lens is dirty, use a lens brush or soft cloth to clean the lens. 11. Do not touch the lens with your fingers. 12. - Page 6 Storage at too high or low temperatures will also result in a gradual capacity loss. As a result, the operating time of your camcorder may be considerably reduced. It is normal for the camcorder to become warm during operation, because the camcorder casing can conduct heat.
-
Page 7: Table Of Contents
Preface ............... ii About this manual .............. ii Copyright ................ii Disclaimer ................. ii Safety warning and notice ..........ii For your safety ................iii Warranty..................iv Taking care of your camcorder............iv Operating environment..............v Introduction............... 1 System Requirements ............1 Main Features .............. - Page 8 Taking a picture................10 To playback the picture: ..............10 Using the LCD Monitor ..........11 LCD Monitor Layout ............11 Record Mode Screen Layout (For Recording Still Images)... 11 Record Mode Screen Layout (For Recording Videos) ....13 Playback Mode Screen Layout............15 Recording Photos and Videos ........
- Page 9 Setting EIS ..................30 Using the Fader function ............... 31 Playback..............32 Viewing Your Photos and Videos ......32 Viewing Slideshow ................ 33 Date Index ..................34 Using Film Roll Function ............. 34 Using the Delete Function ..........35 Delete Selected Images ..............35 Delete All Images ................
- Page 10 Setting HDMI Resolution ............ 45 Setting File Numbering ............45 Format ................46 Reset All ................46 Specifications............. 47 Troubleshooting............50...
-
Page 11: Introduction
Introduction Congratulations on the purchase of your new DV. This manual provides step-by-step instructions on how to use your DV, and is intended for your reference only. System Requirements In order to get the most out of your DV, your computer must meet the following system requirements: For Windows: •... -
Page 12: Unpacking The Camcorder
Unpacking the Camcorder All the following items should be present in the package. If any item is missing or appears damaged, contact your dealer immediately. Quick Start Guide/ CD-ROM User manual HDMI AV cable USB cable HDMI cable (optional) Battery charger Battery Power adapter... -
Page 13: About The Camcorder
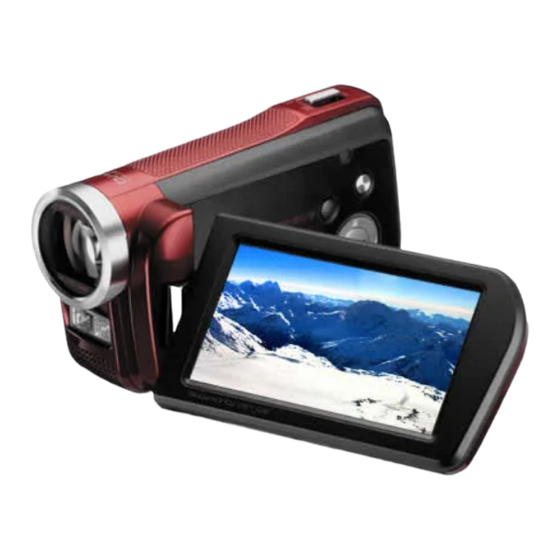
About the Camcorder Refer to the following illustrations to familiarize yourself with the buttons and controls of the camcorder. Front View Lens Flash Microphone Top View Zoom lever Back View LED indicator Start/Stop button LCD Display Strap ring... -
Page 14: Right View
Right View Pre-Record/ Backlight button Self-timer button Power button Mode switch MODE Speaker Left View USB port / HDMI DC IN AV OUT DC In/ AV Out terminal Bottom View Tripod connector Battery / SD card cover... -
Page 15: Dv Buttons
DV Buttons Your camcorder is equipped with different buttons for easy use. Button Description Power Press to turn on/off the power. Pre-Record/ In Video mode, press to turn pre-record function on or off. Self-timer In Photo mode, press to set self-timer. Start/Stop Press to capture an image or start/stop recording video clip. -
Page 16: Getting Started
Getting Started Read this section to learn how to start using the camcorder. This section covers only basic functions such as inserting the battery and memory cards, turning it on, and making preliminary settings. See later chapters for advanced functions. Inserting the Battery/SD/SDHC Card Open the battery compartment at the bottom of the camcorder. -
Page 17: Charging The Battery/ Dv
Charging the battery/ DV Insert the battery into the charger as shown and connect the power supply to the charging unit and the mains supply. You can also use the DV directly by connecting the power adaptor to the DC in con- nector as shown. -
Page 18: Turning On The Power
Turning on the Power Press the Power button to turn on the DV. Before Recording Stand with back to sun to avoid object being in shadow. Hold the unit firmly with both hands. Flash Microphone Keep elbows close to body. When recording keep at waist height. -
Page 19: Using The Dv
Using the DV The camcorder can operate in Video mode and Photo mode. Press the Mode switch to toggle between two different modes. MODE Video mode Photo mode MODE Shooting a Video Turn on the DV and make sure it is in [ 0h04m ] STBY Video mode. -
Page 20: To Playback The Video
To playback the video: Tap the LCD screen to show the toolbar. Tap the icon to show the thumbnails of all video clips. Tap the icons to scroll previous/next page. Tap the desired video thumbnail to playback. Tap the respective icon to fast forward /rewind / pause the video. -
Page 21: Using The Lcd Monitor
Using the LCD Monitor The high resolution 3” LCD monitor shows all important information regarding cam- corder settings as well as the visual image of your photo or video. The display on the LCD monitor is called the On Screen Display or OSD. LCD Monitor Layout The following illustrations show the LCD monitor layout and icon descriptions. - Page 22 Item Description Remaining shots Indicates the remaining shots available. Battery indicator Indicates the battery level. When connecting to DC power, will be displayed. Display ISO settings. Backlight Indicates the backlight is enabled. Exposure Displays exposure settings. Date Stamp Displays date stamp. Toolbar Tap to display the toolbar.
-
Page 23: Record Mode Screen Layout (For Recording Videos)
Record Mode Screen Layout (For Recording Videos) [ 0h04m ] STBY 0:00:00 2009/01/01 12:00 Item Description REC Mode Indicates the current mode. Wind cut Indicates wind cut settings. Indicates EIS (Electronic Image Stabilizer) is enabled. Zoom indicator Indicates the zoom in/out control. Recording status Indicates the current recording status. - Page 24 Item Description Battery indicator Indicates the battery level. When connecting to DC power, will be displayed. Fader Indicates the fader function is enabled Backlight Indicates the backlight function is enabled. Date stamp Indicates the date stamp. Toolbar Tap to display the video toolbar. AF Lock on/off Tap to toggle between the following two states: •...
-
Page 25: Playback Mode Screen Layout
Playback Mode Screen Layout The Playback mode display varies depending on the type of image being viewed. Photo playback 355-0009 355-0009 2009/01/01 12:00 2009/01/01 12:00 Video playback 00:00:15 00:00:15 335-0009 335-0009 2009/01/01 12:00 2009/01/01 12:00 Item Description File no./ Total no. Indicates the file no. - Page 26 Item Description Next file Tap to go to the next file. File name Indicates the current file name. Date stamp Displays the date stamp Toolbar Displays the toolbar icons. Previous file Tap to go to the previous file. Protect Indicates the file is protected. REC mode/ Photo Indicates REC mode/photo size.
-
Page 27: Recording Photos And Videos
Recording Photos and Videos Taking Photos Now that you are familiar with your camcorder, you are now ready to take your photos. Taking photos with your camcorder is very simple. Turn on the camcorder by pressing the Power [ [ 164 164 ] button. -
Page 28: Using The Scene Mode
To activate Flash: Tap the Flash icon on your video to display the Flash menu. Your camcorder is equipped with five flash modes: Auto: The flash fires automatically whenever extra lighting is needed. Forced On: The flash fires whenever you press the shutter button regardless of lighting conditions Forced Off: The flash is turned off. - Page 29 Icon Item Description Portrait The camcorder blurs the background to focus on the subject. Candlelight This feature is used to capture warm candle light effects. Sunset This feature enhances the red hue for recording sunset images. Landscape This feature is used to emphasize wide scenic views. Surf &...
-
Page 30: Using The Photo Menu
Using the Photo Menu The Photo Menu is used to adjust capture settings in Photo Mode. It contains Photo size, Quality, Drive mode, ISO, White Balance, EV Compensation, Focus Area, Macro, Auto Review, Metering, and Guideline. Photo Menu To go to the Photo menu: to display the toolbar options. -
Page 31: Setting The Image Quality
Setting the Image Quality The Quality function allows you to adjust the quality settings of your photos before you Quality capture them. The quality determines the amount of compression applied to your Super Fine Super Fine photos. More compression results in a more detailed image. -
Page 32: Iso
The ISO function lets you adjust the ISO sensitivity in recording still images depending on the lighting levels of your surroudnings. Auto Auto AUTO AUTO • Use a higher ISO setting in dim conditions and a lower ISO setting in brighter conditions. -
Page 33: Ev Compensation
EV Compensation EV stands for Exposure Value. In difficult EV Compensation lighting condition, the auto exposure function of your camcorder may be misled into giving the wrong readings. The EV Compensation function allows you to adjust the exposure value and correctly expose your images. Available for still images only. -
Page 34: Using The Macro Function
Using the Macro function This mode is designed for close-up Macro photography. If Macro is enabled, you can capture the detail and sharpness of a very close image by fixed focus. From the Photo menu, tap Macro to display the menu options. Tap the selected option to save your settings. -
Page 35: Using Guideline
Tap the to exit the Photo menu. Icon Item Specifications Multi The camcorder measures the exposure readings from multiple points in the subject area. Spot The camcorder selects the exposure value based on the center of your picture. Center The camcorder measures the average light from the entire frame but gives more importance to the values near the center. -
Page 36: Using The Video Menu
Using the Video Menu The Video Menu is used to adjust capture settings in Video Mode. It contains REC Mode, Digital Zoom, EIS, Wind Cut, and White Balance (see "White Balance" on page 22 for details). Video Menu To go to the Video menu: to display the toolbar options. -
Page 37: Shooting Videos
Shooting Videos You can record movies with your camcorder. The available recording time depends on the capacity of the memory card and the following conditions: • When one of the following memory cards is used, once the video file size reaches 1GB (512MB if the video resolution is 640x480), the video recording will automatically stop. -
Page 38: Using The Pre-Record Function
Turn on the camcorder by pressing the REC mode PRE-REC mode Power button. By doing this, your camcorder is also set to Record mode. [ 0h04m ] STBY Frame the shot using the LCD monitor. 0:00:00 Press the Start/Stop button to start recording the video. -
Page 39: Setting The Movie Size
Setting the Movie Size The REC Mode function adjusts the resolution and quality of video clips. From the Video menu, tap to select REC REC Mode Mode. The REC Mode menu display the movie HQ HQ 1920x1080 1920x1080 0h07m 0h07m size settings and the respective remaining recording time for each SP SP... -
Page 40: Setting Eis
Icon Frame Size Up to 5x zoom is performed optically. Up to 5x zoom is performed optically, and after that, up to 10x zoom is performed digitally. Setting EIS EIS stands for Electronic Image Stabilizer. This feature can stabilize the image without decreasing the image quality. -
Page 41: Using The Fader Function
Using the Fader function This feature allows the user to add a fade-in transition effect in the beginning of moving recording, and add a fade-out transition effect in the end of movie recording. Tap the icon on toolbar to display Fader the Fader menu. -
Page 42: Playback
Playback View images and video clips through your camcorder’s Playback mode. Viewing Your Photos and Videos 2009.01.01 Item Description Video tab Indicates the video thumbnails are displayed. Photo tab Indicates the photo thumbnails are displayed. Battery indicator Indicates the battery level. Movie index / Displays the video/photos stored in memory. -
Page 43: Viewing Slideshow
Tap the Play icon to set or turn on the camcorder to Playback mode. The LCD monitor displays the recorded images and videos in thumbnail mode. Tap the to view recorded videos or images in thumbnail. Tap the icon to scroll all the videos or images. Tap to select the video or image to view on screen. -
Page 44: Date Index
Date Index You can choose to view your stored images or videos by the Date Index function. Date Index 2009.01.01 2009.01.01 In Playback mode, tap to show a list of date index of the stored images/ 2009.01.03 2009.01.03 videos. 2009.01.15 2009.01.15 Tap the Date and tap OK. -
Page 45: Using The Delete Function
Using the Delete Function Delete In Playback mode, tap to display Select Select the Playback menu. Tap Delete to show the delete options. Choose to delete by selecting images, By Date By Date delete all images, or delete images by date index. -
Page 46: Protect
Protect The Protect function allows you to lock a Protect photo or video to protect it from being modified or accidentally erased. A protected Select Select file has a lock icon when viewed in Playback mode. Lock all Lock all To protect files: Unlock all Unlock all... -
Page 47: Dpof
DPOF The Digital Print Order Format (DPOF) function allows you to mark image in your memory card for printing and allows you to specify the number of copies that you want to print at a later date. When all images to be printed are marked, take the memory card to a digital printing service, or use a DPOF compatible printer. -
Page 48: Pictbridge
PictBridge The PictBridge function allows you to print images captured by your camcorder without connecting the camcorder to a PC. Print images with a PictBridge compatible printer directly. To activate PictBridge: Connect your camcorder to a PictBridge compatible printer using the USB cable. -
Page 49: Using The Setup Menu
Using the Setup Menu You can access the Setup menu whether you are in Record or Playback mode. The Setup menu allows you to configure general camcorder settings. To go to Setup Menu: In Playback menu, tap change the menu tab to Setup menu. Display Display Tap the... -
Page 50: Using Quick Start Function
Using Quick Start Function The Quick Start feature allows the camcorder Quick Start to resume operation about 0.6 seconds after the LCD monitor is reopened. In Quick Start submenu, tap to select the display settings. • Off: Disable Quick Start function •... -
Page 51: Using The World Time Function
Using the World Time Function This feature automatically calculates the time difference between the home region and travel destination. World Time Beijing Beijing Home/ Travel option New York Current used. Current Setting to display the time zone and World Time the current time on screen. -
Page 52: Setting The Language
10. The time difference is now displayed on screen. 7:00 PM Harbin Harbin Beijing Beijing Shanghai Shanghai Taipei aipei Setting the Language The Language menu allows you to choose the language of the on screen display (OSD) menu. In Language submenu, tap the Language icons to scroll through the list of language options. -
Page 53: Setting Auto Power Off
Setting Auto Power Off The Power Save function allows you to set an Auto Power Off idle time after which the camcorder automatically sets to sleep mode to save power. After 5 minutes of being in sleep mode, 5 min. 5 min. -
Page 54: Setting Tv Mode
Setting TV Mode Use the TV Mode function to adjusts video TV Mode output signal to accommodate different regional settings. If TV out is not set correctly, NTSC NTSC NTSC NTSC the image may not display properly on TV. From the Settings menu, select TV Mode. -
Page 55: Setting The Display Output
Setting the Display Output This function controls the OSD displays of the DV when it is connected to the TV. You may choose to show or hide the OSD icons. In Display Output submenu, tap to Display Output select the display settings. •... -
Page 56: Format
Format Use this function to format the current storage media. This format action will delete everything on the media. From the Settings menu, select Format. Format A warning message appears to confirm formatting the memory card. Tap Yes to proceed or No to cancel. Format the memory card will permanently erase all recordings. -
Page 57: Specifications
Specifications Item Specifications Sensor 10 Mega Pixels, Type: 1/2.3 Lens Focal Length: f = 6.1 - 30.5 mm, 5X optical zoom, 10x digital zoom LCD Monitor 3.0” color LCD Focusing Range Normal: 30cm - Infinity Macro: 10cm - Infinity (Wide), 30cm - Infinity (Tele) Aperture F = 3.49 (W) - 3.59 (T) Shutter... - Page 58 Item Specifications Scene Mode Off, Portrait, Candlelight, Sunset, Landscape, Surf & Snow ISO/ ASA Sensitivity Video: Auto Photo: Auto, 50, 100, 200, 400 White Balance Auto, Daylight, Cloudy, Tungsten, Fluorescent, Custom Exposure Control -2EV to + 2EV (1/3EV steps) Metering Multi, Spot, Center Drive Mode Single, 2MP Burst, 10MP Burst...
- Page 59 Item Specifications Ambient Humidity Operating: 5 – 85% RH Storage: up to 90% RH Microphone Built-in Speaker Built-in Dimensions 112.5 X 44.35 X 63.5 mm Weight 210g...
-
Page 60: Troubleshooting
Troubleshooting Problem Cause and/or Action Camcorder does not The batteries may be exhausted. Charge or replace turn on. the batteries. Camcorder turns off Press any button except the Power button to turn on automatically. the camcorder. LCD turns blank. Press any button except the Power button to turn on the LCD. - Page 61 Problem Cause and/or Action LCD screen displays The memory card is protected. Remove the card and ‘Format error’. slide the write-protect switch to its unlock position. LCD screen displays The memory card is protected. Remove the card and ‘Copy error’. slide the write-protect switch to its unlock position.
Need help?
Do you have a question about the M1 Series and is the answer not in the manual?
Questions and answers