Table of Contents
Advertisement
Advertisement
Table of Contents

Related Manuals for Zanussi ZOB343X


Summary of Contents for Zanussi ZOB343X
- Page 1 User Manual GETTING STARTED? EASY. ZOB343X EN User Manual Oven...
-
Page 2: Safety Information
VISIT OUR WEBSITE TO: Get usage advice, brochures, trouble shooter, service and repair information: www.zanussi.com/support SAFETY INFORMATION Before the installation and use of the appliance, carefully read the supplied instructions. The manufacturer is not responsible for any injuries or damage that are the result of incorrect installation or usage. -
Page 3: Safety Instructions
Disconnect the appliance from the power supply before • carrying out any maintenance. If the mains power supply cable is damaged, it must be • replaced by the manufacturer, its Authorised Service Centre or similarly qualified persons to avoid an electrical hazard. The means for disconnection must be incorporated in the fixed •... - Page 4 Ventilation opening 560x20 mm minimum size. Opening Cable types applicable for installation or re- placed on the bottom placement for Europe: rear side Mounting screws 4x25 mm H07 RN-F, H05 RN-F, H05 RRF, H05 VV-F, H05 V2V2-F (T90), H05 BB-F ELECTRICAL CONNECTION For the section of the cable refer to the total power on the rating plate.
-
Page 5: Internal Lighting
• Do not put flammable products or items that are • Clean regularly the appliance to prevent the wet with flammable products in, near or on the deterioration of the surface material. appliance. • Clean the appliance with a moist soft cloth. Use only neutral detergents. -
Page 6: Installation
INSTALLATION BUILDING IN WARNING! Refer to Safety chapters. (*mm) min. 550 min. 560 (*mm) min. 550 min. 560 SECURING THE OVEN TO THE CABINET... -
Page 7: Product Description
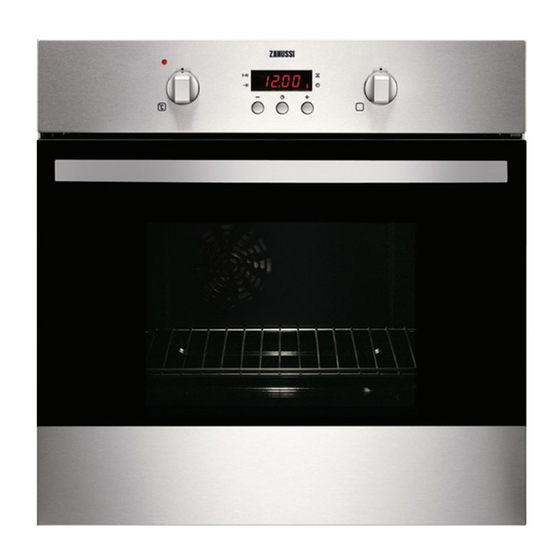
PRODUCT DESCRIPTION GENERAL OVERVIEW Control panel Knob for the heating functions Power lamp / symbol Display Control knob (for the temperature) Temperature indicator / symbol Air vents for the cooling fan Heating element Lamp Shelf positions ACCESSORIES For roasting and grilling. •... -
Page 8: Before First Use
BEFORE FIRST USE WARNING! Refer to Safety chapters. BEFORE FIRST USE The oven can emit an odour and smoke during preheating. Make sure that the room is ventilated. Step 1 Step 2 Step 3 Set the clock Clean the oven Preheat the empty oven 1. -
Page 9: Clock Functions
The oven door should be closed during cooking so that the function is not interrupted and the oven Heating function Application operates with the highest energy efficiency possible. To grill thin pieces of food For the cooking instructions refer to "Hints and tips" and to toast bread. - Page 10 How to change: Time of Day Step 2 - press to set the time. After approximately 5 sec., the flashing stops and the display shows the time. How to set: Duration Step 1 Set an oven function and the temperature. Step 2 - press repeatedly.
-
Page 11: Using The Accessories
How to set: Time Delay Step 6 Press: At the set time the signal sounds and the oven turns off. Step 7 Press any button to stop the signal. Step 8 Turn the knobs to the off position. How to set: Minute Minder Step 1 - press repeatedly. -
Page 12: Additional Functions
Deep pan: Push the tray between the guide bars of the shelf support. TRIVET AND GRILL- / ROASTING PAN Step 1 Put the trivet into a deep pan. Step 2 Put the deep pan on the recommended shelf position. Roasting larger pieces of meat or poultry Grilling and toasting thin pieces of food in on one shelf position. - Page 13 Cooking meat and fish Cooking times Use a deep pan for very fatty food to prevent the Cooking times depend on the type of food, its oven from stains that can be permanent. consistency, and volume. Leave the meat for approximately 15 minutes before Initially, monitor the performance when you cook.
-
Page 14: Information For Test Institutes
(°C) (min) Poached fish, 0.3 baking tray or dripping 35 - 45 Whole fish, 0.2 kg baking tray or dripping 35 - 45 Fish fillet, 0.3 kg pizza pan on wire shelf 35 - 45 Poached meat, baking tray or dripping 40 - 50 0.25 kg Shashlik, 0.5 kg... -
Page 15: Care And Cleaning
(°C) (min) Toast, 4 - Grill Wire max. 2 - 4 minutes Preheat the oven 6 pieces shelf first side; 2 - 3 for 3 minutes. minutes sec- ond side Beef bur- Grill Wire max. 20 - 30 Put the wire shelf ger, 6 shelf and on the third level... - Page 16 HOW TO REMOVE AND INSTALL: DOOR The oven door has two glass panels. You can remove the oven door and the internal glass panel to clean it. Read the whole "Removing and installing door" instruction before you remove the glass panels. CAUTION! Do not use the oven without the glass panels.
-
Page 17: Troubleshooting
When installed correctly the door trim clicks. Make sure that you install the internal glass panel in the seats correctly. HOW TO REPLACE: LAMP WARNING! Risk of electric shock. The lamp can be hot. Before you replace the lamp: Step 1 Step 2 Step 3 Turn off the oven. -
Page 18: Energy Efficiency
ENERGY EFFICIENCY PRODUCT INFORMATION SHEET ACCORDING TO UK ECODESIGN AND ENERGY LABELLING REGULATIONS Supplier's name Zanussi Model identification ZOB343X 944064891 Energy Efficiency Index 94.8 Energy efficiency class Energy consumption with a standard load, fan-forced mode 0.73 kWh/cycle Number of cavities... -
Page 19: Environmental Concerns
ENVIRONMENTAL CONCERNS with the symbol with the household waste. Recycle materials with the symbol . Put the Return the product to your local recycling facility or packaging in relevant containers to recycle it. Help contact your municipal office. protect the environment and human health by recycling waste of electrical and electronic appliances. - Page 20 WWW.ZANUSSI.COM/SHOP...
Need help?
Do you have a question about the ZOB343X and is the answer not in the manual?
Questions and answers
Do you have the oven door open or closed when using the grill
The oven door should be closed when using the Zanussi ZOB343X grill. The manual advises keeping the oven door closed when the oven operates to save energy and ensure proper functionality.
This answer is automatically generated
How to set time for oven to wofk