Table of Contents
Advertisement
PolySprint
I
n
t
e
g
r
a
l
I
n
t
e
g
r
a
l
N
N
OPERATOR'S MANUAL
Thoroughly read this operator's manual before operating the press.
To use endless splicing tools safely, be sure to hand this manual to the operator or
worker.
H
e
a
t
i
n
g
H
e
a
t
i
n
g
P
S
-
1
2
P
S
-
1
2
a
n
d
C
o
o
a
n
d
C
o
o
1
0
A
-
1
1
0
A
-
1
PSM-NIT-20003E
TM
l
i
n
g
P
r
e
s
l
i
n
g
P
r
e
s
/
2
/
2
s
s
Advertisement
Table of Contents

Related Manuals for Nitta PolySprint NPS-1210A-1


Summary of Contents for Nitta PolySprint NPS-1210A-1
- Page 1 PSM-NIT-20003E PolySprint OPERATOR'S MANUAL Thoroughly read this operator’s manual before operating the press. To use endless splicing tools safely, be sure to hand this manual to the operator or worker.
-
Page 2: Table Of Contents
Table of Contents 1. Precautions for the Safety .... 2 2. Confirmation of Product ....6 3. Specification ........7 4. Operation Environment ....8 5. Storage Environment ..... 8 6. Name of each parts ......9 7. Operation Procedure ....11 8. -
Page 3: Precautions For The Safety
1. Precautions for the Safety We would like to thank you for having purchased our Integral Heating and Cooling Press NPS-1210A-1/2. Thoroughly read this manual, especially the chapter of Precautions for the Safety, to use this machine safely. This indicates a hazardous situation which, if improperly handled, WARNING will result in death or serious injury. - Page 4 Confirm that the power supply to be used is within the designated of WARNING specification for this machine. Failure to do this may cause fire or electric shock. Model Power supply NPS-1210A-1 100 - 120V 50 / 60Hz NPS-1210A-2 200 - 240V 50 / 60Hz ...
- Page 5 Use a conversion plug when the plug shape does not match the socket. WARNING Failure to do this may cause electric shock. The plug shape of the attached power cable is as follows. The conversion plug is not attached. When the conversion plug is necessary, the user must prepare it yourself.
- Page 6 CAUTION Exercise care not to pinch your hands between the top cover and control CAUTION box or the upper and lower heat plates. Failure to do this may cause injury. Avoid inserting your hands into the opening (part with a wire net) on the CAUTION front face of the press.
-
Page 7: Confirmation Of Product
2. Confirmation of Product Before operating the press, check that the product is exactly what you CAUTION have ordered. Using this product other than those specified in this manual may cause fire, electric shock, injury or burn. 2-1) Confirmation of Product On opening the package, confirm the following points. -
Page 8: Specification
3. Specification 3-1) Outline of the press (1) This machine is the press intended for finger-endless splicing of the PolySprint belt of our product, and composed of the press mechanism with the turning of rotary handle, press body equipped with electric heaters and cooling fans, and control box to regulate heater temperature and heating and cooling times. -
Page 9: Operation Environment
4. Operation Environment Ambient temperature 5 – 40C (no dew condensation) Ambient humidity 15 – 85%R.H. Working place Indoor (place without dust and water) Atmosphere No inflammable, combustible or corrosive gas and steam Avoid using this machine in the following environment. WARNING Failure to do this may cause fire or electric shock. -
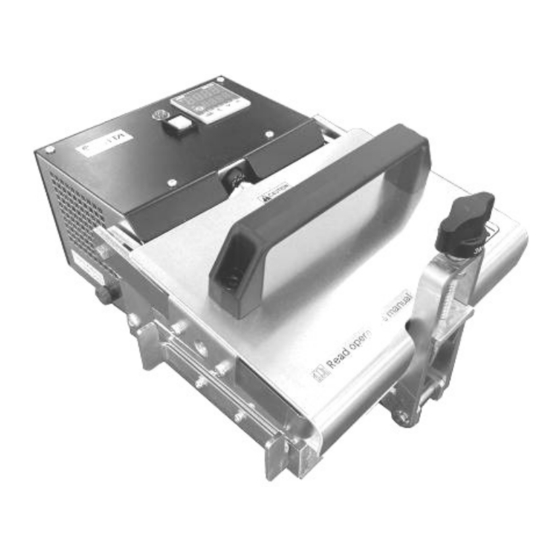
Page 10: Name Of Each Parts
6. Name of each Part 6-1) Front view of the press Temperature controller Nameplate Torque limiter ASSY Power cable inlet Hook WARNING label 6-2) Rear view of the press Start switch Top cover Pilot lamp Upper heat plate Lower heat plate Pre-setter guide Fuse box Fuse nameplate... - Page 11 6-3) Temperature controller Present temperature display Preset temperature display Setting buttons Display change button - 10 -...
-
Page 12: Operation Procedure
7. Operation Procedure 7-1) Power ON Connect the power plug to the socket correctly. The power is supplied to the temperature controller. The controller indicates the present temperature (upper display) and preset temperature (lower display). Be sure to connect an earth line. WARNING 7-2) Temperature setting (Temperature controller) 1) Check that the pilot lamp is off (no heating or cooling). - Page 13 7-4) Operation 1) To start operation, push the start switch for 0.5 sec or more. 2) On starting of operation, the pilot lamp lights and the heating of upper and lower heat plates start. 3) The machine operates in the sequence of; heating to the preset temperature, temperature holding (period previously set) and cooling.
-
Page 14: Endless Splicing Procedure
8. Endless Splicing Procedure 8-1) Required Tool Figure/Photo Description Fig. a Integral Heating and Cooling Press [NPS-1210A-1/2] Fig. b Heat resistant gloves (burn-preventive protection kits) This item is not contained in the product package. The user must prepare gloves yourself. Fig. - Page 15 Figure/Photo Description 3) Set the silicone sheet on the belt as shown in Fig. f. * Remove any dust or foreign object on the silicon sheet before operation. * Change the sheet if deteriorated, scratched or torn. Fig. f Silicone sheet (Both sides can be used.) 4) Place the upper pre-setter over the silicone sheet as shown in Fig.
- Page 16 8-4) Endless splicing Figure/Photo Description This machine reaches a WARNING high temperature in operation. Wear heat-resistant gloves when carrying out the following works. 1) Place the pre-setter prepared as described in section 8-2) Belt setting on page 12, between pre-setter guides as shown in Fig. Presetter guide * Place the pre-setter at the center as Fig.
- Page 17 Figure/Photo Description Torque limiter 7) To continue endless splicing, prepare the pre-setter by following the procedure of section 8-2) Belt setting and then repeat the procedure of section 8-4) Endless splicing. Be sure to wear heat-resistant gloves WARNING when operating the press.
-
Page 18: Troubleshooting
9. Troubleshooting Abnormal Cause Solution phenomenon The power plug has been Connect the power plug. disconnected. The fuse has blown out. Replace the fuse. Failure of the temperature controller or No display on the disconnection of power cable or internal temperature controller wiring is suspected. -
Page 19: Inspection
10. Inspection Check item Date/check Date/check Date/check Date/check Date/check The power cable have no flaw. The temperature controller is not damaged. There is no screw or part missing. The machine body is not damaged. Heat plates have no resin or foreign matter adhered. The pre-setter have no flaw. -
Page 20: Maintenance
11. Maintenance Applying grease to the pressure parts Lightly apply the grease periodically to the point shown below ① through ④. This will deliver a correct pressure. However please do not apply excessively. ① screw ② boss of the screw ③... -
Page 21: Warranty And After-Sales Service
12. Warranty and after-sales service Warranty period The warranty period is for one full year after the delivery of the order at your appointed place. Warranty coverage 1) Should the product malfunction due to causes for which our company is responsible during the abovementioned warranty period, our company will provide a replacement product or repair the product free of charge. - Page 22 Oct, 2020 Rev2 NPS-1210A E - 21 -...