
Related Manuals for National Geographic BRESSER 70/400


Summary of Contents for National Geographic BRESSER 70/400
- Page 1 70/400 AR-TELESKOP AR TELESCOPE Bedienungsanleitung Operating instructions Mode d’emploi Istruzioni per l’uso Instrucciones de uso Руководство по эксплуатации Art.No. 9101003...
-
Page 2: Manual Download
MANUAL DOWNLOAD: Besuchen Sie unsere Website über den Prosimy więc odwiedzić naszą stronę, folgenden QR Code oder Weblink um weitere korzystając z tego linku (QR Code), aby zapoznać Informationen zu diesem Produkt oder die się dostępnymi wersjami. verfügbaren Übersetzungen dieser Anleitung zu finden. -
Page 3: Activation Code
BRESSER AR APP DOWNLOAD PORTAL: ODER / OR / OU / OF / O / ИЛИ / LUB: APP DOWNLOAD „ARTelescope“: Activation Code Apple and the Apple logo are trademarks of Apple Inc., registered in the U.S. and other countries. App Store is a service mark of Apple Inc., registered in the U.S. -
Page 4: Service And Warranty
SERVICE AND WARRANTY: (DE) WARNUNG: Schauen Sie mit diesem Gerät niemals direkt in die Sonne oder in die Nähe der Sonne. Es besteht ERBLINDUNGSGEFAHR! (EN) WARNING: www.bresser.de/warranty_terms Never use this device to look directly at the sun or in the direct proximity of the sun. TELESCOPE GUIDE: Doing so may result in a risk of blindness. - Page 5 ...
-
Page 6: Allgemeine Warnhinweise
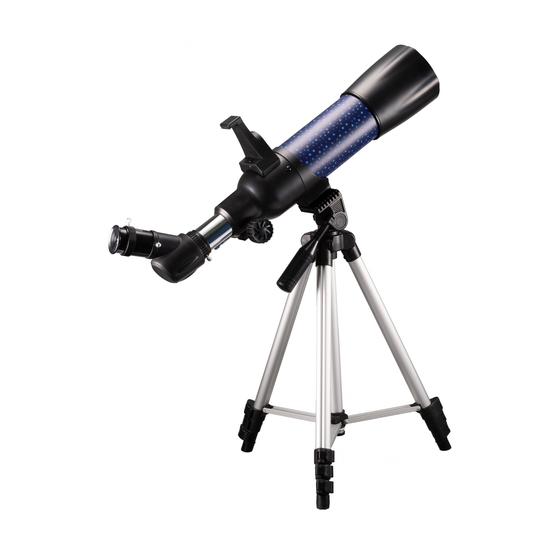
Allgemeine Warnhinweise • ERBLINDUNGSGEFAHR! Schauen Sie mit diesem Gerät niemals direkt in die Sonne oder in die Nähe der Sonne. Es besteht ERBLINDUNGSGEFAHR! • ERSTICKUNGSGEFAHR! Kinder sollten das Gerät nur unter Aufsicht benutzen. Verpackungsmaterialien (Plastiktüten, Gummibänder, etc.) von Kindern fernhalten! Es besteht ERSTICKUNGSGEFAHR! •... - Page 7 Verbinde jetzt das Fernrohr (8) mit dem Stativkopf (Abb. 2). Benutze die Fixierschraube für das Fernrohr (12) um beide Teile fest miteinan- der zu verbinden. Fig. 2 Okular einsetzen Entferne nun die Staubschutzkappe von der Okular- halterung (2). Nun kannst du den Zenitspiegel (3) in die Okularhalterung einsetzen und ihn mit der kleinen Schraube am Stutzen befestigen.
-
Page 8: Batterie Einsetzen
Batterie einsetzen 1. Mit einem Schraubenzieher die Batteriefachabdeckung im Uhrzeigersinn öffnen. 2. Eine CR2032 Knopfzellenbatterie einlegen und dabei auf die richtige Polarität achten. 3. Batteriefachdeckel an passender Position anhalten und gegen den Uhrzeigersinn handfest anziehen. Dein Teleskop benutzen Um das Teleskop nach oben, nach unten und von Seite zu Seite zu bewegen, greife das Fernrohr und be- wege den Tubus kontinuierlich, bis dein Ziel im Okular ins Blickfeld kommt. - Page 9 Microfaser). Das Tuch nicht zu stark aufdrücken, um ein Verkratzen der Linsen zu vermeiden. • Zur Entfernung stärkerer Schmutzreste befeuchten Sie das Putztuch mit einer Brillen- Reinigungsflüssigkeit und wischen damit die Linsen mit wenig Druck ab. • Schützen Sie das Gerät vor Staub und Feuchtigkeit! Lassen Sie es nach der Benutzung – speziell bei hoher Luftfeuchtigkeit –...
- Page 10 3D Montageanimation Gehe zum Startmenü-Bildschirm und tippe auf die obere rechte Ecke, um die 3D-Montageanimation des Teleskops aufzurufen, und tippe auf die Schaltfläche Animation abspielen, um die 3D-Montageanimation in der frei drehbaren Oberfläche anzusehen. Lexikon für Sternbilder Gehe zum Startmenü-Bildschirm und tippe auf das Lexikon-Symbol in der unteren linken Ecke, um auf Informationen über Sternbilder und Objekte des Sonnensystems zuzugreifen.
- Page 11 Sternbild Quiz Gehe zum Startmenü-Bildschirm und tippe auf das Symbol in der unteren linken Ecke, um den Multiple- Choice-Quiz-Modus aufzurufen. AR Sternbild Fotofunktion Gehe zum Startmenü-Bildschirm und tippe unten rechts auf die AR-Sternbildfunktion. Die Namen und Umrisse der Sternbilder im Sichtbereich werden angezeigt, wenn du dein Gerät über den Nachthimmel bewegst.
- Page 12 Smartphone-Halterung (Für Okulare) Öffne die flexible Halterung und setze dein Smartphone hinein. Schließe die Halterung und stelle sicher, dass dein Smartphone richtig fest sitzt. Die Kamera muss genau über dem Okular aufliegen. Öffne dazu den Feststellclip auf der Rückseite der Halterung und passe den Okulareinblick genau auf deine Smartphone-Kamera ein.
-
Page 13: Eg-Konformitätserklärung
Okular (5): Ein Okular ist ein deinem Auge zugewandtes System bestehend aus einer oder mehreren Linsen. Mit einem Okular wird das im Brennpunkt einer Linse entste- hende scharfe Bild aufgenommen und nochmals vergrößert. Für die Berechnung der Vergrößerung gibt es eine einfache Rechenformel: Brennweite des Fernrohrs / Brennweite des Okulars = Vergrößerung Du siehst: Bei einem Teleskop ist die Vergrößerung sowohl von der Brennweite des Okulars als auch von der Brennweite des Fernrohrs abhängig. -
Page 14: General Warnings
General Warnings • Risk of blindness — Never use this device to look directly at the sun or in the direct proximity of the sun. Doing so may result in a risk of blindness. • Choking hazard — Children should only use the device under adult supervision. Keep packaging mate- rial, like plastic bags and rubber bands, out of the reach of children, as these materials pose a choking hazard. - Page 15 Connect the telescope tube (8) to the tripod head (Abb. 2). Use the Fixation screw for the Telescope tube (12) to firmly connect both parts. Abb. 2 How to insert an eyepiece Take the lens cap off the eyepiece holder (2). You can now place the zenith mirror (3) into the eyepiece hol- der and secure it with the small screw on the connec- tor.
-
Page 16: Installing The Battery
Installing the battery 1. Open the battery compartment cover clockwise with a screwdriver. 2. Insert a CR2032 button cell battery, paying attention to the correct polarity. 3. Hold the battery compartment cover in the appropriate position and hand-tighten it anti-clockwise. Using your telescope To move the scope up, down and side to side, grip the telescope and steadily move the tube until your target comes into view in the eyepiece. - Page 17 • To remove more stubborn dirt, moisten the cleaning cloth with an eyeglass-cleaning solution, and wipe the lenses gently. • Protect the device from dust and moisture. After use, particularly in high humidity, let the device ac- climatise for a short period of time, so that the residual moisture can dissipate before storing. How to install &...
- Page 18 3D assembly animation Go to the home menu screen, click the upper right corner to enter the 3D assembly animation of the telescope, and click the animation play button to watch the 3D assembly animation in the freely rotating interface. Encyclopedia for constellations Go to the home menu screen, click the encyclopedia icon in the lower left corner to access information on constellations and solar system objects.
- Page 19 Constellation quiz Go to the main home screen and tap the icon in the lower left corner to enter the multiple choice quiz mode. AR constellation photo function Go to the home menu screen, click the AR constellation function in the lower right. The names and out- lines of constellations in the viewing area will appear as you move your device across the night sky.
- Page 20 Smartphone holder (For eyepieces) Open the flexible holder and put your smartphone in it. Close the holder and make sure your phone is properly secured. The camera must be positioned exactly above the eyepiece. Open the locking clip on the back of the holder and fit the eyepiece exactly onto your smartphone camera.
- Page 21 Eyepiece (5): An eyepiece is a system made for your eye and comprised of one or more lenses. In an eyepiece, the clear image that is generated in the focal point of a lens is captured and magnified still more. There is a simple formula for calculating the magnification: Focal length of the telescope tube / Focal length of the eyepiece = Magnification In a tele- scope, the magnification depends on both the focal length of the telescope tube and the focal length of the eyepiece.
-
Page 22: Consignes Générales De Sécurité
Consignes générales de sécurité • RISQUE DE CECITE ! Ne jamais regarder directement le soleil à travers cet appareil en le pointant direc- tement en sa direction. L’observateur court un RISQUE DE CECITE ! • RISQUE D’ETOUFFEMENT ! Les enfants ne doivent utiliser cet appareil que sous surveillance. Maintenez les enfants éloignés des matériaux d’emballage (sacs plastiques, bandes en caoutchouc, etc.) ! RISQUE D’ETOUFFEMENT ! •... - Page 23 Connectez le tube du télescope (8) à la tête du trépied (Fig.2). Utilisez la vis de fixation du tube du télescope (12) afin de solidariser les deux parties. Fig. 2 Si vous utilisez une lunette astronomique Retire maintenant le couvercle anti-poussière du sup- port de l’oculaire (2).
-
Page 24: Installer La Batterie
Installer la batterie 1. Ouvrez le couvercle du compartiment des piles dans le sens horaire avec un tournevis. 2. Insérez une pile bouton CR2032, en faisant attention à la polarité correcte. 3. Maintenez le couvercle du compartiment des piles dans la position appropriée et serrez-le à la main dans le sens inverse des aiguilles d'une montre. - Page 25 • Pour éliminer les traces plus coriaces, le chiffon peut être humidifié avec un produit liquide destiné au nettoyage de lunettes de vue avant d’essuyer la lentille avec le chiffon en exerçant une pression légère. • Protégez l’appareil de la poussière et de l’humidité ! Après usage, et en particulier lorsque l’humidité de l’air est importante, il convient de laisser l’appareil reposer quelques minutes à...
- Page 26 Animation d'assemblage 3D Accédez à l'écran du menu d'accueil, cliquez sur le coin supérieur droit pour accéder à l'animation d'assemblage 3D du télescope, puis cliquez sur le bouton de lecture d'animation pour regarder l'animation d'assemblage 3D dans l'interface à rotation libre. Animation d'assemblage 3D Accédez à...
- Page 27 Quizz Constellation Accédez à l'écran d'accueil principal et appuyez sur l'icône dans le coin inférieur gauche pour accéder au mode de questionnaire à choix multiples. Fonction photo de constellation AR Accédez à l'écran du menu d'accueil, cliquez sur la fonction de constellation AR en bas à droite. Les noms et les contours des constellations dans la zone de visualisation s'affichent lorsque vous déplacez votre appareil dans le ciel nocturne.
-
Page 28: Renvoi D'angle
Support de smartphone Ouvrez le support coulissant et placez votre smartphone dedans. Fermez le support et assurez-vous que votre téléphone est correctement sécurisé. Le smartphone doit être positionnée exactement au-dessus de l'oculaire. Ouvrez le clip de verrouillage situé à l'arrière du support et placez l'oculaire exactement sur l'objectif de votre smartphone. -
Page 29: Déclaration De Conformité Ce
Oculaire (5): Un oculaire est un système orienté vers ton œil composé d’une ou de plusieurs lentilles. Avec un oculaire, l’image nette du centre d’une lentille est enregistrée et à nouveau grossie. Pour le calcul du grossissement, il existe une formule facile: Distance focale de la lunette / Centre de l’oculaire = grossissement Tu vois: Dans un télescope, le grossissement dépend autant de la distance fo- cale de l’oculaire que de la distance focale de la lunette. -
Page 30: Avvertenze Di Sicurezza Generali
Avvertenze di sicurezza generali • PERICOLO PER LA VISTA! Mai utilizzare questo apparecchio per fissare direttamente il sole o altri ogget- ti nelle sue vicinanze. PERICOLO PER LA VISTA! • PERICOLO DI SOFFOCAMENTO! I bambini possono utilizzare l’apparecchio soltanto sotto la vigilanza di un adulto. - Page 31 Collega il tubo ottico (8) alla testa del treppiede (fig. 2). Utilizzare la vite del tubo del telescopio (12) per collegare saldamente entrambe le parti. Fig. 2 Come inserire un oculare su un telescopio rifrattore Rimuovi il coperchio di protezione antipolvere dal por- taoculari (2).
-
Page 32: Inserire La Batteria
Inserire la batteria 1. Apri il vano batterie con un cacciavite in senso orario. 2. Inserisci una pila a bottone CR2032 rispettando la po- larità. 3. Tieni la copertura del vano batterie nella posizione cor- retta e fissalo a mano ruotando in senso antiorario. Utilizzo del telescopio Per spostare il telescopio verso l'alto, verso il basso e lateralmente, afferra il tubo e muovilo gradualmente finché... - Page 33 • Per rimuovere eventuali residui di sporco più resistenti, inumidire il panno per la pulizia con un liquido per lenti e utilizzarlo per pulire le lenti esercitando una leggera pressione. • Proteggere l’apparecchio dalla polvere e dall’umidità! Dopo l’uso, in particolare in presenza di un’eleva- ta percentuale di umidità...
- Page 34 Animazione 3D del montaggio Vai alla schermata principale, clicca in alto a destra per accedere all’animazione 3D del montaggio del telescopio, poi clicca sul tasto Play per vedere l’animazione 3D del montaggio nell’interfaccia rotante. Enciclopedia delle costellazioni Vai alla schermata principale, clicca sul simbolo dell’enciclopedia in basso a sinistra per accedere a informazioni su costellazioni e oggetti del sistema solare.
- Page 35 Quiz sulle costellazioni Vai alla schermata principale e clicca sull’icona in basso a sinistra per passare alla modalità dei quiz a risposta multipla. Funzione foto alle costellazioni con AR Vai alla schermata principale e clicca sulla funzione Costellazioni AR in basso a destra. Muovendo il dis- positivo vedrai i nomi e i contorni delle costellazioni nell’area di visualizzazione.
- Page 36 Supporto Smartphone Apri il supporto flessibile e mettici dentro il tuo smartphone. Chiudere il supporto e assicurarsi che il tele- fono sia seduto correttamente. La telecamera deve essere posizionata esattamente sopra l'oculare. Aprire la clip di bloccaggio sul retro del supporto e montare la vista oculare esattamente sulla fotocamera del vostro smartphone.
-
Page 37: Dichiarazione Di Conformità Ce
… oculare (5)? Un oculare è il sistema, costituito da una o più lenti, che è rivolto verso l’occhio. Con l‘oculare l‘immagine nitida originata nel punto focale di una lente viene ac- quisita e ulteriormente ingrandita. Per calcolare l’ingrandimento si usa una semplice formula: distanza focale del tubo ottico: focale dell’oculare = ingrandimento In un telescopio l‘ingrandimento dipende sia dalla distanza focale dell‘oculare sia dalla distanza focale del tubo ottico. -
Page 38: Advertencias De Carácter General
Advertencias de carácter general • ¡Existe PELIGRO DE CEGUERA! No mire nunca directamente al sol o cerca de él con este aparato. ¡Existe PELIGRO DE CEGUERA! • ¡Existe PELIGRO DE ASFIXIA! Los niños solo deberían utilizar el aparato bajo supervisión. Mantener los materiales de embalaje (bolsas de plástico, bandas de goma) alejadas del alcance de los niños. - Page 39 Conecte el tubo del telescopio (8) a la cabeza del trípode (Fig. 2). En- roscar el Tornillo de fijación para el tubo del telescopio(12) para co- nectar firmemente ambas partes. Fig. 2 Si usa un telescopio refractor Quita ahora la cobertura de protección contra el polvo del soporte del ocular (2).
-
Page 40: Instalación De Las Pilas
Instalación de las pilas 1. Abra la tapa del compartimento de las pilas en el senti- do de las agujas del reloj con un destornillador. 2. Inserte una pila de botón CR2032, prestando atención a ponerla con la polaridad correcta. 3. - Page 41 per lenti e utilizzarlo per pulire le lenti esercitando una leggera pressione. • Proteggere l’apparecchio dalla polvere e dall’umidità! Dopo l’uso, in particolare in presenza di un’elevata percentuale di umidità dell’aria, lasciare acclimatare l’apparecchio a temperatura ambiente in modo da eliminare l’umidità residua. Cómo instalar y utilizar la App BRESSER ARTelescope Para descargar la aplicación Método 1:...
- Page 42 Animación de montaje en 3D Vaya a la pantalla del menú de inicio, haga clic en la esquina superior derecha para entrar en la anima- ción de montaje 3D del telescopio, y haga clic en el botón de reproducción de la animación para ver la animación de montaje 3D en la interfaz de movimiento libre.
- Page 43 Juego de constelaciones Vaya a la pantalla principal y toque el icono situado en la esquina inferior izquierda para entrar en el modo de preguntas de selección múltiple. Función de foto de la constelación AR Vaya a la pantalla del menú de inicio, haz clic en la función de constelación AR, situado en la parte infe- rior derecha.
- Page 44 Soporte para smartphone Abre el soporte flexible e introduce el smartphone. Cierra el soporte y comprueba que el smartphone está firme y colocado correctamente. La cámara debe estar situada justo encima del ocular. Para ello, abre el clip de fijación en la parte trasera del soporte, y ajusta el visor del ocular exactamente a la cámara de tu smartphone.
-
Page 45: Declaración De Conformidad
Ocular (5): Un ocular es un sistema adaptado para tus ojos compuestos de una o varias lentes. Con un ocular se toma la imagen nítida producida en el punto focal de una lente y se aumenta de nuevo. Para el cálculo del aumento existe una sencilla fórmula aritmética: Distancia focal del telescopio : Distancia focal del ocular = Aumento En un telescopio el aumento depende tanto de la distancia focal del ocular como de la distancia focal del telescopio. -
Page 46: Общие Предупреждения
Общие предупреждения • Опасность ПОТЕРИ ЗРЕНИЯ! Ни в коем случае не смотрите через это устройство прямо на солнце или в направлении солнца. Опасность ПОТЕРИ ЗРЕНИЯ! • Существует опасность УДУШЕНИЯ! Дети могут пользоваться устройством только под присмо- тром взрослых. Храните упаковку (пластиковые пакеты, резиновые ленты и пр.) в недоступном для... - Page 47 Подсоедините трубу телескопа (8) к площадке треноги (рис. 2). Затяните фиксатор трубы телескопа (12), чтобы прочно соединить обе части. Рис. 2 Установка окуляра для телескопа-рефрактора: Установите диагональное зеркало (3) в фокусер и закрепите соединение винтом на фокусере. Вставьте необходимый окуляр (5) в диагональное зеркало...
-
Page 48: Установка Батареек
Установка батареек 1. Откройте крышку батарейного, вращая отвертку по часовой стрелке. 2. Вставьте батарейку типа CR2032, соблюдая полярность. 3. Держите крышку батарейного отсека в соответствующем положении и вручную затяните ее против часовой стрелки. Использование телескопа Чтобы сместить область обзора вверх, вниз или в сторону, возьмитесь за телескоп и постепенно сдвигайте... - Page 49 • Для удаления более сильных загрязнений смочите чистящую салфетку в жидкости для чистки очков и протрите линзы с небольшим усилием. • Защищайте устройство от пыли и влаги! После использования – в особенности при высокой влажности воздуха – подержите устройство некоторое время при комнатной температуре, чтобы...
- Page 50 3D-анимация сборки Перейдите на экран главного меню и прикоснитесь к верхнему правому углу, чтобы вывести 3D-анимацию сборки телескопа. Прикоснитесь к кнопке воспроизведения анимации, чтобы просмотреть 3D-анимацию сборки в свободно вращающемся режиме. Энциклопедия созвездий Перейдите на экран главного меню и прикоснитесь к значку энциклопедии в левом нижнем углу, чтобы...
- Page 51 Тест на знание созвездий Перейдите на экран главного меню и прикоснитесь к значку в левом нижнем углу, чтобы перейти в раздел тестов. Функция астросъемки созвездия Перейдите к экрану главного меню, прикоснитесь к функции астросъемки созвездия в правом нижнем углу. При перемещении смартфона по ночному небу будут отображаться названия и контуры...
- Page 52 Подсветка Откройте гибкий держатель и вставьте в него смартфон. Закройте держатель и убедитесь, что телефон надежно закреплен. Камера должна располагаться точно над окуляром. Откройте зажим на задней стороне держателя и точно вставьте окуляр в камеру смартфона. Теперь снова затяните стопорный зажим и прикрепите адаптер смартфона к окуляру вашего Телескоп. Теперь запустите...
-
Page 53: Сертификат Соответствия Ес
Окуляр (5): Окуляр – это оптическая система, состоящая из нескольких линз. Окуляр получает увеличенное изображение от объектива, увеличивает его еще больше и дает вам возможность насладиться красотой удаленного объекта в деталях. Существует простая формула для расчета увеличения: Фокусное расстояние оптической трубы / Фокусное расстояние окуляра = Увеличение... - Page 56 © National Geographic Partners LLC. All rights reserved. NATIONAL GEOGRAPHIC KIDS and Yellow Border Design are trademarks of National Geographic Society, used under license. Visit our website: kids.nationalgeographic.com Bresser GmbH Gutenbergstr. 2 · DE-46414 Rhede www.bresser.de · info@bresser.de Irrtümer und technische Änderungen vorbehalten.
Need help?
Do you have a question about the BRESSER 70/400 and is the answer not in the manual?
Questions and answers