Table of Contents
Advertisement
Advertisement
Table of Contents

Related Manuals for XAG R150


Summary of Contents for XAG R150
- Page 1 R150 Unmanned Ground Vehicle (Spray Version) User Manual Version 1.0...
- Page 2 To Users Hi there. Thank you for choosing XAG products. For safety reasons and the best experience possible, XAG recommends that you read the User Manual and Disclaimer contained in this document before attempting to use the R150 Unmanned Ground Vehicle.
-
Page 3: Table Of Contents
Contents Product Profile List of Items About the R150 Unmanned Ground Vehicle Structure Emergency Stop Vehicle Assembly Assemble jet sprayer Wiring guideline for jet sprayer control module Install RTK antennas Adjust wheel arm Adjust front wheel arms alone Adjust both front and rear wheel arms... - Page 4 Button/indicator light Checking Battery Level Checking Battery Status Battery Use Instructions Charging Battery Charger Status Indicators Charger Use Instructions Pairing Firmware Update Update ControlStick Update vehicle Connecting to Cloud RTK Base Calibrating Pump Sprayer Test Horizontal control Vertical control Spray settings Operation Mode Waypoint mode Shuttle mode...
-
Page 5: Product Profile
XAG JetSprayer ™ System, XIoT ™ Agriculture IoT System, or other smart agriculture options, the R150 can offer a wide range of services from precision crop protection, field scouting to on-farm material delivery. By delivering industry-leading autonomous solutions that lead to better operating performance and higher operating efficiency, XAG is committed to moving beyond business success alone and bring benefits to both the environment and society. -
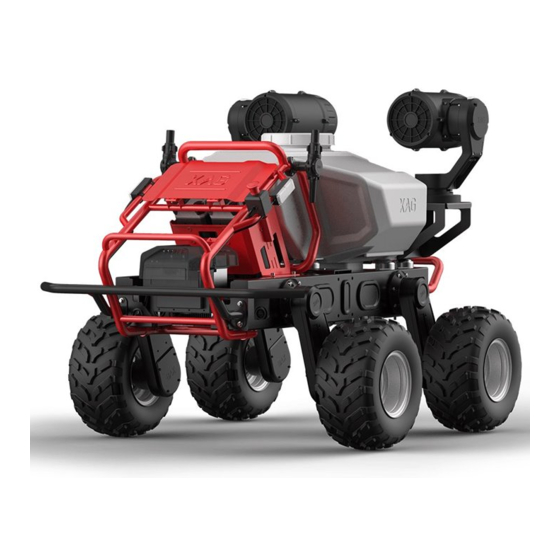
Page 6: About The R150 Unmanned Ground Vehicle
About the R150 Unmanned Ground Vehicle Structure Jet Sprayer Smart Pan Tilt RTK Antenna Battery Hatch Cover Warning Light Liquid Container Emergency Stop Rear Bumper 2.4/5.8GHz Dual-frequency Antenna Wheel Arm Cover Nameplate Wheel Arm Roll Cage Vehicle Frame Control Box... -
Page 7: Emergency Stop
Sprayer Holder Jet Sprayer Control Module Sprayer Connector Vibration Damper Peristaltic Pump Figure 3: Module Structure in Liquid Pump Control Box Emergency Stop Each time before you turn on the power, make sure the red emergency stop button is not pressed; in case of emergency while driving, press the emergency stop button, and the braking device will cut off the power and stop the vehicle. -
Page 8: Vehicle Assembly
Vehicle Assembly Assemble jet sprayer Fix the left and right jet sprayers on the vehicle and tighten the fixing screws (M8*20). Note Inspect underneath the sprayers to distinguish between the left unit and the right one, as shown in the figure below: the arrow points to the vehicle front, L stands for left, and R stands for right. www.xa.com/en... -
Page 9: Wiring Guideline For Jet Sprayer Control Module
Wiring guideline for jet sprayer control module After the jet sprayers are fixed, plug the sprayer connection cable into the sprayer connector on the water pump control box. See the figure below for wiring instructions. Wiring of Jet Sprayer Control Module Liquid container Atomization motor Pan tilt power... -
Page 10: Install Rtk Antennas
Note After the connection cable is plugged in, please use zip ties to affix the cable to the control box holder to avoid cable loosening or wear caused by bumps while the vehicle is in motion. Install RTK antennas Fix the left and right RTK antenna on the vehicle and tighten the fixing screws (M3*8*6). www.xa.com/en... -
Page 11: Adjust Wheel Arm
Adjust wheel arm Both front and rear wheel arms can be adjusted. You may change the vehicle's wheelbase or chassis height by either adjusting the front wheel arms individually or adjusting both front and rear arms col- lectively. Changes made to the wheelbase can improve the vehicle’ s climbing performance. Adjust front wheel arms alone Adjust both front and rear wheel arms www.xa.com/en... -
Page 12: Use R150
Use R150 Activate Steps Visit our User Registration Website at: https:// agri.xaircraft.com/pm/#!/login, register and log Choose "Me" on the homepage, and then click "Scan QR" to begin the process of activation. www.xa.com/en... - Page 13 Enter your activation code (to be acquired from your dealer), and click "Confirm". Check your account information and click "Bind Device". Then your device should be activated. www.xa.com/en...
-
Page 14: Download Xag Agri App
Download XAG AGRI App Before using the R150, please first scan the QR code below to download and install the XAG AGRI App (Android only. Coming soon on iOS). Scan QR code to download/install XAG AGRI App Connect to ACS2 ControlStick In order to control the vehicle with ACS2, please first connect the ControlStick to the XAG AGRI App. -
Page 15: Connect To Xag Agri App
XXX is the serial number marked on the top of the ControlStick, and the default password is 20070401. Open the XAG AGRI App and log in to your account. When the icon on the homepage lights up, it means the phone and the ControlStick are successfully connected. -
Page 16: Controlstick Buttons
ControlStick Buttons After successful pairing, you may control the vehicle as directed by the following guide. Autonomous/remote control switch Press and hold the middle button to switch to autonomous mode. Press any button to switch back to remote control mode. Unlock/Unpark Press and hold the two buttons on the back of the ControlStick at the same time to unlock the vehicle,... -
Page 17: Speed Settings
Speed settings Press the button to broadcast the current speed level (Level 1: 0.4m/s, Level 2: 0.8m/s, Level 3: 1.2m/s). Press the button to accelerate the vehicle. Press the button to decelerate the vehicle. Smart mode Double click the button to enter/exit follow-me mode. -
Page 18: Smart Battery Preparation
Smart Battery Preparation Install The R150 comes with the B13860S Smart Battery by default, and can be powered by either one or two B13860Ses. Open the battery hatch cover and insert the smart battery into the slot. A “ click” should be heard, which indicates that the battery is in place. -
Page 19: Checking Battery Status
• It is strictly forbidden to use batteries other than those provided by XAG, or to dismantle or replace a battery without authorization. For repairs or replacement, please contact XAG or a designated dealer. -
Page 20: Charging Battery
• When the battery is found swollen, leaking, deformed, or damaged, stop using the battery immediately and contact XAG or your dealer promptly. • The liquid inside the battery is highly corrosive. If it is inadvertently contacted with your skin or eyes, rinse with clean water and seek medical advice immediately. -
Page 21: Charger Use Instructions
• When the Super Charger is found damaged, stop using the battery immediately and contact your dealer. Note The battery must be charged using the devices produced by XAG. The user shall bear the responsibility for all consequences caused by the use of charging devices not produced by XAG. www.xa.com/en... -
Page 22: Pairing
Pairing Steps For first time use, please pair the device via the XAG AGRI App. Once your ControlStick and smartphone are connected, open the XAG AGRI App, swipe right on the homepage or click the profile photo, and select "Devices" to view the list of devices. - Page 23 Power on the Smart Battery when the prompt “Please set device to pairing mode” is displayed on the screen. The vehicle should be powered off for more than 10 seconds before being powered on again. Wait until your vehicle is shown on the pairing page, and click on it to pair.
- Page 24 Having your vehicle paired, select it in the device list and click "Deploy". If "Deploy" is marked next to the vehicle's name, it means it is functioning normally. www.xa.com/en...
-
Page 25: Firmware Update
Firmware Update Firmware (including ControlStick firmware and unmanned vehicle firmware) needs to be checked before using the R150 to confirm if there are new versions available; if so, follow the update procedure to update the firmware to the latest version. - Page 26 Choose the module to be updated, and click on "Update". Once the firmware update is complete, follow the instructions to restart the ControlStick, and the system will be automatically updated. Do not disconnect the smartphone and the ControlStick while downloading or transmitting data.
- Page 27 After the update is complete, return to the home- page and click on the icon to view informa- tion on the ControlStick. Check whether the corresponding firmware has been updated to the latest version; if not, please follow the above steps again. www.xa.com/en...
-
Page 28: Update Vehicle
Update vehicle Open the XAG AGRI App , swipe right on the homepage or click on the profile photo, and Se- lect "Devices" . Choose the vehicle to be updated, and click on "Update". www.xa.com/en... - Page 29 Choose the module to be updated, and click on "Update". Once the firmware transfer is complete, follow the instructions to restart the vehicle, and finish the update. Do not disconnect the smartphone and the ControlStick while downloading or transmitting data. www.xa.com/en...
- Page 30 After the update is completed, return to the homepage and click on the icon to view infor- mation on the vehicle. Check whether the firmware has been updated to the latest version; if not, please follow the above steps again. www.xa.com/en...
-
Page 31: Connecting To Cloud Rtk Base
Connecting to Cloud RTK Base Before being operated on, the R150 needs to be connected to a base station with a strong signal, so that the vehicle can obtain stable and effective differential data during operation. If there is no Cloud RTK Base in the operation area, please refer to "RTK Rover/Portable Base"... - Page 32 Select "Cloud RTK Base" . Select the cloud RTK base with the shortest phys- ical distance and the strongest singal, and click on "Connect". www.xa.com/en...
-
Page 33: Calibrating Pump
After a successful connection, the name of the connected station will be displayed on the right of the "Base Station" on the page displaying GPS system parameters. Calibrating Pump Before each spraying operation, please first calibrate the pump of the liquid container to ensure the information on liquid volume is accurate. -
Page 34: Sprayer Test
Sprayer Test You may change spraying parameters and yaw angle when the vehicle is at a standstill, so that the jet sprayers can spray at a specified point or within a specified range. Click on the icon on the homepage to view information on the vehicle. -
Page 35: Horizontal Control
Horizontal control Turn on/off "Synchronous Control", and swipe the vertical control bar to synchronously/sepa- rately set the range of vertical swing of the left and right sprayers. Turn on/off "Swing", and swipe the vertical con- trol bar to synchronously/separately set the an- gle or range of vertical swing of the left and right sprayers. -
Page 36: Spray Settings
Spray settings Click "Dosage", "Atomization" or "Air Speed" to set the corresponding parameters by sliding left or right. "Spray Test" on the page of spray system parameters allows simulative debugging of the "Dosage", "Atomization" or "Air Speed” of the pan tilt. -
Page 37: Operation Mode
Operation Mode The R150 can be controlled by both the ControlStick and the XAG AGRI App, with three operation modes available: waypoint mode, shuttle mode and follow-me mode. These modes are designed for different operational requirements, farmland conditions, crop types, etc. to match your personal farming needs. - Page 38 Select the "Survey" mode in the pop-up menu below. Type in the name of the new field, select route type and click "OK" . www.xa.com/en...
- Page 39 Click on the icon on the upper right corner, and select the "HD" mode. Click the icon on the upper left corner, and choose "Mapping By Rover" in the pop-up menu. www.xa.com/en...
- Page 40 Select "BOUNDARY", move the red cross cursor on the map to the desired boundary point, and click "Record" to define it as a boundary point of the plot; Select "OBSTACLE", move the red cross cursor within the marked field, and click "Record" around an obstacle to define its boundary points;...
- Page 41 C l i c k t h e i c o n t o v i s i t t h e b o u n d a r y management page where you may change boundary points if necessary. Click any field boundary line, and the system will automatically generate a route using the boundary as the base line.
- Page 42 Click the icon on the upper right and choose "Upload" to upload the field. ACS2 RTK Insert the differential positioning module (RTK) into the top of the ControlStick. A "click" will be heard when it is installed correctly. www.xa.com/en...
- Page 43 O p e n t h e X AG AG R I A p p , s w i p e r i g h t o n homepage or click the profile photo, and select "Field". Click the icon on the page to create a new field.
- Page 44 Select the "Survey" mode in the pop-up menu below. Type in the name of the new field, select route type and click OK. www.xa.com/en...
- Page 45 Click the icon on the upper left corner, and choose "Mapping By Rover" in the pop-up menu. Choose your ACS2 RTK. www.xa.com/en...
- Page 46 Press and hold the button on the ControlStick for 3 seconds to enter the surveying and mapping mode. Hold your ControlStick and move to a location, choose "BOUNDARY", "OBSTACLE" or "RESTRICTED ZONE" on the App and click "Record" to define it as a boundary point. www.xa.com/en...
- Page 47 Click the icon to set parameters such as spray width, safety distances from the boundary, restricted zone, and obstacle. After setting these parameters, return to the page of field creation. Click the icon to visit the page of boundary management, where you may change boundary points if necessary.
- Page 48 Click any boundary line of the field, and the sys- tem will automatically generate a route using the boundary as the baseline. Click the icon on the upper right and choose "Upload" to upload the field. Upon completion, press and hold the button on the ControlStick for 3 seconds to exit surveying and mapping mode.
- Page 49 Create operation order Open the XAG AGRI App , click "Please Select Task" on top to view the list of operation orders. Click "NEW TASK" at the bottom. www.xa.com/en...
- Page 50 Fill in the information on the order of operation, and click "Confirm" to return to the list of orders. Click the operation order created to view information on field. www.xa.com/en...
- Page 51 Click the icon , and select " Add" in the pop- up menu. Choose the corresponding field, and click "Confirm" on the upper right corner. www.xa.com/en...
- Page 52 Page 50). Start operation Before a spray operation, please first add an appropriate volume of liquid into the container. Open the XAG AGRI App , swipe right on the homepage or click the profile photo, and select "Operation" .
- Page 53 Click "Please Select Task" on top to view the list of operation orders. Click the operation order. www.xa.com/en...
- Page 54 Choose the field to be operated, and click the × icon to return to the operation page.. Long press the name of the vehicle shown on the menu bar below or the red arrow on the map and drag it to the field. www.xa.com/en...
- Page 55 Then the menu bar below will show the required operation parameters to be set. Set departure speed Click "Departure" in the menu bar at the bottom of the operation page to set the speed for the vehicle to enter the route by swiping left and right. www.xa.com/en...
- Page 56 Select route Click "Route" in the menu bar at the bottom of the operation page to set the route for operation. Set return speed Click "Return" in the menu bar at the bottom of the operation page to set the speed for the vehicle to exit the route and return by swiping left and right.
- Page 57 Spray mode Click "Spray Mode" in the menu bar at the bottom of the operation page to set the pan tilts of the sprayers. Set parameters for Horizontal Swing Control and Vertical Position Control of the sprayer's pan tilt. www.xa.com/en...
- Page 58 Set dosage Click "Dosage" on the operation page to set the dosage and degree of atomization as required. After setting, click "Upload Route" . www.xa.com/en...
- Page 59 Check if the prerequisite conditions are met and tick the boxes accordingly, and then slide the confirm button to the right. After the route has been uploaded, the vehicle will automatically start the operation. To pause operation, click the pause button and the vehicle will suspend current operation.
-
Page 60: Shuttle Mode
Shuttle mode Record a designated route with the ControlStick, then the vehicle can make automatically shuttles between those locations. Double click the button to enter/exit the shuttle mode. Driving the vehicle along a certain route, the sys- tem will automatically record the driving path. Press and hold the B button, then the system will learn the path. - Page 61 When the vehicle begins path learning /auto shuttle, the homepage of the XAG AGRI App will display the icon and the status information of the vehicle. www.xa.com/en...
-
Page 62: Follow-Me Mode
Follow-me mode With the aid of the RTK on the ACS2, the vehicle can move safely behind you and follow your track. Double click the button on the ControlStick to enter the follow-me mode. After the sixth light on the ControlStick is on in green, press and hold the A button. -
Page 63: Technical Specifications
Technical Specifications Unmanned Ground Vehicle Overall dimensions: 1515×1090×1105mm Power battery: B13860S smart battery Net weight: 200kg Single batter capacity: 865.8Wh Rated load: 150kg Upslope angle: ≤ 15° Motor : 2x Downslope angle: ≤ 15° Rated power of single motor: 1.5kW Protection grade: IP54 Rated speed of motor: 70r/min Maximum drive speed: 1.4m/s... -
Page 64: Safety Instructions
Safety Instructions • Ensure that all operations are carried out in an open area away from obstacles and crowds, and free from all kinds of risks. • Operators should thoroughly read the Product Manual and be familiar with how to operate the vehicle. -
Page 65: Disclaimer
XAG servers during use. In the event that the drive records and data fail to be uploaded and saved and XAG fails to analyze the drive records and data due to any reason caused by the user, XAG will not assume any responsibility. -
Page 66: Warning
This product is not suitable for children and people under the age of 18. Do not use the parts that are not officially provided or suggested by XAG. Please strictly follow XAG's instructions to install and use the product within the intended scope of use. - Page 67 WeChat Public Account of XAG...
- Page 68 All information of this User Manual (including but not limited to any text description, illustrations, photos, methods and processes, etc.) belongs to XAG Co., Ltd. and is protected by copyright law. Without written authorization, no individual or institution is allowed to reproduce, extract, translate, distribute or otherwise reproduce or quote any content hereof.
Need help?
Do you have a question about the R150 and is the answer not in the manual?
Questions and answers