Table of Contents
Advertisement
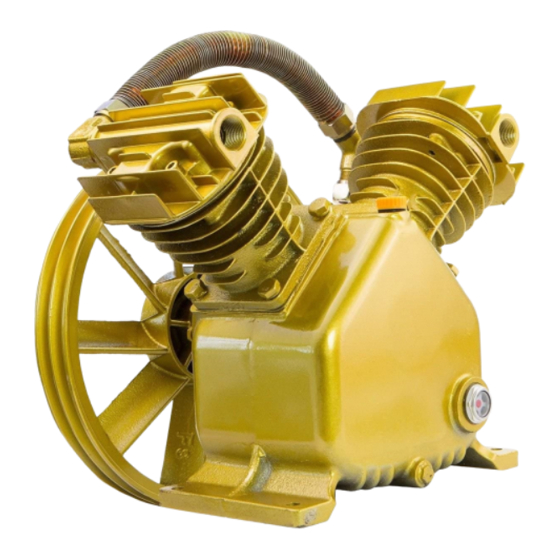
5HP TWIN CYLINDER COMPRESSOR PUMP
ITEM: 65027
OWNER'S MANUAL AND SAFETY INSTRUCTIONS
SAVE THIS MANUAL: KEEP THIS MANUAL FOR SAFETY WARNINGS, PRECAUTIONS, ASSEMBLY,
OPERATING, INSPECTION, MAINTENANCE AND CLEANING PROCEDURES. WRITE THE PRODUCT'S
SERIAL NUMBER ON THE BACK OF THE MANUAL NEAR THE ASSEMBLY DIAGRAM (OR MONTH
AND YEAR OF PURCHASE IF PRODUCT HAS NO NUMBER).
FOR QUESTIONS PLEASE CALL OUR CUSTOMER SUPPORT: (909) 628 0880 MON-FRI 9AM TO 3PM PST
Advertisement
Table of Contents

Related Manuals for Stark 65027


Summary of Contents for Stark 65027
- Page 1 5HP TWIN CYLINDER COMPRESSOR PUMP ITEM: 65027 OWNER’S MANUAL AND SAFETY INSTRUCTIONS SAVE THIS MANUAL: KEEP THIS MANUAL FOR SAFETY WARNINGS, PRECAUTIONS, ASSEMBLY, OPERATING, INSPECTION, MAINTENANCE AND CLEANING PROCEDURES. WRITE THE PRODUCT’S SERIAL NUMBER ON THE BACK OF THE MANUAL NEAR THE ASSEMBLY DIAGRAM (OR MONTH AND YEAR OF PURCHASE IF PRODUCT HAS NO NUMBER).
-
Page 2: Important Safety Information
IMPORTANT SAFETY INFORMATION GENERAL SAFETY WARNINGS Read all safety warnings and instructions. Failure to follow the warnings and instructions may result in electric shock, fire and/or serious injury. Save all warnings and instructions for future reference. SAFETY The warnings, precautions, and instructions discussed in this instruction manual cannot cover all possible conditions and situations that may occur. - Page 3 Industrial applications must follow OSHA guidelines. Maintain labels and nameplates on the Compressor Pump. These carry important safety information. If unreadable or missing, contact Stark Tools for a replacement. This product is not a toy. Keep it out of reach of children WARNING: The brass components of this product contain lead, a chemical known to the State of California to cause cancer and birth defects or other reproductive harm.
- Page 4 IMPORTANT SAFETY INFORMATION The use of accessories or attachments not recommended by the manufacturer may result in a risk of injury to persons. USE OF AN EXTENSION CORD IS NOT RECOMMENDED. If you choose to use an extension cord, use the following guidelines: Make sure your extension cord is in good condition.
-
Page 5: Parts Information
PARTS INFORMATION 1. AIR FILTER ASSEMBLY 2. CYLINDER 3. OIL FILL PLUG 4. OIL SIGHT GLASS 5. OIL DRAIN PLUG 6. CRANKCASE 7. PUMP PULLEY 8. CYLINDER HEAD... - Page 6 ASSEMBLY 1. Place a small amount of grease in the slot at the tapered end of the Crankshaft (49) and insert the Woodruff Key (50) into the slot. 2. Make sure that the center hole and the keyway on the Pump Pulley (58) are clean and free of burrs and rough edges.
-
Page 7: Installation
INSTALLATION NOTE: Depending on your level of expertise, you may wish to have a qualified technician perform this installation. NOTICE: Avoid damage to the Air Compressor Pump and other equipment. The Compressor Pump mounting platform should be flat, level, and strong enough to support the combined weight of the Pump, electric motor or engine, and related hardware and equipment. -
Page 8: Checking The Oil
INSTALLATION 9. Move the Compressor Pump back to its mounting position and secure each corner of the base with a 3/8” diameter grade 5 or better bolt, washer, lock washer, and nut (all not included). 10. Make final alignment and adjust belt tension with the motor. It may be necessary to loosen the motor mounting bolts to adjust the motor location. - Page 9 DIGITAL CONTROL INTERFACE FIGURE D: PORTABLE AIR SUPPLY SETUP...
-
Page 10: Cleaning, Maintenance, And Lubrication
MAINTENANCE TO PREVENT SERIOUS INJURY FROM ACCIDENTAL OPERATION: Turn the power switch “OFF” and unplug the motor from its electrical outlet before performing any inspection, maintenance, or cleaning procedures. TO PREVENT SERIOUS INJURY FROM COMPRESSOR FAILURE: DO NOT use damaged equipment. If abnormal noise or vibration occurs, have the problem corrected before further use. -
Page 11: Oil Maintenance
OIL MAINTENANCE Check the oil periodically for clarity. Replace oil if it appears milky or if debris is present, or every 6 months, or 100 hours of runtime, whichever comes first. In harsh environments such as high heat or high humidity, you will need to replace the oil more frequently. -
Page 12: Troubleshooting
TROUBLESHOOTING... -
Page 13: Parts Diagram
PARTS DIAGRAM... -
Page 14: Parts List
PARTS LIST... - Page 15 DISCLAIMER PLEASE READ THE FOLLOWING CAREFULLY THE MANUFACTURER AND/OR DISTRIBUTOR HAS PROVIDED THE PARTS LIST AND ASSEMBLY DIAGRAM IN THIS MANUAL AS A REFERENCE TOOL ONLY. NEITHER THE MANUFACTURER OR DISTRIBUTOR MAKES ANY REPRESENTATION OR WARRANTY OF ANY KIND TO THE BUYER THAT HE OR SHE IS QUALIFIED TO MAKE ANY REPAIRS TO THE PRODUCT, OR THAT HE OR SHE IS QUALIFIED TO REPLACE ANY PARTS OF THE PRODUCT.
Need help?
Do you have a question about the 65027 and is the answer not in the manual?
Questions and answers