
Related Manuals for Dvico TViX HD M-4000PA


Summary of Contents for Dvico TViX HD M-4000PA
-
Page 1: User Manual
User Manual TViX HD M-4000PA(PATA) TViX HD M-4000SA(SATA) All specifications and information are subject to changes without further notices... -
Page 2: Safety Notice
Safety Notice Do not disassemble the device; it may cause malfunction or fire Do not expose TViX to oil, smoke, water, humidity and dust. Do not touch power plug with wet hands or do not use defective power cable & loose outlet. It may cause electric shock or fire Do not take out the internal hard drive by yourself. -
Page 3: Usage Precautions
Usage Precautions Please read the following usage precautions before using your TViX HD. Make sure the power is off when you connect the A/V cable between the TViX and the TV. When cleaning the TViX product, pull out the power cord and then wipe it with a soft piece of dry cloth. When connected to the computer through the USB cable the TViX HD acts as an external USB storage device (In this state, there is no video/audio output and the VFD will show as USB ON). -
Page 4: Table Of Contents
Safety Notice ... 2 Usage Precautions ... 3 Introduction... 5 Multimedia Player ... 5 Audio Player ... 6 External Storage ... 6 Specifications ... 7 Name of Each Part ... 8 Control Panel ... 8 Cable Connection ... 8 Package Contents ... 8 Installation and Connection ... -
Page 5: Introduction
1 Introduction Multimedia Player TViX HD plays back DVD movies with the full functionality of DVD navigation. You can create your own virtual DVD library by storing your personal collection of DVDs in .ISO or .IFO format and watch them exactly as if they were running from the original DVDs (all original features included: Menu, Chapter, Audio Stream, Subtitle, Fast Forward, Rewind, Slow, Pause, Step Forward, Repeat, Search etc.). -
Page 6: Audio Player
Audio Player TViX HD can play a variety of audio files such as FLAC,MP3, Ogg Vorbis or WMA (Windows Media Audio) through the TV speaker and any other audio systems. You can listen to your favorite music files nonstop, by organizing a custom winamp playlist. -
Page 7: Specifications
Text Subtitle : smi,sub,srt,aqt,utf,lrc Subtitle Image Subtitle : sub (with idx) TViX HD M-4000SA : SATA Hard Disk TViX HD M-4000PA : PATA(IDE) ODD Support Through USB 2.0 Host English, French, German, Spanish, Italian, Swedish, Czech, Russian, Mexican, Language Japanese, Chinese, Korean... -
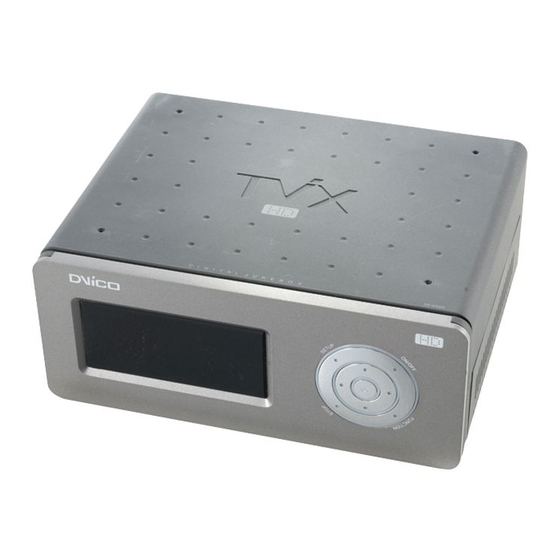
Page 8: Components View
2 Name of Each Part Control Panel Basic functions can be done without the remote control. Cable Connection You can connect the TViX to a TV display or audio Amplifier using the A/V cable. There is detail instruction for tuner box on the quick guide of optional tuner box package. USB HOST DVI OUT POWER... -
Page 9: Installation And Connection
3 Installation and Connection Making an HDD Folder 1. As shown in the picture below, one end of the USB cable should be connected to the USB connector of the TViX and the other end to the computer. CAUTION! The USB cable has a different shape on both ends. -
Page 10: Video Connection
Video Connection We support DVI, Component, S-Video, Composite video output for connecting to the TV and each output needed to change settings on the TViX HD. The highest quality components are as follows: DVI > S-Video > Composite. 3.2.1 Connection with an Ordinary (Composite) TV Output Connect the TViX HD and your TV using the yellow video cable. -
Page 11: Connection To Component Output
3.2.3 Connection to Component Output Connect the TViX HD and your TV with the component cables. Turn on the TViX HD and TV. Select an appropriate video input mode on your TV (in this case, the Component input mode) 3.2.4 Connection to DVI Output Simply connect your TViX HD to the DVI port on the TV. -
Page 12: Audio Connection
Audio Connection 3.3.1 Connection to 2 CH Normal TV Connect the left(white) and right(red) sound output to the appropriate terminal of your TV or Hi-Fi system. 3.3.2 Connection to 5.1CH Amplifier (Digital) If you have a multi-channel decoder/amplifier with an optical/coaxial input, you can enjoy 5.1 CH high quality sound through the coaxial or optical cables. -
Page 13: Lan Connection
LAN Connection 3.4.1 Connect PC via Network < When connecting the computer directly to the TViX HD > Connect the LAN cable to the LAN port of both the TViX HD and the PC. TIPS In this case, you generally use a LAN cross cable type. If the computer’s LAN card was connected to an Internet line, you can install an additional LAN card to your PC and connect that LAN card to the TViX. -
Page 14: Set Network Configurations Under Windows Xp
3.4.2 Set Network Configurations Under Windows XP (SAMBA mode) 3) Use ‘Everyone’ if ‘Everyone’ is displayed, otherwise you don’t have to change anything. Also, add ‘Everyone’ to the security tab. 4) After that, the shared folder will be displayed like the following picture. - Page 15 5) Move to 'Settings' > 'Control Panel' > 'Administrative Tools' > 'Computer Management' > 'Local Users and Groups' > 'Users', and double click ‘Guest’. CAUTION This is for Windows XP Professional. Windows XP Home users cannot see this window. If you cannot find ‘Administrative Tools’...
- Page 16 7) ‘GUEST’ must be shown as the following image (a red X mark should not be shown on ‘Guest’). 8) Move to 'Control Panel' > 'Network connections', and select ‘Local area connections’ properties by right clicking the mouse. 9) Remove “Guest” from the ‘User Rights Assignment’ > ‘Deny access to this computer from the network’ option.
- Page 17 10) Move to ‘Access this computer from the network’, and then select ‘Properties’ by right clicking the mouse or double clicking it. 11) Click ‘Add User or Group’ 12) Type in “Guest” and then click the “OK” button. 13) Press OK, and Guest will be registered.
- Page 18 < When connecting Computer to TViX directly > In this case, you have to use Cross LAN cable type generally.. 1. Move to ‘Control Panel’ > ‘Network connections’, and select ‘Properties’ properties by right click of mouse. 2. When Windows 2000 or XP, Check “Allow other network users to connect through this computer’s internet connection”...
- Page 19 < When connecting with IP Router or Hub > If you have already been provided a dynamic IP address from a DHCP Server or IP Router in your local area network, you don’t need to write a static IP address. Use ‘Obtain an IP address automatically on’ or write an IP address &...
-
Page 20: Setting Network Configurations In Tvix Hd
3.4.3 Setting Network Configurations in TViX HD 2) If you cannot access via LAN with DHCP setting, we recommend to use the Static IP setting. 3) Select 'Control Panel > 'Network Connections', and select 'Status' properties by right clicking the mouse. After clicking the Support tab, press details, and you can see the Network connection details. -
Page 21: Connect Wireless Network
3.4.4 Connect Wireless Network [ Connect USB wireless module ] 1) Connect the USB module into enclosed cradle after connecting the AP Router to a PC. 2) You should not connect the USB module to TViX without cradle. If you connect it by force, the TViX can be damaged. -
Page 22: Hdd Installation/Exchange
HDD Installation/Exchange Warning: If you change the HDD of a TViX equipped with an HDD, the warranty will be voided. TViX M-4000PA < Jumper Settings for TViX M-4000PA only > The ‘Jumper Setting’ differs according to the HDD manufacturers, so please refer to the instructions of the specific HDD provided by the HDD manufacturers. - Page 23 4. Put the HDD into the TViX after spreading the cable to avoid damage PATA HDD SATA HDD 5. Close the lid of TViX. 6. To change the hard disk, pull the hdd’s guide while pushing the locking.
-
Page 24: Tvix Hd Setup Menu
4 TViX HD Setup Menu Audio/Video Setting This section indicates the Audio/Video settings. Setup password protection is available. You can set password to enter into setup menu. (on MISC menu inside SETUP) .This will block children changing setup accidentally. The password is 1111 Audio : Digital DTS Audio : Digital WMA Audio : Analog(PCM) - Page 25 * The 4:3 Pan & Scan will adjust the image of the 16:9 multimedia file to the 4:3 of the TV screen by scaling the image. * 16:9 can adjust any ratio of the multimedia file to the TV screen with the original image. * Video Port : If you fail to see the initial TViX HD screen after turning the unit and TV on, make sure you have chosen the right TV out option by repeatedly pressing the TV Out button on the remote control.
-
Page 26: Misc Setting
MISC Setting This section indicates the MISC settings. Slide Show Effect : Slide Show Delay : Date / Time Setting : FAN Speed : Select Language : Autorun : OSD Display : Safety Lock: Subtitle/Outline: Screen Saver Remote Controller * Slideshow Effect : This is used when playing background music while watching picture slideshows. * Slideshow Delay : Set the slide show time interval (0 sec –... -
Page 27: Network Setting
Network Setting This section indicates the Network settings. Default Network : Wired IP Setting : Wi-Fi IP Setting : Search Wi-Fi Network TViX Network Info Network Disk1 : Network Disk2 : Network Disk3 : Network Disk4 : Restart FTP server FTP Password * IP setting : Default setting is DHCP. -
Page 28: Easy Usage Of Tvix Hd
5 Easy Usage of TViX HD Play Video Files TIPS If you want to play the next video, press the NEXT(▶▶|) button. When installation is successfully finished, you will see screen A. You may copy a video file into the VIDEO folder in advance. -
Page 29: Play Audio Files
Play Audio Files You may copy an audio file into the AUDIO folder in advance and play music files. TIPS If you want to play the next video, press the NEXT(▶▶|) button. 1. If you cannot see screen A, press the MENU button on the remote control. -
Page 30: Play Image Files
Play Image Files 2. Press the PHOTO button. 5. If you want to play the next video, press the NEXT(>>|) button. TIPS You can play the Video and Audio as well as the Photos with the remote control. If you connect the LAN cable or external USB, Network or USB icon is enabled. We’re supporting up to 4 hard disk partition, 4 network PC, 4 USB1 partition and 4 USB2 partition. -
Page 31: Using The Remote Control
6 Using the remote control Basic Functions This indicates Remote Buttons. POWER On/Off button Go to DTV Go to Video Folder @ : / _ - Scroll button Previous File button Navigation Arrow Button REW / FF Change Volume Information button GOTO button SETUP button DVD Menu button... -
Page 32: Descriptions Of Each Buttons
Descriptions of Each Buttons The playback of multimedia files. Basically you can choose the file you want and press the OK button. For playback of DVD files copied to the HDD, please locate the cursor to VIDEO_TS.IFO file and press OK. You can do a full DVD navigation like you would do with a DVD player. - Page 33 <NOTE> INFO Button : • First Press – Shows information of the contents. • Second Press – Shows the elapsed time (the progress bar is displayed on the upper left hand corner of the screen). • Third Press – Show remaining time. •...
- Page 34 - You can set sleep time by pressing function key repeatedly on a remote controller. - SLEEP ON will blink for 30 second before turning off The present playing time will be displayed with the GOTO function. FF/REW Button • AVI : 4X •...
-
Page 35: Audio Playback
6.2.2 Audio Playback When you press the AUDIO button on the remote control, only the AUDIO folder shows in the TViX HD. It applies only to the active partition if you have more than one partition. POWER On/Off button Previous File button Change Volume Displays the audio file information being played Information button... - Page 36 - Press the Shuffle button again to disable the shuffle mode. Supports 10 Sec function when playing WMA, WAV files. 10 sec FF/REW function is available while playing audio files. Supports Lyric Files (.lrc) If the file name of a music file and .lrc file are the same, the lyrics will be displayed automatically. Supports ID3 TAG (ID3V1) when playing MP3 files - Press the INFO button to view the ID3 TAG (ID3V1).
-
Page 37: Image Playback
6.2.3 Image Playback Only the PHOTO folder will show in the TViX HD when pressing the PHOTO button on the remote control. It applies only to the active partition if you have more than one partition. POWER On/Off button Scroll button Previous File button Change Volume Information button... - Page 38 Some non-standard JPEG files may not be displayed If you press the SETUP button, you will see in sequence the Contrast In these menus, you can adjust the Contrast, Brightness and Saturation by pressing the left/right arrow buttons. When you see the picture files, you can play background music. It will check the Autoaudio or Automp3 folder on the root folder of current partition.
-
Page 39: Extra Features
Extra Features 6.3.1 Using the AutoRun Function When you want to play music with the TViX but do not have any display devices, the following function may come in handy. 1. Make a folder and name it, “autorun” in the root directory of the First partition. 2. -
Page 40: Using Wallpaper
6.3.2 Using Wallpaper If you put a JEPG file named "TViX.jpg" under the folder which you want to change the wallpaper, the wallpaper of the folder will be changed. You can select any wallpaper you want by using the various JPEG files of different folders. <Tips>... - Page 41 6.3.3 Playing Background Music while Watching Picture Slideshows (1) Make an autojpg folder in the HDD of TViX HD and copy image files. (2) While users are watching the picture slideshow, the MP3 files can be played as background music. Pressing 0 button, and you can see the audio list.
-
Page 42: Using Internet Radio
6.3.4 Using Internet Radio * Notice - TViX can be connect via network - Download the .pls file or .m3u (WinAmp playlist) file. - Before play the .pls or .m3u file, you must set the network setting (DHCP or Static IP). - TViX supports only shoutcast streaming format and doesn’t support other proprietary streaming formats TViX is available to shoutcast method and don’t support private server. -
Page 43: Firmware Upgrade
7 Firmware Upgrade Firmware Version Check. 1. Connect the TViX HD to your TV and then turn on the TViX HD 2. Press the SETUP button on the top panel and the setup screen will be displayed. 3. Check the latest firmware version of TViX HD at *** You’ll be posted for any firmware updates or news if you fill out the customer registration form at http://www.tvix.co.kr Downloading the Firmware. - Page 44 5. New firmware upgrade is in process (takes about 1 minute). When the upgrade is successfully finished, the TViX HD will reboot automatically. < CAUTIONS: Safe Mode Upgrading > Even if the TViX accidentally turns off during the firmware upgrade, the safe mode will enable the TViX to be re-upgraded.
-
Page 45: Using Usb Connection With The Pc
8 Using USB Connection with the PC TViX HD uses a 3.5” HDD as its contents storage device and works just like an external USB 2.0 hard drive when you connect it to your PC. You need to ensure that your HDD is set to master mode, and connected to the IDE cable and power cable before using it on your PC. - Page 46 3) After rebooting the system, connect the TViX HD. Add New Hardware Wizard will automatically pop up. 4) Select “Search for the best driver for your device” menu and then press the Next button. 5) Do not change any of the menus. Just click “Next”.
- Page 47 6) As shown in the pop up the system will find DVICO USB-ATA Bridge automatically. Press the “Next” button. 7) Press the “Finish” button and the driver installation will be finished.
- Page 48 8) You will be able to see the disk drive inside the TViX HD in the Device Manager tab. < TIPS > Windows ME/2000/ XP will automatically provide the driver, so you do not have to install any extra software. Run Plug &...
-
Page 49: Making A Partition And Formatting The Hdds Under Windows 98Se / Me
Making a Partition and Formatting the HDDs under Windows 98SE / ME Click “Start” and select “Run” and the “Run” window will appear as shown below. Type “fdisk” in the text box of the “Run” window and then click the “OK” button. 1) The following DOS window will appear for the partition program. - Page 50 4) After making partitions, do not reboot the system. Instead turn off the power of the TViX and then turn it back on. By doing so your system will reinitialize the TViX HD. 5) Run Window explorer and you will find the new disk created. Right click the new disk and choose “Format”...
-
Page 51: Making A Partition And Formatting The Hdds Under Windows 2000 / Xp
Making a Partition and Formatting the HDDs under Windows 2000 / 1) Under Windows 2000, you can make a partition and format the HDD using the Disk Manager utility. 2) Right click “My Computer” Choose “manage” from the pop up menu and the “Computer Management” window will appear choose “Disk Management”... - Page 52 5) Select the partition size. If you want one partition, press “Next>”. For FAT32, size is limited to 32000MB or under. 5) Select the Drive Letter. Then press the “Next>” button.
- Page 53 5) Select the partition Format. If you want FAT32, it is limited to 32GBs. 5) When completed, detailed information will appear as shown below. Click the “OK” button to finish.
-
Page 54: Unplug Or Eject Hardware
8.4 Unplug or Eject Hardware 1) On the windows tray, double click the hot swap icon. The “Unplug or Eject Hardware” window will appear. Press the Stop button if you want to unplug the device. 2) Press OK on “Stop a Hardware device” window. 3) Press OK and unplug the device. -
Page 55: Appendix - Technical Terms
9 Appendix - Technical Terms DivX -------------------------------------------------------------------------------- DivX is the name of a revolutionary new video codec which is based on the new MPEG-4 compression standard for video. When you install a video codec on your system it basically works as an add-on to your system with instructions on how to compress/decompress video in that video format. - Page 56 used for motion pictures differs from that featured in consumer and professional audio music and home theater systems, their DTS heritage means end users can enjoy sound that closely matches the original. -------------------------------------------------------------------------------- WMA stands for Windows Media Audio. It is a proprietary format developed by Microsoft for audio streaming and compression.
-
Page 57: Gnu General Public License
10 GNU General Public License Dvico Co., Ltd is using a part of Free Software code under the GNU General Public License in operating TViX player. This General Public License applies to most of the Free Software Foundation’s code and to any other program whose authors commit by using it. - Page 58 TERMS AND CONDITIONS FOR COPYING, DISTRIBUTION AND MODIFICATION 0. This License applies to any program or other work which contains a notice placed by the copyright holder saying it may be distributed under the terms of this General Public License. The "Program", below, refers to any such program or work, and a "work based on the Program"...
- Page 59 b) Accompany it with a written offer, valid for at least three years, to give any third party, for a charge no more than your cost of physically performing source distribution, a complete machine-readable copy of the corresponding source code, to be distributed under the terms of Sections 1 and 2 above on a medium customarily used for software interchange;...
- Page 60 explicit geographical distribution limitation excluding those countries, so that distribution is permitted only in or among countries not thus excluded. In such case, this License incorporates the limitation as if written in the body of this License. 9. The Free Software Foundation may publish revised and/or new versions of the General Public License from time to time.
Need help?
Do you have a question about the TViX HD M-4000PA and is the answer not in the manual?
Questions and answers