Table of Contents
Advertisement
Available languages
Available languages
Quick Links
Advertisement
Table of Contents

Related Manuals for Gorenje BM321A7X-BR-XY032Z


Summary of Contents for Gorenje BM321A7X-BR-XY032Z
- Page 1 BM321A7X-BR – XY032Z www.gorenje.com www.gorenje.com www.gorenje.com.br...
- Page 3 Instruções de utilizção / Forno de Micro-ondas PT ............................4 Instruction manual / Microwave oven EN ............................27...
-
Page 4: Estimado Cliente
FORNO MICRO-ONDAS ESTIMADO CLIENTE Agradecemos sua confiança ao adquirir um aparelho da nossa marca. Acreditamos que, em breve, você se certificará de que realmente pode confiar em nossos produtos. Este manual tem o objetivo de facilitar a utilização do seu novo aparelho. -
Page 5: Instruções De Segurança Importantes
INSTRUÇÕES DE SEGURANÇA IMPORTANTES Nunca encoste nas superfícies de aparelhos destinados ao aquecimento ou cozimento quando estes estiverem ligados, pois elas atingem temperaturas extremamente elevadas durante o funcionamento. Mantenha as crianças a uma distância segura. Risco de queimadura! Energia de Micro-ondas e Alta Voltagem! Não remova a tampa. - Page 6 • ATENÇÃO! Quando o aparelho estiver no modo combinado, não deixe que as crianças o utilizem sem a supervisão de um adulto, pois ele atinge temperaturas extremamente elevadas (apenas para o modelo com a função Grill). • ATENÇÃO! Se a porta ou a vedação da porta estiverem danificadas, não utilize o forno até...
- Page 7 • O aquecimento de bebidas no forno micro-ondas pode retardar a entrada do líquido em ebulição; por isso, tenha cuidado ao manusear o recipiente com a bebida aquecida. • Os conteúdos de mamadeiras e recipientes com alimentos para bebês devem ser agitados ou misturados após o aquecimento ou cozimento no forno micro-ondas e sua temperatura deve ser verificada antes do consumo a fim de evitar queimaduras.
- Page 8 Esta substituição deve ser feita exclusivamente por uma assistência técnica autorizada da Gorenje. • Não use aparelhos de vapor ou de alta pressão, objetos pontiagudos ou cortantes, produtos de limpeza abrasivos ou agressivos, esponjas...
- Page 9 INSTRUÇÕES GERAIS Segue abaixo uma lista de regras e medidas de segurança DE SEGURANÇA PARA que, assim como para qualquer tipo de aparelho, devem O USO DO APARELHO ser seguidas para garantir o melhor desempenho deste forno: Certifique-se de que o prato giratório, seu eixo de acionamento (encaixe), os braços/suporte para o prato giratório e o trilho de rolamento estejam devidamente posicionados quando o forno estiver em...
- Page 10 – Não use utensílios de porcelana, cerâmica ou barro, se o material do qual é feito tiver poros ou se seu interior não for revestido por um esmalte. – Não use recipientes com abertura restrita, como garrafas com abertura pop-up ou garrafas e recipientes com tampa hermética, pois eles podem explodir quando aquecidos em forno micro-ondas.
- Page 11 15. Os utensílios usados para aquecer ou cozinhar alimentos e líquidos no forno micro-ondas podem ficar quentes devido à transferência de calor dos alimentos para eles. Isso ocorre principalmente se o utensílio ou suas alças/cabos estiverem cobertos com filme plástico. Pode ser necessário o uso de pegadores de panela para manusear o utensílio.
-
Page 12: Painel De Controle
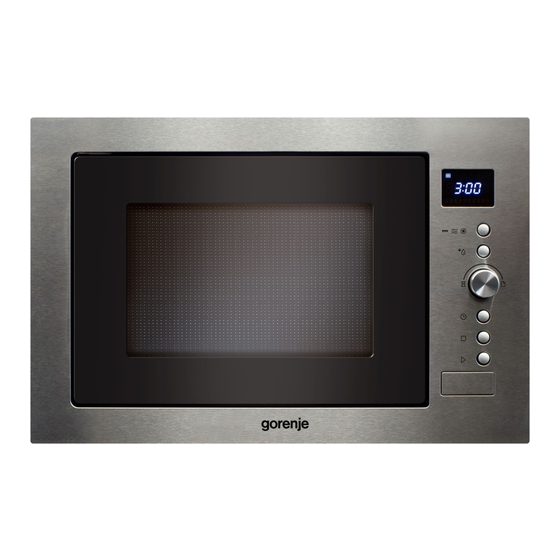
PAINEL DE CONTROLE DISPLAY Convecção Micro-ondas Grill Descongelar BOTÃO GIRATÓRIO Tempo Programas Automáticos Relógio Parar Iniciar BOTÃO PARA ABRIR A PORTA 1. Sistema de Trava de Segurança da Porta 2. Janela do Forno 3. Anel Giratório 4. Prato Giratório 5. Painel de Controle Grelha (deve ser usada apenas para grelhar - função Cozimento com Grill - ou para a função Cozimento Combinado. -
Page 13: Ajuste Do Relógio
FUNCIONAMENTO E OPERAÇÃO AJUSTE DO RELÓGIO Quando o forno micro-ondas é conectado à rede elétrica, os números 0:00 são exibidos e o aparelho emite um sinal sonoro uma vez. 1) Pressione duas vezes, o número correspondente às horas começará a piscar. 2) Gire o Botão Giratório para ajustar as horas –... - Page 14 COZIMENTO COM 1) Pressione a tecla uma vez e o valor “P100” será GRILL exibido no display. 2) Pressione a tecla algumas vezes seguidas ou gire o Botão Giratório para selecionar a função Grill “G- 1”. 3) Pressione para confirmar. 4) Gire o Botão Giratório para ajustar o tempo do Grill (escolha um tempo entre 0:05- 95:00).
- Page 15 2) Pressione a tecla algumas vezes seguidas ou gire o Botão Giratório para selecionar a função Convecção. Quando a temperatura de convecção é exibida, ela indica que a função Convecção foi selecionada. A temperatura pode ser escolhida entre 140°C e 230°C. 3) Pressione para confirmar a temperatura.
-
Page 16: Programas Automáticos
Exemplo: Se você quiser usar a função Descongelar por 5 minutos e, em seguida, cozinhar o alimento com micro-ondas em uma potência de 80% durante 7 minutos. Os passos a serem seguidos são: 1) Pressione duas vezes e o valor “dEF2” será exibido no display. - Page 17 2) Pressione para confirmar o programa que você selecionou. 3) Gire o Botão Giratório para selecionar o peso do alimento – a letra “g” será exibida no display. 4) Pressione para iniciar o cozimento. NOTA: 1) O programa Bolo é realizado no modo de cozimento por convecção com função de preaquecimento a 180 °C e, portanto, o forno é...
- Page 18 Programa Peso Display Função 1 batata - aprox. 230g Micro-ondas 2 batatas – aprox. 460g Batata 100% 3 batatas – aprox. 690g 200ml Micro-ondas 400ml Sopa 100% 600ml 800g Micro-ondas 100% Frango 1000g 1000 220°C Assado Convecção 1200g 1200 Grill Torrada Preaquecimento 180°C...
- Page 19 FUNÇÃO TRAVA DE Para travar: SEGURANÇA PARA No modo de espera (stand-by), pressione por 3 segundos CRIANÇAS – um sinal sonoro longo (bipe) será emitido, indicando a ativação do modo Trava de Segurança para Crianças. Se o relógio tiver sido ajustado, o display exibirá o horário atual. Caso contrário, o display exibirá...
- Page 20 CUIDADOS COM SEU FORNO MICRO-ONDAS Antes de limpar o forno, desligue-o e tire o cabo de alimentação da tomada. 2. Mantenha o interior do forno sempre limpo. Limpe os respingos de alimentos ou líquidos que se aderem às paredes do forno com um pano úmido. O uso de detergentes ou produtos de limpeza abrasivos não é...
-
Page 21: Meio Ambiente
MEIO AMBIENTE Não descarte o aparelho junto com o lixo doméstico comum após o fim de sua vida útil. Leve seu aparelho usado para um centro oficial de coleta seletiva para reciclagem. Ao fazer isso, você ajuda a preservar o meio ambiente. - Page 22 COMO INSTALAR O FORNO MICRO-ONDAS INSTALAÇÃO Certifique-se de que todos os materiais de embalagem foram removidos do interior do forno 2. Após desembalar o aparelho, verifique se ele apresenta algum tipo de dano, como: – Porta desalinhada – Porta danificada –...
-
Page 23: Especificações Técnicas
ESPECIFICAÇÕES Consumo de energia .......... 230V~50Hz, 1550W TÉCNICAS Potência de saída ................1000W Resistência Grill .................1100W Potência de convecção ..............2500W Frequência de funcionamento ..........2450MHz Dimensões externas ..595mm(W)x388mm(H)x468mm(D) Capacidade do Forno ..............32 litres Peso ..................Approx. 22,1 kg Nível de ruído ..............Lc < 58 dB (A) Diâmetro do Prato Giratório ............ - Page 24 ≥ 550 GABINETE EMBUTIDO ≥ 45 560-568 380-382 850 mm INSTALAÇÃO DO FORNO...
- Page 25 ANTES DE CHAMAR UMA ASSISTÊNCIA TÉCNICA Se o forno não estiver funcionando, o display não estiver exibindo informações ou o display estiver completamente apagado: a) Verifique se o forno está conectado corretamente e com firmeza à tomada. Se não estiver, retire o cabo de alimentação da tomada, aguarde 10 segundos e conecte-o novamente do modo correto.
-
Page 26: Garantia E Serviços
Se você precisar de informações ou tiver algum problema, entre em contato com a Central de Atendimento ao Cliente da Gorenje em seu país (você encontra o número de telefone no folheto de garantia mundial). Se não houver uma Central de Atendimento ao Cliente em seu país, entre em contato com seu... -
Page 27: Microwave Oven
MICROWAVE OVEN DEAR CUSTOMER We sincerely thank you for your purchase. We believe you will soon find ample evidence that you can really rely on our products. To make the use of the appliance easier, we attach these comprehensive instruction manual. The instructions should aid you in getting familiar with your new appliance. -
Page 28: Important Safety Instructions
IMPORTANT SAFETY INSTRUCTIONS Never touch the surfaces of heating or cooking appliances. They will become hot during operation. Keep children at a safe distance. There is a risk of burning! Microwave energy & High voltage! Do not remove the cover. WARNING! The appliance and its accessible parts become hot during use. - Page 29 • WARNING: If the door or door seals are damaged, the oven must not be operated until it has been repaired by a competent person; • WARNING: It is hazardous for anyone other than a competent person to carry out any service or repair operation that involves the removal of a cover which gives protection against exposure to microwave energy;...
- Page 30 • Never replace the light bulb inside the oven. It must always be replaced by Gorenje service. • Do not clean the appliance with steam cleaners, high- pressure cleaners, sharp objects, abrasive cleaning...
-
Page 31: Safety Instructions For General Use
SAFETY INSTRUCTIONS Listed below are, as with all appliances, certain rules to FOR GENERAL USE follow and safeguards to assure top performance from this oven: Always have the glass tray, roller arms, coupling and roller track in place when operating the oven. 2. - Page 32 hot to the touch when removed from the oven, please remember that the food/liquid inside will be releasing the same amount of steam and/or spitting when the lid is removed as in conventional cooking. 12. Always test the temperature of cooked food yourself especially if you are heating or cooking food/liquid for babies.
-
Page 33: Control Panel
CONTROL PANEL DISPLAY Convection Microwaves Grill Defrosting JOGGER Time Auto Menu Clock Stop Start BUTTON FOR DOOR OPENING 1. Door Safety Lock System 2. Oven Window 3. Roller Ring 4. Glass Tray 5. Control Panel Grill rack (Only be used for grill or for combination function and be placed on glass tray... -
Page 34: Clock Setting
OPERATION INSTRUCTION CLOCK SETTING When the microwave oven is electrified,the oven will display »0:00«, buzzer will ring once. 1) Press twice, the hour figure flash; 2) Turn »Jogger« to adjust the hour figures, the input time should be within 0-23. 3) Press , the minute figures will flash. -
Page 35: Combination Cooking
food, you should turn the food over, close the door and then press »Start« to continue cooking. If no operation, it will continue working. COMBINATION 1) Press the key once, and »P100« displays. COOKING 2) Press for times or turn »Jogger« to select the combination function from »C-1, C-2, C-3, C-4«... -
Page 36: Convection Cooking (Without Pre-Heating Function)
NOTE: a) Cooking time cannot be input until the preheating temperature arrives. When temperature is reached, door must be opened to put the cooking time. b) If the cooking time not added in 5 minutes, the oven will stop preheating. The buzzer will sound five times and turn back to stand-by. -
Page 37: Speedy Cooking
NOTE: The kitchen time is different from 24-hour system. Kitchen Timer is a timer. During Kitchen timer, none of the programs cannot be set. The timer can be stop by pressing »Stop/Clear«. SPEEDY COOKING 1) In stand-by, press »+30.Sec.« key to cook with 100% power level for 30 seconds. -
Page 38: Defrost By Weight
Menu Weight Display Function 150g 300g Microwave Meat 100% 450g 600g 50g (with water 450g) Microwave 100g (with water 800g) Pasta 150g (with water 1200g) 1 pc app. 230g Microwave 2 pcs app. 460g Potato 100% 3 pcs app. 690g 200ml Microwave 400ml... -
Page 39: Inquiring Function
INQUIRING FUNCTION 1) In cooking states of Microwave, Grill, Combination and Convection, press » «, the current power will be displayed for 2-3 seconds. 2) During cooking state, press to check the current time. It will be displayed for 2-3 seconds. LOCK-OUT FUNCTION Lock: In stand-by, press »Stop/Clear«... -
Page 40: Care Of Your Microwave Oven
CARE OF YOUR MICROWAVE OVEN Turn the oven off and remove the power plug from the wall socket before cleaning. 2. Keep the inside of the oven clean. When food splatters of spilled liquids adhere to oven walls,wipe with a damp cloth. The use of harsh detergent or abrasives is not recommended. -
Page 41: Installation
MOUNTING THE MICROWAVE OVEN INSTALLATION Make sure all the packing materials are removed from the inside of the door. 2. Inspect the oven after unpacking for any visual damage such as: – Misaligned Door – Damaged Door – Dents or Holes in Door Window and Screen –... -
Page 42: Specifications
SPECIFICATIONS Power consumption ..........230V~50Hz, 1550W Output power ..................1000W Grill heater .....................1100W Convection power ................2500W Operating Frequency............... 2450MHz Outside Dimensions ..595mm(W)x388mm(H)x468mm(D) Oven Capacity ................. 32 litres Weight ..................Approx. 22,1 kg Noise level ................Lc < 58 dB (A) Turntable diameter ................ 315 mm This appliance is marked according to the European directive 2012/19/EU on Waste Electrical and Electronic Equipment (WEEE). -
Page 43: Install The Oven
≥ 550 BUILT-IN CABINET ≥ 45 560-568 380-382 850 mm INSTALL THE OVEN BEFORE YOU CALL FOR SERVICE If the oven will not perform at all, the information on the display does not appear or the display disappeared: a) Check to ensure that the oven is plugged in securely. If it is not, remove the plug from the outlet, wait 10 seconds and plug it in again securely. -
Page 44: Guarantee And Service
(you find its phone number in the worldwide guarantee leaflet). If there is no Customer Care Centre in your country, go to your local Gorenje dealer or contact the Service department of Gorenje domestic appliances. Eventual mismatches in colour shades between different... - Page 48 BM321A7X-BR – XY032Z (04-20)
Need help?
Do you have a question about the BM321A7X-BR-XY032Z and is the answer not in the manual?
Questions and answers