Discount Car Stereo A2DIY-C5CD Quick Start Installation Manual
Bluetooth kit for 1994-07 corvette
Hide thumbs
Also See for A2DIY-C5CD:
- Installation manual (10 pages) ,
- Quick start install manual (10 pages)
Table of Contents
Advertisement
Quick Links
Advertisement
Table of Contents

Related Manuals for Discount Car Stereo A2DIY-C5CD


Summary of Contents for Discount Car Stereo A2DIY-C5CD
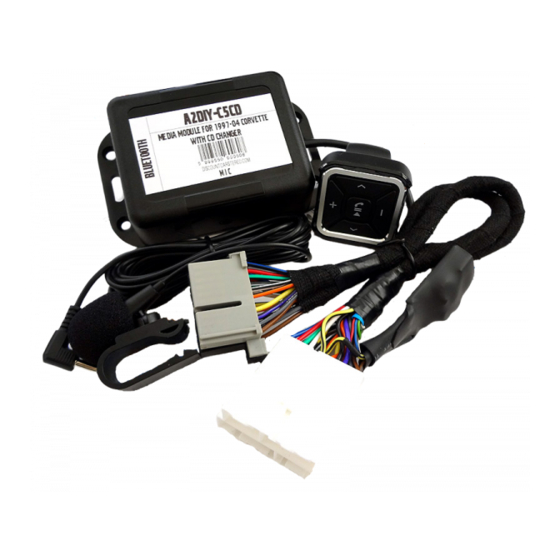
- Page 1 Courtesy of: DiscountCarStereo.com Serving the internet community since 1995 A2DIY-C5CD (Newest Version) QUICK START BLUETOOTH HANDS-FREE INSTALLATION GUIDE FOR SELECT 1997-04 CORVETTE WITH 12-DISC CD CHANGER Created January 16, 2013 Revised April 22, 2021...
- Page 2 In addition, an optional USB charging port is available Fig. 2 to keep devices charged while on the road. Thanks to the A2DIY-C5CD kit users keep the radio and CD changer while enjoying Bluetooth features only available on newer cars.
- Page 3 AUX Jack+ changer playback With this option, AUX plus 12-disc changer playback are possible. Route installation harness aux jack (See Fig. 5) to glove box, dash area etc. (cable is 3 ft. long) 2. Drill a ¼” hole in dash or panel and secure jack with included nut or leave freestanding.
- Page 4 Remove tape backing and attach microphone mounting bracket to Optional button-style microphone: headliner, sun visor etc.; route cable down pillar, under dashboard For added installation flexibility, we offer optional button-style microphone. (See toward module location and connect to module “MIC” input. (See Fig. Fig.
- Page 5 Fig. 11 Flush mount 3 ft. USB cable Optional USB charger can be added to the A2DIY-C5CD Kit. Should you decide to add it, we suggest one of 3 connecting options: A. Flush to dash/panel requires drilling a ¾” hole B.
-
Page 6: Bracket Mount
Fig. 16 Fig. 14 3. Snap USB head (See Fig. 16) to bracket until flush (See Fig. 17) Flush mounted to dash 4. Tuck and secure any extra wire from moving parts and test operation Fig. 17 Bracket Mount (No drilling) 4. - Page 7 Bluetooth Media button Media button Operation: Pairing media button: Once paired with smartphone/Tablet, users may perform the following functions Ensure Bluetooth is enabled on your device (e.g., on iOS devices with Bluetooth 3.0 and later and Android 4.0 or later. Smartphone/Tablet etc.) scan/search for available devices and select BT009 These functions do not apply to the Jaguar radio.
-
Page 8: Bluetooth Pairing And Connection
Bluetooth pairing and connection Test Operation: This process must be carried out upon initial install after which the A2DIY-JAG97 Turn ignition and radio “ON” will automatically reconnect with paired phone. 2. Press AUX button on radio. Go to smartphone settings and enable Bluetooth 3. -
Page 9: Feature Comparison
What is the difference between the C5CD-HF and A2DIY-C5CD? exclusive C5 Bluetooth modules. The A2DIY-C5CD includes media button (remote) and optional push button FYI: Our Bluetooth kits are defined as music streaming and/or hands-free. microphone. The C5CD-HF does not include media button and the push-to-... - Page 10 Email support@discountcarstereo.com © 1995-Apr-21 Discount Car Stereo, Inc. All rights reserved. Information in this document is subject to change without notice. Other products and companies referred to herein are trademarks or registered trademarks of their respective companies or mark holders.
Need help?
Do you have a question about the A2DIY-C5CD and is the answer not in the manual?
Questions and answers