
Related Manuals for AERMEC WLRCA10


Summary of Contents for AERMEC WLRCA10
- Page 1 1 9 . 1 2 - 5 7 9 0 4 1 0 _ 0 0 T r a n s l a t i o n f r o m o r i g i n a l W L R C A 1 0 U s e r m a n u a l REMOTE CONTROL w w w .
- Page 3 Dear customer, Thank you for choosing an AERMEC product. It is the fruit of many years of experience and special design studies and has been made of the highest grade materials and with cutting edge technology. In addition, all our products bear the EC mark indicating that they meet the requirements of the European Machine Directive regarding safety.
- Page 4 CERTIFICATIONS COMPANY CERTIFICATIONS SAFETY CERTIFICATIONS...
-
Page 5: Table Of Contents
INDEX REMOTE CONTROL ..........................................6 FUNCTIONS AVAILABLE THROUGH THE REMOTE CONTROL ..........................8 SWITCHING THE UNIT ON OR OFF ....................................8 SETTING THE OPERATING SET-POINT ....................................8 SELECTING AN OPERATING MODE ....................................9 SETTING THE VENTILATION SPEED ....................................10 ACTIVATING / DEACTIVATING THE TURBO FUNCTION ............................10 SETTING THE MOTORISED DELIVERY FIN (VERTICAL SWING) ...........................11 SETTING THE MOTORISED DELIVERY FIN (HORIZONTAL SWING) ........................11 ACTIVATING / DEACTIVATING THE IFEEL FUNCTION ............................12... -
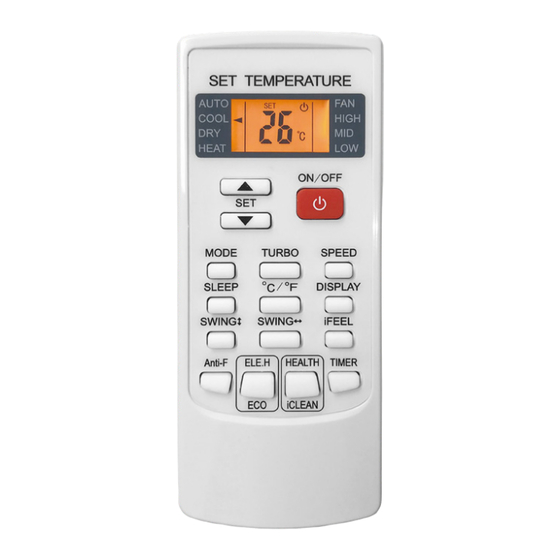
Page 6: Remote Control
REMOTE CONTROL • Some of the buttons of the remote control are not used for the required air conditioner and are therefore not described in these instructions. • Check there are no obstructions between the receiver and the remote control. •... - Page 7 Index Functions represented by the icons Indicates the setting has been Remote control display icons available transmitted to the receiver located on the indoor unit AUTO Indicates the AUTOMATIC mode is active COOL Indicates the COOLING mode is active Indicates the DEHUMIDIFICATION mode is active HEAT Indicates the HEATING mode is active...
-
Page 8: Functions Available Through The Remote Control
FUNCTIONS AVAILABLE THROUGH THE REMOTE CONTROL SWITCHING THE UNIT ON OR OFF By pressing the button it is possible to switch Switching on the unit on or off. When off, some information is still displayed on the remote control: the working set-point of the last mode used, and possibly of the icons linked with the functions activated during the last period of use of the unit. -
Page 9: Selecting An Operating Mode
SELECTING AN OPERATING MODE If the unit is on, you can press the MODE button to pass from one operating mode to another, in the following Operating mode selection sequence: AUTO mode COOL mode DRY mode FAN mode HEAT mode iFEEL The various operating modes have different features and ranges:... -
Page 10: Setting The Ventilation Speed
SETTING THE VENTILATION SPEED Press the SPEED button to modify the fan speed. In the Setting the ventilation DRY mode operation (dehumidification), the fan will speed automatically change to the minimum speed. AUTO HIGH iFEEL Minimum speed Medium speed HIGH Maximum speed AUTO Automatic speed... -
Page 11: Setting The Motorised Delivery Fin (Vertical Swing)
SETTING THE MOTORISED DELIVERY FIN (VERTICAL SWING) Setting the VERTICAL If the unit is on, you can press the SWING button stored delivery fin to activate the swinging movement of the vertical motorised delivery fin. This fin varies the direction of the flow of air into the ambient, on the basis of the selected position. -
Page 12: Activating / Deactivating The Ifeel Function
ACTIVATING / DEACTIVATING THE IFEEL FUNCTION With the remote control close to the user, it is possible Activating / deactivating the to control with precision the surrounding temperature. iFEEL function Press the button iFEEL to activate the function. The symbol on the display shows that the iFEEL function is active. -
Page 13: Air Purifier (Health) Button
AIR PURIFIER (HEALTH) BUTTON FUNCTION NOT AVAILABLE. Setting the air purifier (HEALTH) function iFEEL SETTING THE UNIT SELF-CLEANING FUNCTION (iCLEAN) (ICLEAN) Setting the self-cleaning FUNCTION NOT AVAILABLE. function (iCLEAN) iFEEL... -
Page 14: Enabling / Disabling The Lighting Of The Indoor Unit Display
ENABLING / DISABLING THE LIGHTING OF THE IN- DOOR UNIT DISPLAY Enabling / disabling the lighting of the indoor unit display FUNCTION NOT AVAILABLE. iFEEL ACTIVATING / DEACTIVATING THE ANTI-F EXTENDED VENTILATION FUNCTION Setting the extended FUNCTION NOT AVAILABLE. ventilation function iFEEL... -
Page 15: Setting Or Cancelling A Programmed Switch On (Timer On)
SETTING OR CANCELLING A PROGRAMMED SWITCH ON (TIMER ON) Setting a programmed The units possess a timer used to program switching on switch-on by specifying the time that you want the unit to start. With the unit off, press the TIMER button to access timer programming mode (in this mode, the ”ON”... -
Page 16: Activating / Deactivating The Night-Time Comfort Function (Sleep)
ACTIVATING / DEACTIVATING THE NIGHT-TIME COM- FORT FUNCTION (SLEEP) Setting the SLEEP night-time The SLEEP night-time comfort function controls the air comfort function conditioner in an optimal way during the night. The following logic is applied: • In cooling or dehumidification: the temperature set-point is gradually increased to guarantee maximum comfort combined with energy savings. -
Page 17: Activating / Deactivating The Electric Heating Function
ACTIVATING / DEACTIVATING THE ELECTRIC HEATING FUNCTION FUNCTION NOT AVAILABLE. Activating or deactivating the electric heating function iFEEL ACTIVATING OR DEACTIVATING THE ENERGY SAVING FUNCTION FUNCTION NOT AVAILABLE. Activating or deactivating the energy saving function iFEEL... -
Page 18: Replacing The Remote Control's Batteries
REPLACING THE REMOTE CONTROL’S BATTERIES To replace the batteries of the infra red remote control proceed as follows: 1. Open the battery cover by sliding it in the direction of the arrow. 2. Remove the old batteries 3. Insert two new high-performance R03 (AAA) 1.5V alkaline batteries, taking care not to invert the polarity. - Page 20 DOWNLOAD THE LATEST VERSION: DOWNLOAD THE LATEST VERSION: TÉLÉCHARGER LA DERNIÈRE VERSION: TÉLÉCHARGER LA DERNIÈRE VERSION: http://www.aermec.com/qrcode.asp?q=15102 http://www.aermec.com/qrcode.asp?q=15103 http://www.aermec.com/qrcode.asp?q=15104 A E R M E C S . p . A . V i a R o m a , 9 9 6 - 3 7 0 4 0 B e v i l a c q u a ( V R ) - I t a l y T e l .
Need help?
Do you have a question about the WLRCA10 and is the answer not in the manual?
Questions and answers