Advertisement
OWNER'S MANUAL
ASSEMBLY AND
OPERATING INSTRUCTIONS
WARNING
PLEASE READ THIS ENTIRE MANUAL
BEFORE INSTALLATION AND USE
OF THIS PELLET FUEL-BURNING
APPLIANCE.
FAILURE TO FOLLOW THESE
INSTRUCTIONS COULD RESULT IN
PROPERTY DAMAGE, BODILY INJURY
OR EVEN DEATH.
CONTACT LOCAL BUILDING OR FIRE
OFFICIALS ABOUT RESTRICTIONS
AND INSTALLATION INSPECTION
REQUIREMENTS IN YOUR AREA.
NOTICE TO INSTALLER: LEAVE
THESE INSTRUCTIONS WITH
THE GRILL OWNER FOR FUTURE
REFERENCE.
SAVE THIS MANUAL FOR FUTURE
REFERENCE.
Customer Service Hotline
1-866-994-6390
DO NOT RETURN YOUR GRILL TO THE STORE
Before visiting your local retailer, call our customer
service department at 1-866-994-6390 from 9:00 am
to 5:00 pm Eastern Time, Monday through Friday.
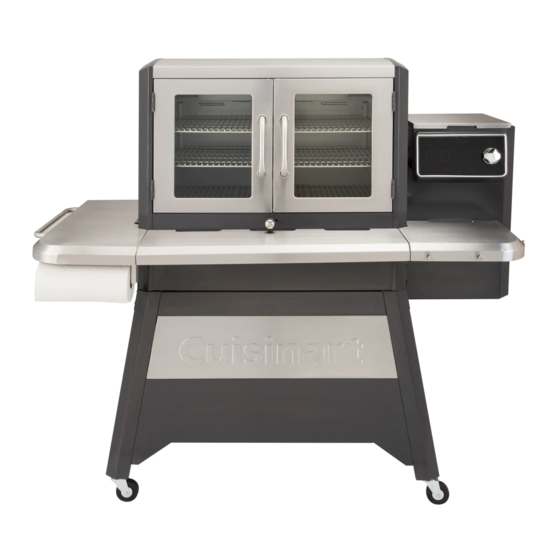
CLERMONT
PELLET GRILL & SMOKER
Model NO: CGWM-080
Advertisement
Table of Contents

Related Manuals for Cuisinart CLERMONT


Summary of Contents for Cuisinart CLERMONT
-
Page 1: Cover
CLERMONT PELLET GRILL & SMOKER Model NO: CGWM-080 OWNER’S MANUAL ASSEMBLY AND OPERATING INSTRUCTIONS WARNING PLEASE READ THIS ENTIRE MANUAL BEFORE INSTALLATION AND USE OF THIS PELLET FUEL-BURNING APPLIANCE. FAILURE TO FOLLOW THESE INSTRUCTIONS COULD RESULT IN PROPERTY DAMAGE, BODILY INJURY OR EVEN DEATH. - Page 2 SAFETY INFORMATION Warnings and Usage IMPORTANT: ALL INSTRUCTIONS AND SAFEGUARDS ON THIS SECTION MUST BE FOLLOWED TO PREVENT DAMAGE AND/OR INJURY. IMPORTANT SAFETY INFORMATION WARNING: For outdoor use only. Do not use near or inside a building, garage or any other enclosed area.
-
Page 3: Table Of Contents
TABLE OF CONTENTS Cover …………….…………..………………………….………...….………….………….….…………………..……..1 Table of Contents……...…….……………………..….………...….………….………………..……….…….…..3 Safety Information……….….....……………………...………...….………….….………….……………..……..4 Exploded View……....………….…………………….…………………….......……….………..5 Parts List….………......……..…..….……...…....……………..………………......6 Assembly Preparation and Instructions…......…………………...……………………….….….…..…..8 Operating the Grill…................…..……..…………………….…..21 Cooking..…………….…………………..………………….…..…...….….……………………...…...25 Care and Maintenance....…......……….………………..…………….……...….….…...…..28 Trouble Shooting..……....…….……………………………………..….…………………..…..…...31 Warranty and Replacement Parts…..………..……….……………………..…………..………….……...33... -
Page 4: Safety Information
SAFETY INFORMATION GENERAL WARNINGS - - - - - - - - - - - - - - - - - - - - - - - - - - - - - - - - - - - - - - - - - - - - - - - - - - - - - - - - - - - - - - - - - - - - - - - - - - - - - - - - - - - •... -
Page 5: Exploded View
EXPLODED VIEW - - - - - - - - - - - - - - - - - - - - - - - - - - - - - - - - - - - - - - - - - - - - - - - - - - - - - - - - - - - - - - - - - - - - - - - - - - - - - - - - - - - *Full parts list with service components is located at the end of the manual. -
Page 6: Parts List
COMPONENTS - - - - - - - - - - - - - - - - - - - - - - - - - - - - - - - - - - - - - - - - - - - - - - - - - - - - - - - - - - - - - - - - - - - - - - - - - - - - - - - - - - - PART DESCRIPTION PART... - Page 7 COMPONENTS - - - - - - - - - - - - - - - - - - - - - - - - - - - - - - - - - - - - - - - - - - - - - - - - - - - - - - - - - - - - - - - - - - - - - - - - - - - - - - - - - - - PART DESCRIPTION PART...
-
Page 8: Assembly Preparation And Instructions
ASSEMBLY PREPARATION Some parts may contain sharp edges. Wear protective gloves during assembly and set up. Read and follow all safety statements, warnings, assembly instructions and use and care instructions before attempting to assemble and use. Before you Begin: Unpack all the components and verify that everything is present before beginning assembly. Several components are packed inside the cooking chamber, it is important to remove these as well. - Page 9 ASSEMBLY INSTRUCTIONS STEP 2 - - - - - - - - - - - - - - - - - - - - - - - - - - - - - - - - - - - - - - - - - - - - - - - - - - - - - - - - - - - - - - - - - - - - - - - - - - - - - - - - - - - •...
- Page 10 ASSEMBLY INSTRUCTIONS STEP 4 - - - - - - - - - - - - - - - - - - - - - - - - - - - - - - - - - - - - - - - - - - - - - - - - - - - - - - - - - - - - - - - - - - - - - - - - - - - - - - - - - - - •...
- Page 11 ASSEMBLY INSTRUCTIONS STEP 6 - - - - - - - - - - - - - - - - - - - - - - - - - - - - - - - - - - - - - - - - - - - - - - - - - - - - - - - - - - - - - - - - - - - - - - - - - - - - - - - - - - - •...
- Page 12 ASSEMBLY INSTRUCTIONS STEP 8 - - - - - - - - - - - - - - - - - - - - - - - - - - - - - - - - - - - - - - - - - - - - - - - - - - - - - - - - - - - - - - - - - - - - - - - - - - - - - - - - - - - •...
- Page 13 ASSEMBLY INSTRUCTIONS STEP 10 - - - - - - - - - - - - - - - - - - - - - - - - - - - - - - - - - - - - - - - - - - - - - - - - - - - - - - - - - - - - - - - - - - - - - - - - - - - - - - - - - - - •...
- Page 14 ASSEMBLY INSTRUCTIONS STEP 12 - - - - - - - - - - - - - - - - - - - - - - - - - - - - - - - - - - - - - - - - - - - - - - - - - - - - - - - - - - - - - - - - - - - - - - - - - - - - - - - - - - - •...
- Page 15 ASSEMBLY INSTRUCTIONS STEP 14 - - - - - - - - - - - - - - - - - - - - - - - - - - - - - - - - - - - - - - - - - - - - - - - - - - - - - - - - - - - - - - - - - - - - - - - - - - - - - - - - - - - •...
- Page 16 ASSEMBLY INSTRUCTIONS STEP 16 - - - - - - - - - - - - - - - - - - - - - - - - - - - - - - - - - - - - - - - - - - - - - - - - - - - - - - - - - - - - - - - - - - - - - - - - - - - - - - - - - - - •...
- Page 17 ASSEMBLY INSTRUCTIONS STEP 18 - - - - - - - - - - - - - - - - - - - - - - - - - - - - - - - - - - - - - - - - - - - - - - - - - - - - - - - - - - - - - - - - - - - - - - - - - - - - - - - - - - - •...
- Page 18 ASSEMBLY INSTRUCTIONS STEP 20 - - - - - - - - - - - - - - - - - - - - - - - - - - - - - - - - - - - - - - - - - - - - - - - - - - - - - - - - - - - - - - - - - - - - - - - - - - - - - - - - - - - •...
- Page 19 ASSEMBLY INSTRUCTIONS STEP 22 - - - - - - - - - - - - - - - - - - - - - - - - - - - - - - - - - - - - - - - - - - - - - - - - - - - - - - - - - - - - - - - - - - - - - - - - - - - - - - - - - - - •...
- Page 20 ASSEMBLY INSTRUCTIONS STEP 24 - - - - - - - - - - - - - - - - - - - - - - - - - - - - - - - - - - - - - - - - - - - - - - - - - - - - - - - - - - - - - - - - - - - - - - - - - - - - - - - - - - - •...
-
Page 21: Operating The Grill
® : This icon will illuminate when a Bluetooth ® connection is established between the Clermont Pellet Grill and a mobile device. • Connection via WiFi: This icon will illuminate when a WiFi or Cloud connection is established between the Clermont Pellet Grill and a mobile device. - Page 22 OPERATING THE GRILL • Fan on: Illuminates when the internal fan is running which provides the firepot with air. • Igniter on: Illuminates when the hot rod is on which ignites the pellets in the fire pot at the beginning of every cook.
- Page 23 - - - - - - - - - - - - - - - - - - - - - - - - - - - - - - - - - - - - - - - - - - - - - - - - - - - - - - - - - - - - - - - - - - - - - - - - - - - - - - - - - - - Many surfaces of your Clermont Pellet Grill have been coated in a thin layer of oil to protect it during shipping.
- Page 24 OPERATING THE GRILL Step 4: Light the contents of the fire pot using a long match or a long lighter. Allow the starter to burn 3 to 5 minutes. Do not attempt to add more starter into the fire pot as this can cause injury. Step 5: Quickly and carefully replace all components removed in Step 3.
-
Page 25: Cooking
- - - - - - - - - - - - - - - - - - - - - - - - - - - - - - - - - - - - - - - - - - - - - - - - - - - - - - - - - - - - - - - - - - - - - - - - - - - - - - - - - - - The Clermont Pellet Grill is equipped with a direct sear mechanism which allows you open an air path between your food and the fire pot. - Page 26 - - - - - - - - - - - - - - - - - - - - - - - - - - - - - - - - - - - - - - - - - - - - - - - - - - - - - - - - - - - - - - - - - - - - - - - - - - - - - - - - - - - There are two food thermometers supplied with your Clermont Pellet Grill. These thermometers are stored under the hopper lid and are meant to be inserted into your food.
- Page 27 COOKING COOKING TIPS: - - - - - - - - - - - - - - - - - - - - - - - - - - - - - - - - - - - - - - - - - - - - - - - - - - - - - - - - - - - - - - - - - - - - - - - - - - - - - - - - - - - CLEANLINESS: •...
-
Page 28: Care And Maintenance
CARE AND MAINTENANCE ASH CLEAN-OUT: - - - - - - - - - - - - - - - - - - - - - - - - - - - - - - - - - - - - - - - - - - - - - - - - - - - - - - - - - - - - - - - - - - - - - - - - - - - - - - - - - - - Before each use, open ash clean-out to get rid of ash and burnt pellets. - Page 29 CARE AND MAINTENANCE PELLET HOPPER CLEAN-OUT: - - - - - - - - - - - - - - - - - - - - - - - - - - - - - - - - - - - - - - - - - - - - - - - - - - - - - - - - - - - - - - - - - - - - - - - - - - - - - - - - - - - If grill will be left un-attended for a long period of time, we recommend you remove unused pellets.
- Page 30 CARE AND MAINTENANCE • Clean inside and outside of grill by wiping off with a damp cloth. Apply a light coat of vegetable oil or vegetable oil spray to the interior surface to prevent rusting. • Never apply paint to the interior surface. Rust spots on the interior surface can be buffed, cleaned, then lightly coated with vegetable oil or vegetable oil spray to minimize further rusting.
-
Page 31: Trouble Shooting
TROUBLE SHOOTING ISSUE RESOLUTION: - - - - - - - - - - - - - - - - - - - - - - - - - - - - - - - - - - - - - - - - - - - - - - - - - - - - - - - - - - - - - - - - - - - - - - - - - - - - - - - - - - - PROBLEM POSSIBLE CAUSE SOLUTION... - Page 32 the fire pot and restart the grill. Temperature fluctuations are normal for pellet grills. Any significant Temperature External Factors fluctuations can be caused by wind, air temperature, improper use, or TROUBLE SHOOTING fluctuations lack of grill maintenance. ISSUE RESOLUTION: - - - - - - - - - - - - - - - - - - - - - - - - - - - - - - - - - - - - - - - - - - - - - - - - - - - - - - - - - - - - - - - - - - - - - - - - - - - - - - - - - - - PROBLEM POSSIBLE CAUSE SOLUTION...
-
Page 33: Warranty And Replacement Parts
WARRANTY AND REPLACEMENT PARTS WIRING DIAGRAM: - - - - - - - - - - - - - - - - - - - - - - - - - - - - - - - - - - - - - - - - - - - - - - - - - - - - - - - - - - - - - - - - - - - - - - - - - - - - - - - - - - -... - Page 34 WARRANTY AND REPLACEMENT PARTS EXPLODED VIEWS - - - - - - - - - - - - - - - - - - - - - - - - - - - - - - - - - - - - - - - - - - - - - - - - - - - - - - - - - - - - - - - - - - - - - - - - - - - - - - - - - - - - - - - - - - - - - - - - - - - - - - - - - - - - - - - - - - - - - - - - - - - - - - - - - - - - - - - - - - - - - - - - - - - - - - - - - - - - - - - - - - - - - -...
- Page 35 WARRANTY AND REPLACEMENT PARTS PARTS LIST: - - - - - - - - - - - - - - - - - - - - - - - - - - - - - - - - - - - - - - - - - - - - - - - - - - - - - - - - - - - - - - - - - - - - - - - - - - - - - - - - - - -...
- Page 36 WARRANTY AND REPLACEMENT PARTS FCC ID: Operation is subject to the following two conditions: (1) This device may not cause harmful interference, and (2) This device must accept any interference received, including interference that may cause any undesired operation. FCC Warning Warning: Changes or modifications to this smoker not expressly approved by the party responsible for compliance could void the user’s authority to operate the equipment.
- Page 37 For replacement parts, call our customer service department at 1-866-994-6390 from 9:00am to 5:00pm Eastern time, Monday through Friday • To register your Cuisinart product, please visit https://cuisinart.registria.com. • For FAQ’s and replacement parts, please contact us at grilling@thefulhamgroup.com. For our consumer care department, please contact us at grilling@thefulhamgroup.com or...
Need help?
Do you have a question about the CLERMONT and is the answer not in the manual?
Questions and answers