Table of Contents
Advertisement
Quick Links
READ AND SAVE THESE INSTRUCTIONS
Thanks for selecting our product.
Please read the user's manual carefully before use for safety and product reliability.
Please keep this information handy for reference.
Please pay special attention to the wording with this marking.
IMPORTANT SAFETY INSTRUCTIONS
● Unplug the fan before maintenance. Do not touch the fan if your hands are wet.
● Do not connect the fan to main power supply or fit the adjusting screw before assembly of the fan blade and the
guards.
● Do not connect to main power supply or switch on the fan before assembly is completed.
● Those who are not qualified electricians should not disassemble, repair or rebuild the fan.
● Unplug the fan when it is not being used.
● Do not unplug the fan by holding the cable cord. Unplug by holding the flexible connector.
● Do not use the fan if the cord or plug has been damaged, or if the power socket is loose.
● Do not make repairs when there is damage to the cord. Do not load the fan with dual cord or bin the cord.
● Do not use the fan near any of the following circumstances: gas stove or any fire source, unusually humid or high
temperature, oil soot with a lot of metal powder, or unstable places not good for oscillation.
● Do not insert your hand into the guards or the moving parts.
● To reduce the risk of fire or electric shock, do not use this fan with any solid-state speed control device.
● Place the fan on a smooth and level surface.
● Do not operate any fan with a damaged cord or plug. Discard fan or return to an authorized service facility for
examination and/or repair.
● Do not run the cord under the carpet. Do not cover cord with throw rugs, runners, or similar coverings. Do not
route the cord under furniture or appliances. Arrange the cord away from traffic area and where it will not be
tripped over.
USER SERVICING INSTRUCTIONS
For products that employ plug with replaceable fuse, please send for qualified electric technician to replace the fuse
in case of replacement required.
Step 1 . Grasp plug and remove from the receptacle or other outlet device. Do not unplug by pulling on the cord.
Step 2 . Open fuse cover. Slide open fuse access cover on top of attachment plug towards blades.
Step 3 . Remove fuse carefully. Push the fuse from the other side or turn fuse holder over to remove fuse.
Step 4 . Risk of fire. Replace fuse only with 5Amp, 125 Volt fuse (provide with product).
Step 5 . Close fuse cover. Slide closed the fuse access cover on top of attachment plug.
FS7-40
1
Advertisement
Table of Contents

Subscribe to Our Youtube Channel
Related Manuals for Star Fans FS7-40


Summary of Contents for Star Fans FS7-40
- Page 1 FS7-40 READ AND SAVE THESE INSTRUCTIONS Thanks for selecting our product. Please read the user’s manual carefully before use for safety and product reliability. Please keep this information handy for reference. Please pay special attention to the wording with this marking.
-
Page 2: Troubleshooting
TROUBLE SHOOTING Please follow checklist below if fan is not working properly during use. If the fan does not run after being switched on. ● Check if the plug is securely connected to the socket ● Check if the plug is knotted or tangled ●... -
Page 3: Installation
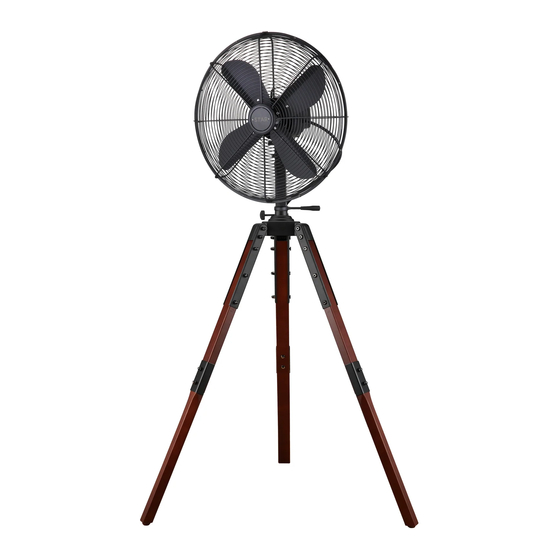
INSTALLATION PARTS NO. PARTS NAME QUANTITY/PCE guard (front & back) 1 SET Fan blade Angle adjusting knob Decorative handle Oscillating knob Speed regulating knob Horizontal angle adjusting knob Flange Tripod fixing plate (for height adjustment) Tripod leg Slippery proof cushion Power cord &... - Page 4 INSTALLATION OF 2-SECTION WOODEN LEGS Step 1: Put the upper leg portion, the lower leg portion and the metal connecting part in alignment Step 2: Fix the 3 parts together by tightening the 2 sets of screws and crown nuts Step 3: Ensure the 3 parts are securely installed INSTALLATION OF TRIPOD LEGS TO THE FLANGE Tripod legs are packed separately with the fan body, installation is required.
-
Page 5: Operating The Fan
Use the sleeve wrench and Allen key wrench to tighten the 2 crown nuts with the 2 long screws. Use the Allen key wrench to tighten the 3 screws with the 3 crown nuts. Notes : Please handle with care when installing the screws to avoid scratch on the flange and the tripod legs fixing plates. -
Page 6: Height Adjustment
Use angle adjusting knob to adjust the up and down of fan head. HORIZONTAL ANGLE ADJUSTMENT Loosen the Horizontal angle adjusting knob Hold the Decorative handle to adjust to the desired horizontal angle and tighten the Horizontal angle adjusting knob. Horizontal angle adjusting knob Decorative handle... - Page 7 Insert the 2 screws through the screw holes of the tripod fixing plates and the wooden leg in alignment. Use Allen key wrench to fix the 3 screws and tighten the crown nuts securely. Down adjustment of fan height: Use Allen key wrench to loosen the 2 screws and the crown nuts Remove the 2 screws between the tripod fixing plates and the wooden leg...
- Page 8 Move the wooden leg up from Position 2 to Position 1 Insert the 3 screws through the screw holes of the tripod fixing plates and the wooden leg in alignment. Use Allen key wrench to fix the 3 screws and tighten the crown nuts securely.
- Page 9 Please ensure the screws are securely tightened to avoid vibration and noise from vibration when the fan is operating, and potential danger. Voltage Frequency Input Power Speed Blade Size Model No. (Hz) (RPM) (in / mm) 1050±80 FS7-40 16 / 400 120V 60Hz...
- Page 10 www.starfans.co info@starfans.co...
Need help?
Do you have a question about the FS7-40 and is the answer not in the manual?
Questions and answers