Table of Contents
Advertisement
Quick Links
Advertisement
Table of Contents

Related Manuals for EMG Bomber


Summary of Contents for EMG Bomber
- Page 1 I N S T R U C T I O N M A N U A L...
- Page 3 BOMBER INSTRUCTION MANUAL This manual contains important information relating to the safety, per- formance and maintenance of your electric bicycle. Please read it carefully before using your bicycle and keep it in a safe place for future reference. NOTE: It is the user’s responsibility to know and comply with the local laws.
-
Page 5: Table Of Contents
INDEX • WAR N I N G S FO R U S E O F T HE B I K E ....... .. 6 •... - Page 6 GE NERA L WA R NI N GS FO R TH E US E OF YO U R B ICYC LE Do not use the vehicle after drinking alcohol, taking exciting or psychotropic drugs which can alter the emotional state, the sensory abilities and the ma- stery of movements.
- Page 7 Do not try to disassemble the product or its parts. Any repair intervention must be carried out by authorized personnel, in compliance with warranty conditions. Please check your bicycle parts frequently, repair them immediately if any fault is found. Take responsibility for your safety and for any question or cla- rification, it is advisable to consult a professional bicycle shop.
-
Page 8: E In T He N I G Ht Ho U Rs
USE IN T HE N IG HT HO U RS Using the bicycle at night is much more dangerous than in the daytime, as it is more difficult to see a cyclist for drivers and pedestrians. Cyclists have to be aware of the risk they run while going out at dawn, dusk or at night, and have to pay more attention when pedalling and should use specific equipment which helps them reduce these risks. - Page 9 WA R NIN G Make sure you comply with all local laws relating to the bike’s usage in the night hours and to take the following additional precautions: • make sure your bicycle is well equipped with reflectors, which should be correctly positioned and fixed in a safe way.
- Page 10 INFORMAT ION TO U SERS ABOU T HO U SEHO LD A P P LI A NC ES pursuant to Legislative Decree No. 49 of March 14, 2014 “Implemen- ta-tion of Directive 2012/19 / EU on waste electrical and electronic equipment (WEEE)”.
-
Page 11: Technical Assistance
BOMBER respects the general safety requirements with reference to the cycling part (frame, fork, handlebar, seat, etc.). The product complies with the Directives: EPAC in accordance with EN15194: 2017 and ISO4210. -
Page 12: Te Ch Ni C A L Sp E Ci F Ic Ati O Ns
TE C HNIC AL S P EC I FI C ATI O N S Power 250 W Battery litium 36V, 10 Ah, 360 Wh Distance 40 Km Max assisted speed 25 Km/h Wheel size 20” Frame Aluminum Bike dimensions 167x58x125 cm Included charger INPUT 100-240 V ~ 50/60 Hz, OUTPUT 42V... -
Page 13: B Om Be R: How It Is M Ade
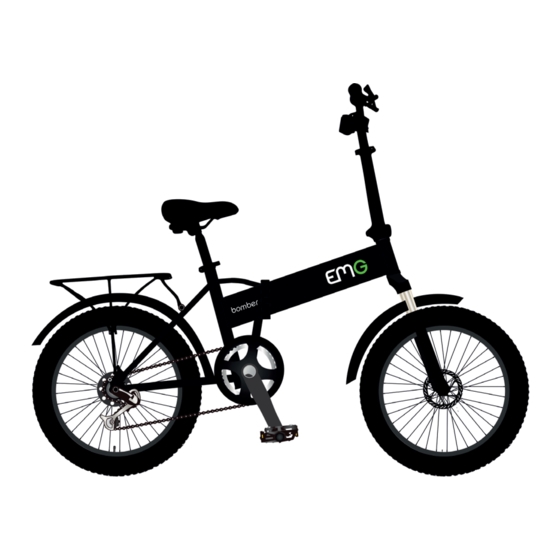
B OM BE R: HOW IT IS M ADE 21: Charging port 11: Easel 1: Frame 22: Front light 12: Chain 2: Handlebar 23: Rear light 13: Crown 3: Front fender 24: Control panel 14: Rear wheel 4: Front brake 25: Parcel carrier 15: Engine 5: Fork... -
Page 14: Battery: Au To N O M Y
BATTERY: AU TO N O M Y The maximum distance that can be traveled on a single battery charge is of about 40 Km. However, this value must be considered indicative as it can be influenced by numerous factors. Among the factors that can most affect the autonomy of the battery are the following: •... - Page 15 CON TR O L PA N EL Information shown on the control panel Instantaneous speed, assistance level, battery charge, distance traveled On / off button Hold for a long time in order to turn the bicycle on and off With the panel on, press to switch between ODO (total odometer), TRIP (partial odometer), VOL (battery voltage), TIME (time of use) Plus and minus keys Press to go to the upper assistance level...
-
Page 16: H Ow To Ch A Rg E Th E B At Tery
H OW TO R EC HA RG E THE BAT TE RY In a ventilated area, insert the charger connector into the corresponding battery charging connector, then the charger into a stan- dard current plug a 230V ~ 50Hz. Do not recharge the bat- tery in closed and poorly ventilated places! Verify that the charger... -
Page 17: E A N D M A In Te N A N C E O F Th E B At T Ery
U SE AND MA I N TE NA N C E OF THE BATT ERY Due to transport safety reasons, the battery is not fully charged; please fully charge the battery before the first use, using the charger contained in the package. Avoiding to charge the battery while the vehicle is stopped for a long time can cause under voltage problems, so when the bikes is not used, it is advisable to recharge the battery every two months. -
Page 18: In Se Rt The B At Te Ry
IN SE RT THE B AT TE RY 1. Open the bicycle frame by unlocking the safety lever 2. Insert the battery in the special compartment inside the frame 3 close the frame (2), lock the safety lever (1) and lock with the key (3) CH A R G ER U SE A N D MA IN T E I N A N CE •... -
Page 19: Re Co Mmen D Ed To Rqu E On Fixing D Ev I C Es
B IK E ASSE M B LY The bicycle will be delivered inside a box, almost completely assembled. Be sure to adjust the saddle and handlebar according to your height. Also be sure to carefully install the pedals in order to avoid problems while using the bike. - Page 20 FO LD T HE B IK E Unlock the safety hook on the frame Open the lever and fold the bike on itself Unlock the safety hook on the handlebar Bend the handlebar on the bi- cycle in order to complete the folding as shown in the photo alongside...
-
Page 21: Adju St I N G T He Sa Dd L E An D H A Nd L Eb
ADJ U STIN G T H E SA DD L E AND HA N D L EB A R After getting on the bicycle, touch the ground with two feet for detect the correct saddle height; then tighten the lever on the seat tube and lock it carefully. - Page 22 US E OF B R A K ES • Use the brakes sensibly, especially on rainy days or snow, or in poor grip conditions • Reduce your speed in poor grip conditions and when you are going down steep slopes; •...
- Page 23 BOM B E R V IS UA L CO N TR O L Make sure you don’t have loose fasteners. Raise the front wheel about 10 cm from the ground, and let it jump on the ground. Verify that no devices appear loose, checking its sound or at sight. In case some accessories appear loose, tighten them with care.
- Page 24 F IR ST U SE A DVI CE A first ride with your new bicycle is recommended to gain confidence with it; choose a simple route, away from traffic, other cyclists, obstacles and dangers. Become familiar with the controls, functionality and performance of your new bicycle.
-
Page 25: Ma In Te N A N C E A N D Re Pa I
M AINTE N A NC E A ND REPA IR Your bicycle requires a minimum of maintenance and regular technical inspection, which depends on the use you make of it: • regularly check the tires and their wear; • if there are cuts or cracks, replace the tire if necessary. •... - Page 26 Check the control cables and the cable housing carefully. If you find rust, they are loose or worn, have them replaced by a qualified bicycle me- chanic. Squeeze each pair of contiguous spokes on each side of the wheel between your thumb and forefinger. If anyone seems loose, have a qua- lified bicycle mechanic check the tension and alignment of the wheel.
-
Page 27: Af T E R E V E Ry I N Te N Se Dr Iv In G S E Ssi O N
AF T E R E V E RY I N TE N SE DR IV IN G S E SSI O N If the bicycle has been exposed to water or sand, or at least every 150 kilometers, clean the bicycle and lightly lubricate the chain rollers with a good quality bicycle chain lubricant. -
Page 28: War R A N T
WA R R A N T Y 1. The warranty comes into force on the date of the tax document and covers manufacturing defects and consequent failures that arose during the warranty period. 2. In the event of a device failure, the buyer can ask for assistance contact the retailer where you purchased the product or: Web: https://bike.s2salvadorigroup.it/... - Page 29 WA R RA N TY d) in the event of use that does not comply with current legislation <ap- plicable to the product covered by the warranty. The recognition of direct and indirect damages of any kind to persons and things deriving directly or indirectly from one or more causes of exclusion mentioned in this paragraph is also excluded.
- Page 30 WA R R A N T Y 8. The period of validity of the battery warranty (if any) is 6 months from purchase. 9. The period of validity of the guarantee for consumers, that is, those who for purposes unrelated to one’s professional or business activity, it is gov- erned by Legislative Decree 2 February 2002, n.24.
- Page 31 Declaration of conformity BOMBER-F20 F...
- Page 32 Trevi S.p.A. Strada Consolare Rimini-San Marino 62, 47924 Rimini (RN) Italia Tel. 0541/756420 Fax Tel. 0541/756420 www.trevi.it email: info@trevi.it...
Need help?
Do you have a question about the Bomber and is the answer not in the manual?
Questions and answers