Advertisement
Available languages
Available languages
Quick Links
Advertisement

Subscribe to Our Youtube Channel
Related Manuals for Fox Warrior Shelter


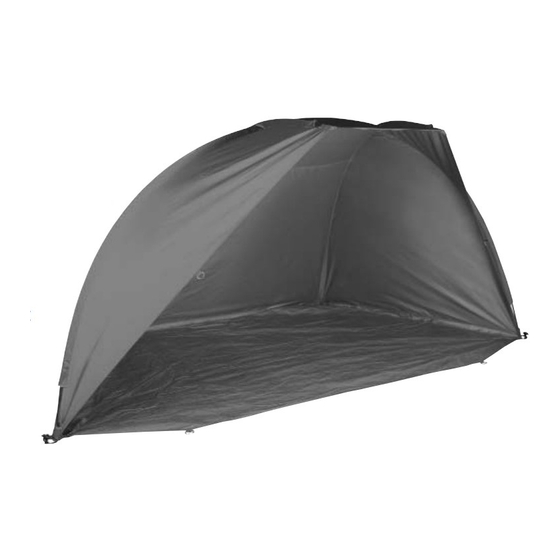
Summary of Contents for Fox Warrior Shelter
- Page 2 Warrior Shelter. As a rule of thumb, any water should maintained correctly, it will ‘bead up’ and run off rather than soaking into the material. provide you with outstanding performance season after season. This leaflet details some of the things you should know about your Warrior Shelter.
- Page 3 Push 2 shorter poles (B) through flaps from back to front with Assembly Instructions pointed end towards the front. Unfold all poles and join together, lay out dome flat on ground as shown. Put one end of long pole (A) into pocket then at opposite side lift shelter whilst pulling on D ring and Push longest pole (A) through flaps from side to side.
- Page 4 TIP: In windy conditions, you will find it easier to Félicitations d’avoir acheté la loosely peg your Warrior Shelter down with one of the rear peg down points and erect it ‘side into the wind’. tente Warrior Shelter de Fox, issue d’un matériau Nylon...
- Page 5 Pour prolonger sa performance, il est conseillé de traiter la toile chez soi. externe avec un imperméabilisant conçu spécialement pour les matériaux respirants. La fréquence de cette opération dépend de la fréquence d’utilisation de votre Warrior Shelter. L’humidité devrait former des gouttelettes plutôt que de pénétrer la toile.
- Page 6 Insérez les deux arceaux les plus courts (B) à l’emplacement Arrimez l’arrière puis ajustez les côtés selon les prévu d’avant en arrière avec l’extrémité pointue vers l’avant. conditions. ASTUCE: Pour faciliter le montage de l’abri dans le vent, il suffit de grossièrement arrimer le Warrior Placez une extrémité...
- Page 7 Shelter Voorbeelden hiervan zijn de luchttemperatuur en de hoeveelheid vocht in de lucht. Hoe vochtiger de lucht des te groter de Hoe berg ik mijn Warrior Shelter condensatie. De Warrior Shelter moet altijd Onder koude en natte omstandigheden rek het doek op, terwijl droog worden opgeborgen.
-
Page 8: Montage Instructies
Duw de twee korte stokken (B) van achteren naar voren door Montage Instructies de flappen, zorg ervoor dat het uiteinde met punt naar voren wijst. ouw alle stokken volledig uit elkaar en verbind ze middels de sluitingen. Leg de dome plat op de grond zoals afgebeeld. - Page 9 150D Nylon hergestellt, das mit einer 3000 mm Wassersäule hydrostatisch belastbar ist. Wenn Sie mit dem Produkt sachgerecht umgehen und es richtig pflegen, werden Sie viele Jahre Freude daran haben. Dieses Blatt enthält einige wichtige Informationen über Ihr Warrior Shelter.
- Page 10 Imprägniermittel zu behandeln, das sich speziell für atmungsfähige Materialien eignet. Wann dies erforderlich ist, richtet sich danach, wie häufig Sie Ihr Warrior Shelter verwenden. Als Faustregel gilt, dass das Wasser als Tropfen ablaufen und nicht vom Material aufgesaugt werden soll.
- Page 11 Passen Sie dann die Seiten an. TIPP: Sie werden feststellen, dass es bei Wind leichter ist, das Warrior Shelter an einer der hinteren Ösen Stecken Sie ein Ende der langen Stange (A) in die dafür vorgesehene Tasche. Heben Sie dann das Zelt locker zu befestigen und es mit der Seite zum Wind hin auf der gegenüber liegenden Seite an, während sie den D-Ring ziehen und spannen die Zeltplane und...
- Page 12 Trattato e ripetere il trattamento dipende fondamentalmente dall’utilizzo mantenuto correttamente, che viene fatto del vostro Warrior Shelter. Come regola continuerà a fornirvi le sue generale, una copertura in buono stato deve consentire grandi capacità, stagione dopo stagione. Questo libretto illustra alcune delle cose che dovete conoscere all’acqua di formare delle “perline”...
-
Page 13: Istruzioni Per Il Montaggio
Spingere 2 pali più corti (B) attraverso le sedi apposite dalla Istruzioni per il montaggio parte posteriore verso la parte anteriore con le estremità appuntite verso la parte anteriore. Dispiegare tutti i pali e unirli assieme, stendere la tenda sul terreno come mostrato. Mettere un’estremità... - Page 14 Picchettare la parte posteriore quindi regolare i lati per adattarsi alle condizioni. CONSIGLIO: in condizioni di vento, troverete agevole montare il vostro Warrior Shelter posizionando un singolo picchetto sulla parte posteriore ed erigendo lo Warrior stesso con il favore del vento.
- Page 15 Fowler Road, Hainault Industrial Estate, Hainault, Essex, 1G6 3UT www.foxint.com Fox International reserve the right to modify or alter specifications in any respect without prior notice. Technical data and specification correct at time of going to press. All weights and dimensions are approximate.
Need help?
Do you have a question about the Warrior Shelter and is the answer not in the manual?
Questions and answers