Table of Contents
Advertisement
Quick Links
Advertisement
Table of Contents

Related Manuals for MAKERGEAR M3-ID


Summary of Contents for MAKERGEAR M3-ID
-
Page 2: Table Of Contents
4 - Hardware Setup 7 - A Note About Nozzles 8 - Software Setup 9 - Changing Filament 10 - M3-ID Features 13 - What’s the Function? 14 - Shutdown & Reset Procedures 15 - Maintenance & Storage 16 - Warranty & Support... -
Page 3: Welcome
Welcome Your MakerGear M3-ID 3D Printer has arrived! Following minimal setup, your M3-ID is ready to print out-of-the-box. To ensure safety as well as high quality printing, carefully follow the setup instructions included in this User Guide. This printer was assembled at the MakerGear shop in Beachwood, Ohio, USA, and was tested for at least six hours to ensure that it was fully operational at the time of shipping. -
Page 4: Important Safeguards
Important Safeguards 1. The following safeguards exist to ensure the safety of users and to avoid potential risks. Ignoring these safeguards can cause damage to the printer and its environment. 2. Unplug the power cord when the printer is not in use. To unplug, grasp the plug and firmly pull it from power outlet. -
Page 5: What's Included
4 extra glass build plate hold-down clips. Two 1 kg spools of 1.75 mm PLA (colors may vary). 2 spool holders with screws and sample container, both of which were printed on an M3-ID. -
Page 6: Hardware Setup
Hardware Setup 1. Carefully compress and remove the foam from the top of the printer and from inside the printer frame. 2. Remove foam from above and below the 4-legged “spider” inside the frame. Remove the heated build platform from its slot in the foam and place it on the spider with the glass build plate facing up, as shown on page 5. - Page 7 4. Remove the binder clip, and rotate the hold-down clips to point toward the front and back of the glass build plate in order to secure it in place. 5. Install both spool holders as shown on page 10, using the 4 screws included with each and the 3 mm allen key and ensuring that the longer side is facing up.
- Page 8 6. Insert the 6-position power supply connector into the 6-position electronics connector, making sure that it is SECURELY IN PLACE in the electronics case. Connect the power supply cord to the power supply. Next, plug the power supply into power outlet, and flip the switch on the power supply to the on position.
-
Page 9: A Note About Nozzles
Some of our users choose to print with nozzles that are either larger or smaller than the 0.35 mm nozzle included on the M3-ID in order to accommodate specific printing needs. If you plan to print with different- sized nozzles, we recommend keeping each nozzle installed in a separate hot end, as this allows you to switch between nozzles more easily. -
Page 10: Software Setup
On the Setup page, enter your printer’s serial number, which is located on the inside of the printer’s frame. Next, connect your computer to the M3-ID’s Wi-Fi, using the provided network name and password, in the same way that you would connect to any other Wi-Fi source. -
Page 11: Changing Filament
Once you complete the Quick Check, the printer will be ready to print. There are three different modes for controlling the M3-ID: • In Independent Movement mode, the tools do not affect one another. • In Park mode, parking one tool moves the other to the same position. -
Page 12: M3-Id Features
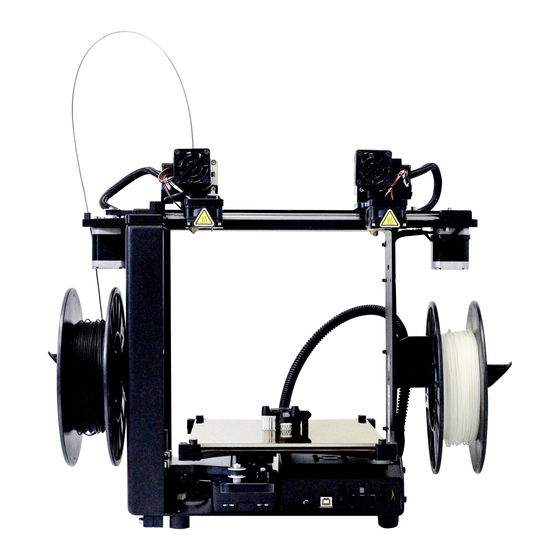
M3-ID Features Front... - Page 13 M3-ID Features Rear...
- Page 14 M3-ID Features X-Stage Assembly...
-
Page 15: What's The Function
RAMBo board. 40x15 mm Fans (24 V) cool printed layers (as needed). 6-Position Power Connector brings low voltage DC power to M3-ID. Extruder Wire Mounts locate and clamp connectors for extruders. Filament Drives pull filament into extruders. -
Page 16: Shutdown & Reset Procedures
Shutdown & Reset Procedures M3-ID Shutdown Procedures Do not switch off the power supply to turn off the MakerGear M3-ID. There are two ways to properly shut it down: 1. Navigate to the printer’s OctoPrint interface and click the power button icon. -
Page 17: Maintenance & Storage
Additionally, fully seal the filament spool in a bag, preferably with a new desiccant packet inside. • If you are storing the M3-ID for a period of 2 weeks or more, follow all above instructions, THEN cover the entire printer in order to protect it from the buildup of dust and other airborne particles. -
Page 18: Warranty & Support
Exceptions The M3-ID has an open design (no proprietary cartridges) and M3-ID owners are free to use third party filament. However, the MakerGear hot end is only covered when MakerGear filament and authentic MakerGear components are used. Due to variance in quality, MakerGear is unable to provide technical support for issues related to third party filament. -
Page 19: About Us
3D printing community. Today, we apply strict standards to our printers, which are made and tested in the USA using domestic and foreign parts. Yet despite countless improvements and advancements during the years since MakerGear’s humble beginnings, our dedication to quality and community remains unchanged. Our work revolves around providing three things: quality printers, excellent customer service, and a user-centric 3D printing experience. - Page 20 What are you making? Tag #madewithMAKERGEAR for a chance to be featured! @MakerGear ©2017 MakerGear. MakerGear LLC 23632 Mercantile Road Unit G Beachwood, Ohio, US 44122...
Need help?
Do you have a question about the M3-ID and is the answer not in the manual?
Questions and answers