
Related Manuals for Esse Bakeheart


Summary of Contents for Esse Bakeheart
- Page 1 Bakeheart & Warmheart Wood Fired Cooking Stoves THIS APPLIANCE MUST BE COMMISSIONED BY A HETAS REGISTERED ENGINEER THE WARRANTY CARD MUST BE RETURNED TO ENSURE GUARANTEE VALIDITY...
-
Page 2: Table Of Contents
Table of Contents OPERATIONAL INSTRUCTIONS ................3 INTRODUCTION ....................3 BEFORE USING YOUR COOKING STOVE ............3 YOUR COOKING STOVE .................. 4 LIGHTING AND CONTROLLING THE FIRE ............6 NOTES ON WOODBURNING ................8 LONG TERM SHUTDOWN ................10 FIREWOOD AND THE WOODBURNING PROCESS.......... 10 COOKING WITH THE COOK STOVE ............... -
Page 3: Operational Instructions
Bakeheart & Warmheart OPERATIONAL INSTRUCTIONS INTRODUCTION Thank you for choosing an ESSE cooking stove. Please read these instructions carefully to ensure your safety and enjoyment whilst using this product. Correctly installed and operated, your ESSE cooking stove will provide faithful service indefinitely. -
Page 4: Your Cooking Stove
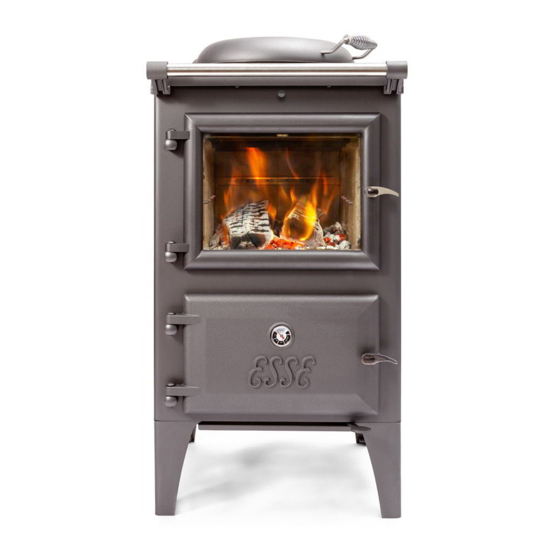
YOUR COOKING STOVE Figure 1 Bakeheart Cooking Stove Figure 2 Warmheart Cooking Stove Figure 1 and Figure 2 show the cooking stoves and their controls. The fire is loaded, refuelled, and emptied through the large glass fire door. Included inside your cooking stove is a multi-purpose Operating Tool – for adjusting the air supply and operating the door. - Page 5 Figure 3 Operating Tool and Glove Figure 4 Filter Control The cooking stoves are also fitted with a filter system controlled by the indicated control in Figure 4. Pulling out this boss disengages the filter, pushing the boss in engages the filter. WARNING Do not place towels on the handrail, keep pets and children away and ensure that any curtains near the appliance cannot ignite even when displaced.
-
Page 6: Lighting And Controlling The Fire
LIGHTING AND CONTROLLING THE FIRE Before lighting the fire ensure that all vermiculite bricks are in the correct position. Ensure the air control is in the open position by moving the control to the right hand position, and the filter is disengaged. Figure 5 Air Control in Open Position Open the fire door and lay two logs along the base of the fire box forming a space between them. - Page 7 Place a firelighter in the space and surround with a small amount of kindling. Figure 7 Fire Lighter and Kindling in Place Lay a third log over the top of the space perpendicular to the other logs. Figure 8 Final Log in Position When you are ready to light the fire all that needs to be done is light the firelighter.
-
Page 8: Notes On Woodburning
WARNING When the cooking stove is running ALL HANDLES become hot and the operating tool or glove provided should be used to open or close the doors (Figure 3) The burning rate of the stove can now be regulated by the rate at which fuel is added and use of the air control. - Page 9 To get the best results from your cooking stove it is recommended that a wood stove thermometer be fitted to the flue pipe above the cooking stove. This allows you to monitor the temperature of the flue gasses leaving the cook stove. Below 115 This is below the condensation point of wood gasses and may cause the build- up of tar in the chimney, dirty the fire door glass and result in the inefficient...
-
Page 10: Long Term Shutdown
LONG TERM SHUTDOWN If the cooking stove is to be shut down for long periods i.e. during summer months or if the appliance is in a second home that is not used all the time, precautions should be taken to avoid damage from condensation and corrosion. First ensure that the cooking stove is fully cleaned and all ash removed. - Page 11 exposing more surface area to the sun and wind, but cutting the wood to shorter lengths is of primary importance. Here’s how you can tell whether your wood is ready or not: Well seasoned firewood generally has darkened ends with cracks or splits visible, it is relatively lightweight, and makes a clear "clunk"...
- Page 12 double of that of a square metre of softwood. This means that the same volume of hardwood will provide you with more fuel to burn than an equal amount of softwood, simply because it contains more substance. (N.B. The price of hardwood will normally not be double that of softwood, because it took the same amount of labour to prepare.
- Page 13 Summarising we can say that it is always sensible to buy this year for next years fuel supply and that it is very handy to have both soft and hardwoods. You can use the softwoods to start a good fire and you will have additional control over the fire (in addition to the cookers controls) by adding slower burning wood to fast ones if you want to leave the cooker without tending it for a while.
-
Page 14: Cooking With The Cook Stove
drippy and sticky or shiny and hardened. Quite often, all forms will occur in one chimney system. If the wood you are using is water logged, or green, the fire will tend to smoulder and not warm the chimney sufficiently. Wet wood causes the whole system to be cool, and inefficient. -
Page 15: Extended Woodburning
The shelf in the Bakeheart oven has anti-pull out stops on the ends to prevent it from being pulled out inadvertently; to remove a shelf, pull forward until the stop is reached, then lift at the front and pull out of the oven. -
Page 16: Cleaning And Maintainance
CLEANING AND MAINTAINANCE The successful operation of your range cooker is entirely dependent on the adequate performance (pull) of the chimney or flue to which it is connected. The following maintenance guidelines will be pointless unless the flue is also maintained and cleaned regularly. - Page 17 Figure 10 Under the Hotplate To clean the flue way of the cook stove the hotplate must be removed. With the hotplate removed the filter can be removed from its holder and cleaned. To clean the filter it is recommended that it is just shaken vigorously for 20 seconds in a plastic bag to catch the particulate.
-
Page 18: Conditions Of Guarantee
Your ESSE is guaranteed against defects arising from faulty manufacture for 2 years when supplied by an ESSE Specialist. Upon registration of the warranty, ESSE will extend the guarantee period to 5 years from purchase. Your details must be registered with us by either returning the completed warranty card or by completing registration on-line at www.esse.com. -
Page 19: Customer Care
Should you have cause for dissatisfaction with your cooker, you should contact your ESSE dealer, who will, in most instances, be able to offer you immediate assistance. You will be required to give the following details. o Your name, address and postcode. -
Page 20: Safety Notes
SAFETY NOTES o Properly installed, operated and maintained, this appliance will not emit fumes into the dwelling. However, occasional fumes from de-ashing and re-fuelling may occur. o Persistent fume emission is potentially dangerous and must not be tolerated. If fume emission does persist, open doors and windows to ventilate the room. - Page 21 o These instructions give a guide for the installation of the appliance but in no way absolve the installer from responsibilities to conform to British Standards, in particular BS8303 and BS6461, relating to the installation of solid fuel appliances. All local regulations including those referring to national and European standards need to be complied with, when installing this appliance.
-
Page 22: Installation Instructions
Clearances from combustible materials are 400mm from the sides and 500 mm from the rear for the Bakeheart, and 350mm from the sides and 400mm from the rear for the Warmheart. The Warmheart is also certified for use on decorative hearths. -
Page 23: The Clean Air Act 1993 And Smoke Controlled Areas
It is also recommended that a smoke alarm and appropriate fire safety equipment such as a fire extinguisher and fire blanket are installed in the kitchen as a safety precaution and also a carbon monoxide detector as stated in Approved Document J of the Building Regulations. An adequate air supply for combustion and ventilation is required. -
Page 24: Chimney And Flue Information
Clean Air Act requirements “The ESSE Bakeheart and Warmheart Cooking Stoves have been recommended as suitable for use in smoke control areas when burning dry wood logs”... - Page 25 o Voids in the chimney should be avoided, as these will prevent a steady flue draught. The appliance flue pipe should pass beyond the narrowing of the chimney. o Terminate at least 1m above roof level so that the chimney does not terminate in a pressure zone.
- Page 26 This test is only a guide as an apparently poor flue may improve once the appliance is installed, lit and the flue is warmed. Once the appliance is installed a flue draught reading should be taken as detailed below. Two flue draught readings should be taken, one with the appliance at minimum burning rate and one at maximum burning rate.
- Page 27 Table 1 Flue Draught Trouble Shoothing Guide Low flue draught symptoms: difficult to light and smoke coming into room CAUSE REMEDY Cold chimney Line the Chimney Chimney too short Extend the chimney Relocate/extend chimney terminal. Fit an Down draught anti-down draught cowl Chimney diameter too large Line the chimney Chimney obstruction Clear/sweep the chimney...
-
Page 28: Installing The Appliance
INSTALLING THE APPLIANCE Flue Connection The flue pipe used to connect the appliance to the chimney is 6’’ (150mm) in diameter. (The flue connection is on the top of the appliance, in the centre at the back.) Important Installation Notes o The installation must allow access for adequate chimney sweeping and flue cleaning. -
Page 29: Commissioning The Appliance
Measure and record flue draught o Check ventilation o If applicable check plumbing circuit o Check no extractor fan, other appliance or other flue interferes o Complete commissioning card and return to ESSE to validate warranty REPLACEMENT PARTS Fire Door Glass Filter Assembly... -
Page 30: Commissioning Checklist
COMMISSIONING CHECKLIST To assist with any potential guarantee claim please complete the following information:- To be completed by the installer. Dealer the appliance was purchased from: Name: Address: Telephone No: ESSENTIAL information: Date Installed Model Description: Serial No: Installation Engineer: Company Name: Address: Telephone No:... - Page 31 Page 31 500IH-I05-020320...
- Page 32 ESSE Engineering Limited, Ouzledale Foundry, Long Ing, Barnoldswick, Lancashire BB18 6BJ Tel. 01282 813 235, Fax: 01282 816 876 Website and On-line Store http://www.esse.com...
Need help?
Do you have a question about the Bakeheart and is the answer not in the manual?
Questions and answers