Table of Contents
Advertisement
This product requires an AcuRite Iris (5-in-1) Weather Sensor
CONTENTS
Unpacking Instructions .....................2
Package Contents .............................2
Product Registration..........................2
Wi-Fi Setup .......................................2
Features & Benefits: Display .............4
Setup .................................................8
Display Setup ....................................8
Placement Guidelines .......................9
Set the Time, Date & Units ..............10
Questions? Visit www.acurite.com/support
SAVE THIS MANUAL FOR FUTURE REFERENCE.
Professional Weather Display
(sold separately) to be operational.
Backlight Settings ............................10
Using the Weather Center .............. 1 1
Programmable Alarms ................... 12
Troubleshooting ..............................13
Care & Maintenance ......................15
Specifications ..................................16
FCC Information .............................16
Customer Support ........................... 17
Warranty......................................... 17
Instruction Manual
model 06086
Advertisement
Table of Contents

Subscribe to Our Youtube Channel
Related Manuals for AcuRite 06086


Summary of Contents for AcuRite 06086
-
Page 1: Table Of Contents
Instruction Manual Professional Weather Display model 06086 This product requires an AcuRite Iris (5-in-1) Weather Sensor (sold separately) to be operational. CONTENTS Backlight Settings ......10 Unpacking Instructions .....2 Using the Weather Center ....1 1 Package Contents ......2 Programmable Alarms ....12 Product Registration......2... -
Page 2: Unpacking Instructions
• Open the Wi-Fi settings of your Wi-Fi-compatible device and select and connect to the Wi-Fi network with "AcuRite" in its name. › If you see any “unsecure network” warnings, know that it’s safe to continue. › You will not be able to access the internet while connected to this "AcuRite" network. - Page 3 4. Once connected to the Wi-Fi network with "AcuRite" in its name: • Open a web browser on the device you used to connect to the display. • To access the AcuRite Wi-Fi display setup page, type the following into the address bar and then press go/enter/return: 192.168.4.1 •...
-
Page 4: Features & Benefits: Display
Features & Benefits DEVICE ID ############... - Page 5 DISPLAY BACK Backlight Button 5. Plug-in for Power Adapter For momentary backlight and dimmer 6. Battery Compartment Cover settings. Power Adapter 2. Integrated Keyhole Hangers 8. RESET Button For easy wall mounting. Press and release to clear historical record. 3. Backup Battery Compartment Press and hold for 10 seconds for full reset 4.
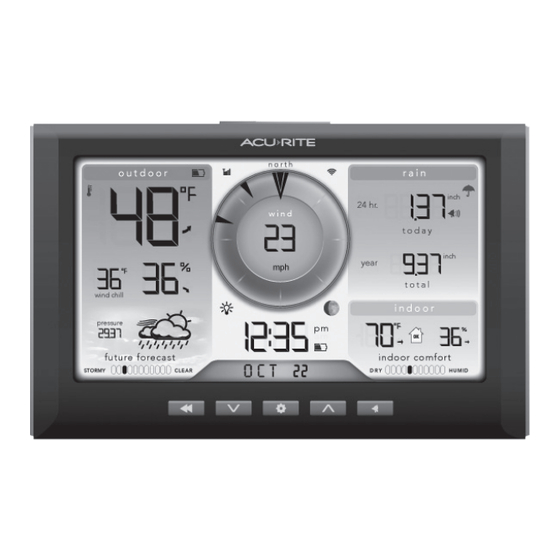
- Page 6 Features & Benefits Display 1 1 12 14 15 16 17 18 19 20...
- Page 7 DISPLAY FRONT 1. Seasonal Display Button Heat Index calculation displays when For viewing high and low records. temperature is 80°F (27°C) or higher. Dew Icon Point calculation displays when temperature auto Indicates display is in auto-dimming is 79°F (26°C) or below. Wind chill brightness mode (see page 9).
-
Page 8: Setup
SETUP Display Setup Set the A-B-C Switch 2. Insert 3 x AAA batteries into the battery compartment, as Locate the A-B-C switch inside the shown. Follow the polarity battery compartment. Set the A-B-C (+/-) diagram in the battery switch to A, B or C. You must select the compartment. -
Page 9: Placement Guidelines
Placement for Maximum Accuracy AcuRite sensors are sensitive to surrounding environmental conditions. Proper placement of both the display and the sensor are critical to the accuracy and performance of this unit. Display Placement Place the display in a dry area free of dirt and dust. Display stands upright for tabletop use and is wall-mountable. -
Page 10: Set The Time, Date & Units
Set the Time, Date & Units Press the " " button, located on the front of the display, to enter SET MODE. Once in set mode, the preference you are currently setting will blink on the display. To adjust the currently selected (flashing) item, press and release the " "... -
Page 11: Using The Weather Center
Weather Forecast AcuRite’s patented Self-Calibrating Forecasting provides your personal forecast of weather conditions for the next 12 to 24 hours by collecting data from the sensor in your backyard. It generates a forecast with pinpoint accuracy - personalized for your exact location. -
Page 12: Programmable Alarms
Programmable Alarms This display features programmable alarms that sound an alert to notify you when a value (for outdoor temperature, humidity, wind speed or rainfall) has been reached or exceeded. When an alarm is triggered, the display emits an audible beep and flashes data in the affected category. -
Page 13: Troubleshooting
Troubleshooting Problem Possible Solution • Relocate the display and/or the 5-in-1 sensor. The units must be within 330 ft (100 m) of each other. • Make sure both units are placed at least 3 feet (.9 m away from electronics that may interfere with the wireless communication (such as TVs, microwaves, computers, etc). - Page 14 Troubleshooting Problem Possible Solution • Your internet router and display must be within range of each other. Relocate your display closer to your router. • Ensure the network name (SSID) and password you've entered are correct. NOTE: Both network name and password are case sensitive.
-
Page 15: Care & Maintenance
If your AcuRite product does not operate properly after trying the troubleshooting steps, visit www.acurite.com/support. Care & Maintenance Display Care Clean with a soft, damp cloth. Do not use caustic cleaners or abrasives. Keep away from dust, dirt and moisture. Clean ventilation ports regularly with a gentle puff of air. -
Page 16: Specifications
Specifications DISPLAY’S BUILT-IN 32ºF to 122ºF; 0ºC to 50ºC TEMPERATURE SENSOR RANGE DISPLAY’S BUILT-IN 1% to 99% HUMIDITY SENSOR RANGE OPERATING FREQUENCY 433 MHz 5V power adapter POWER 3 x AAA alkaline batteries (optional) DATA REPORTING Display: Indoor temperature & humidity: 60 second updates DATA REPORTING Wind Speed: 18 second updates;... -
Page 17: Customer Support
Customer Support AcuRite customer support is committed to providing you with best-in-class service. For assistance, please have the model number of this product available and contact us in any of the following ways: Chat with our support team at www.acurite.com/support Email us at support@chaney-inst.com... - Page 18 © Chaney Instrument Co. All rights reserved. AcuRite is a registered trademark of the Chaney Instrument Co., Lake Geneva, WI 53147. All other trademarks and copyrights are the property of their respective owners. AcuRite uses patented Printed in China technology.
Need help?
Do you have a question about the 06086 and is the answer not in the manual?
Questions and answers
How do I change the wi fi account
How do I adjust my acurite iris indoor temperature reading. And why is there a wrench icon in the lower left hand screen?