Advertisement
Quick Links
Advertisement

Related Manuals for Digitus DN-13006-1


Summary of Contents for Digitus DN-13006-1
- Page 1 USB 2.0 PRINT SERVER Quick Installation Guide DN-13006-1...
-
Page 2: Wired Network With Print Server
Before you start, you should prepare the following items: One Windows-based PC with print server setup CD One printer One printer cable One HUB Wired Network with Print Server: Print Server Printer Computer Computer Computer Hardware Installation: Turn off the printer’s power. -
Page 3: Software Installation
Software Installation: To enable network communication with print server, your computer must have a proper IP address, e.g. 192.168.0.100 Insert the setup CD into your CD-drive, and the following message appears. Note: For setup wizard under Windows Vista/7/8/10, you have to choose the Run as administrator by right-click the icon on desktop. - Page 4 Choose Setup Wizard to install the print server and configure the connected printer. Click Next, the wizard will automatically discover the print server.
-
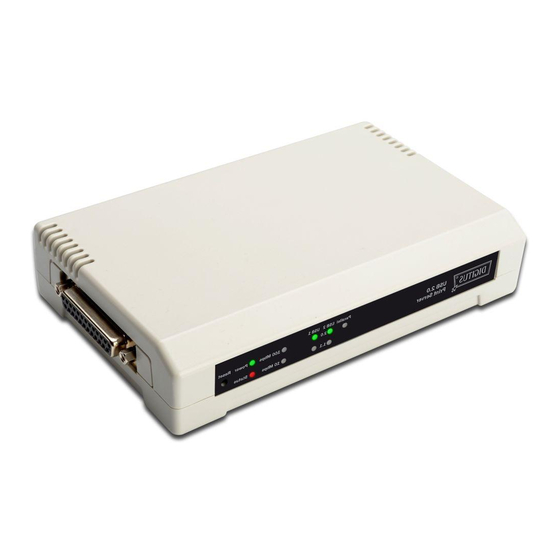
Page 5: Rear Panel
From the Select A Print Server screen, select the print server and its port number that you want to configure and click Next. Note: Rear Panel USB1 USB2 PARALLEL PARALLEL is Port 1(PID1) USB1 is Port 2(PID2) USB2 is Port 3(PID3) - Page 6 On the Change Settings screen, select No or Yes: Click No if you want the print server to keep using the default IP address and keep the default settings, and then click Next. IP address: 192.168.0.10 Subnet Mask: 255.255.255.0 Click Yes if you want change IP address to the print server, and then click Next.
- Page 7 On the Select A Printer screen, select an already configured printer from the list, click Next and then Finish to complete the installation. Select Add New Printer if the print server is connected to a printer that hasn’t been installed before and does not appear in the list.
- Page 8 Click Add New Printer to launch Windows Add Printer Wizard. Click Next and select Local Printer, make sure the Automatically detect and install my Plug and Play printer check box is NOT checked. Then click Next.
- Page 9 10. Make sure the Use the following port radio-button is clicked and select LPT1: (Recommended Printer Port) from the pull-down list. Then click Next. 11. Select Manufacturer and Printer from the lists of printer’s driver. Then click Next.
- Page 10 12. If you already have the printer’s driver installed, you will be asked whether to keep it or to replace it. Click Next. Supply a name for the printer and choose whether you want to make it your default printer. Then click Next. 13.
- Page 11 15. From Windows system, go to start -> Printers and Faxes and highlight your newly installed printer. 16. Right-click, select Properties -> Ports and verify that the print server’s port appears.
- Page 12 17. Go to General; click Print Test Page to verify the configuration. 18. Done. Note: If you wish to install more print servers, start setup wizard from your Windows Start menu: start -> All Programs -> Network Print Server -> PSWizard and repeat the installation procedure.
Need help?
Do you have a question about the DN-13006-1 and is the answer not in the manual?
Questions and answers