Table of Contents
Advertisement
Available languages
Available languages
Quick Links
Het toestel-identifi catieplaatje bevindt zich aan de onderkant van het toestel.
The appliance identifi cation card is located on the bottom of the appliance.
Plak hier het toestel-identifi catieplaatje.
Stick the appliance identifi cation card here.
Houd, wanneer u contact opneemt met de serviceafdeling, het complete typenummer bij de hand.
When contacting the service department, have the complete type number to hand.
Adressen en telefoonnummers van de serviceorganisatie vindt u op de garantiekaart.
You will fi nd the addresses and phone numbers of the service organisation on the guarantee card.
gebruiksaanwijzing
keramische kookplaat
instructions for use
ceramic hob
HL6271T
HL6271G
HL6271M
HL7271G
HL7271M
Advertisement
Table of Contents

Related Manuals for Atag HL6271T


Summary of Contents for Atag HL6271T
- Page 1 When contacting the service department, have the complete type number to hand. Adressen en telefoonnummers van de serviceorganisatie vindt u op de garantiekaart. You will fi nd the addresses and phone numbers of the service organisation on the guarantee card. HL6271T HL6271G HL6271M...
- Page 2 Handleiding NL 3 - NL 29 Manual GB 3 - GB 29 Gebruikte pictogrammen - Pictograms used: Belangrijk om te weten - Important information...
- Page 3 INHOUDSOPGAVE Uw keramische kookplaat Inleiding NL 4 Bedieningspaneel NL 5 Beschrijving NL 6 Veiligheid Kookduurbegrenzing NL 7 Gebruik Werking van de aanraaktoetsen NL 8 Pannen NL 8 Bediening Inschakelen NL 10 Vermogen instellen NL 10 Uitschakelen NL 10 Restwarmte-indicatie NL 11 Zone-functie NL 11 (Kinder)slot...
- Page 4 UW KERAMISCHE KOOKPLAAT Inleiding Deze keramische kookplaat is ontworpen voor de echte kookliefhebber. De kookplaat is voorzien van Cooklight elementen. Dit zijn zeer snel opwarmende stralingselementen die een hoog rendement hebben, wat zeer gunstig is voor de aankooktijd. Bovendien hebben deze elementen een zeer goede warmteverdeling.
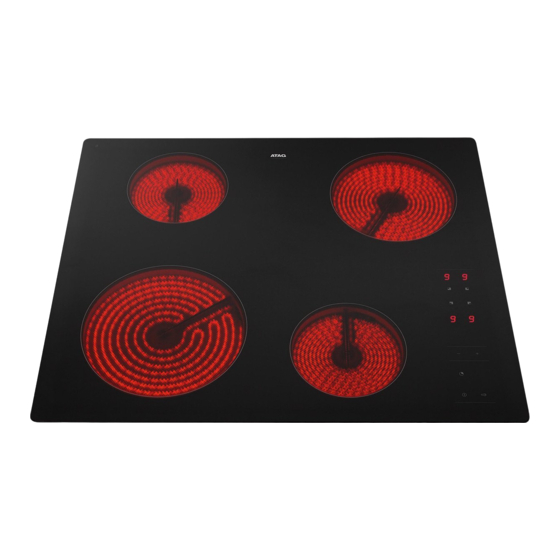
- Page 5 UW KERAMISCHE KOOKPLAAT Bedieningspaneel 1. Standen-indicatie linksachter 2. 3 Zone-element indicatie linksachter 3. 2 Zone-element indicatie linksachter 4. Zoneselectietoets linksachter 5. Zoneselectietoets linksvoor 6. Standen-indicatie linksvoor 7. Standen-indicatie rechtsachter 8. Zoneselectietoets rechtsachter 9. Zoneselectietoets rechtsvoor 10. Standen-indicatie rechtsvoor 11. Extra zone-elementtoets 12.
- Page 6 UW KERAMISCHE KOOKPLAAT Beschrijving HL6271T HL6271G HL6271M HL7271G HL7271M Kookzone Ø 145 1,2 kW Kookzone Ø 140/210 1,0/2,2 kW Kookzone Ø 160 1,5 kW Kookzone Ø 170/170x265 1,5/2,4 kW Kookzone Ø 180 1,8 kW Kookzone Ø 120/180/210 0,8/1,6/2,3 kW Kookzone Ø 180 2,0 kW Kookzone Ø...
- Page 7 VEILIGHEID Lees de separate veiligheidsvoorschriften voordat u het toestel in gebruik neemt! Kookduurbegrenzing • Als een kookzone gedurende een ongebruikelijk lange tijd aan is, wordt deze automatisch uitgeschakeld. • Afhankelijk van het gekozen kookvermogen wordt de kookduur als volgt begrensd: Kookstand De kookzone wordt automatisch uitgeschakeld na:...
- Page 8 GEBRUIK Werking van de aanraaktoetsen Het bedienen van de kookplaat door middel van de aanraaktoetsen is even wennen als u andere bediening gewend bent. Leg uw vinger- toppen plat op de toetsen voor het beste effect. U hoeft niet hard te drukken.
- Page 9 GEBRUIK Let op • Zandkorreltjes of andere substanties kunnen krasjes en vlekken veroorzaken die niet meer te verwijderen zijn. Zet daarom alleen pannen met een schone bodem op het kookvlak en til pannen altijd op als u ze verplaatst. • Kook altijd met het deksel op de pan om energieverlies te voorkomen.
- Page 10 BEDIENING Inschakelen • Zet een pan op een kookzone. • Druk op de aan-/uittoets. Er klinkt een enkel geluidssignaal. Alle displays geven “0” weer. Wanneer u geen verdere actie onderneemt, schakelt de kookplaat na 10 seconden vanzelf uit. Vermogen instellen •...
- Page 11 BEDIENING Restwarmte-indicatie Na gebruik van een kookzone kan de gebruikte zone nog een tijd heet blijven. Zolang de kookzone heet is, blijft er een “H” in de display staan. Zone-functie De ‘extra zone-element’-functie kunt u gebruiken om een extra zone- element in te schakelen.
- Page 12 BEDIENING (Kinder)slot U kunt de kookplaat met het (kinder)slot vergrendelen. Onbedoeld inschakelen of wijzigen van instellingen van de kookzones wordt hiermee voorkomen. Met de (kinder)slottoets heeft u toegang tot de volgende twee functies: De (standaard) slotmodus De kinderslotmodus Met de (standaard) slotmodus Met de kinderslotmodus wordt wordt het ongewenst wijzigen van het onbedoeld inschakelen van de...
- Page 13 BEDIENING Zet de kookplaat in de (kinder)slot modus voordat u de kookplaat gaat reinigen om te voorkomen dat deze per ongeluk inschakelt. Kook- / Eierwekker Er is een kookwekker voor elke afzonderlijke kookzone. Deze zijn gelijktijdig te gebruiken. Daarnaast is er nog een eierwekker. Zowel de kookwekker als de eierwekker is in te stellen op maximaal 99 minuten.
- Page 14 BEDIENING De eierwekker uitschakelen (indien 1 of meer kookzones actief zijn) • Druk op de kook-/eierwekkertoets todat het eierwekker indicatielampje gaat knipperen. • Houd de - toets ingedrukt tot “01.” in de display verschijnt. Druk daarna nogmaals op de - toets, of druk gelijktijdig op de + en - toets. De eierwekker staat nu in stand-by modus.
- Page 15 BEDIENING Het kook-/eierwekker alarm uitschakelen Wanneer de ingestelde tijd/kookduur verstreken is gaat het alarm af terwijl het rode lampje van de actieve kook-/eierwekker en “00” blijven knipperen. • Druk op een willekeurige bedieningstoets om het alarm uit te schakelen. • U kunt de + of - toets ingedrukt houden om sneller de gewenste kookduur in te stellen.
- Page 16 BEDIENING In onderstaande tabel ziet u de duur van de kookautomaat per vermogensstand: Stand Seconden De kookautomaat uitschakelen De kookplaat is ingeschakeld. In de display knippert ‘A.’ om en om met een vermogensstand. De kookzone is actief. • Druk op de - toets. In de display verschijnt een andere vermogensstand, ‘A.’...
- Page 17 KOKEN Gezond koken Rookpunt van verschillende oliesoorten Om gezond te bakken, adviseert Atag om de oliesoort af te stemmen op de baktemperatuur. Elke oliesoort heeft een ander rookpunt waarbij giftige gassen vrijkomen. In onderstaande tabel ziet u de rookpunten van verschillende oliesoorten.
- Page 18 KOKEN Kookstanden Het onderstaande overzicht is uitsluitend bedoeld als leidraad, omdat de instelwaarde afhankelijk is van de hoeveelheid en samenstelling van het gerecht en de pan. Gebruik stand 9 voor: • snel aan de kook brengen; • slinken van bladgroenten; •...
- Page 19 ONDERHOUD Reinigen Schakel, voordat u met schoonmaken begint, eerst het (kinder)slot in. Dagelijkse reiniging • Voor de dagelijkse reiniging kunt u het beste een mild reinigings- middel en een vochtige doek gebruiken. • Nadrogen met keukenpapier of een droge doek. •...
- Page 20 STORINGEN Algemeen Indien u een barstje of scheurtje (hoe klein ook) op de glasplaat ziet, schakel dan de kookplaat onmiddellijk uit, neem direct de stekker van de kookplaat uit het stopcontact, verbreek de (automatische) zekering(en) in de meterkast of zet de schakelaar in de meterkast op nul bij een vaste aansluiting.
- Page 21 STORINGEN Symptoom Mogelijke oorzaak Oplossing Foutcode E2 - Elektronica oververhit. - Laat het toestel afkoelen tot Er is mogelijk een te grote de code verdwijnt. pan geplaatst op de zone rechtsvoor. - Toestel heeft onvoldoende - Zorg voor voldoende ventilatie. ventilatie.
- Page 22 Benodigde vrije ruimte rondom Voor een veilig gebruik is voldoende ruimte romdom de kookplaat noodzakelijk. Controleer of deze ruimte aanwezig is. HL6271T: 600 mm HL6271G: 600 mm HL6271M: 640 mm HL7271G: 770 mm...
- Page 23 INSTALLATIE Inbouwmaten In de volgende illustraties zijn de afmetingen van de uitsparingen aangegeven. HL6271T/G min.50 HL6271M min.50 NL 23...
- Page 24 INSTALLATIE HL7271G min.50 HL7271M min.50 NL 24...
- Page 25 INSTALLATIE Wanneer de kookplaat breder is dan het kastje, met een werkblad met een dikte van minder dan 43 mm, moet u een uitsparing aan beide zijden in het kastje zagen, zodat het toestel vrij ligt van het kastje. Inbouwmaten in corpus x<43 mm: y = 43 mm - x x>= 43 mm: y = 0 mm NL 25...
- Page 26 INSTALLATIE Elektrische aansluiting Veel voorkomende aansluitingen: • 3 fasen met 1 nul aansluiting (3 1N, 400 V ~ / 50 Hz): ▷ De spanning tussen de fasen en de nul is 230 V ~. Tussen de fasen staat een spanning van 400 V ~. Breng een verbindingsbrug aan tussen de aansluitpunten 4-5.
- Page 27 INSTALLATIE Inbouwen Controleer of het keukenmeubel en de uitsparing voldoen aan de gestelde eisen ten aanzien van afmetingen en venti latie. Behandel van kunststof of houten werkbladen de kopse kanten met eventueel afdichtvernis, om uitzetten van het werkblad door vocht te voorkomen.
- Page 28 INSTALLATIE Technische gegevens Deze toestellen voldoen aan alle relevante CE richtlijnen. Type kookplaat HL6271T HL6271G HL6271M HL7271G HL7271M Keramisch Aansluiting 230V - 50Hz 230V - 50Hz 230V - 50Hz 230V - 50Hz 230V - 50Hz Max. vermogen kookzones (kW) Linksvoor...
- Page 29 MILIEU ASPECTEN Afvoeren toestel en verpakking Bij de vervaardiging van dit toestel is gebruik gemaakt van duurzame materialen. Dit toestel moet aan het eind van zijn levenscyclus op verantwoorde wijze worden afgevoerd. De overheid kan u hierover informatie verschaffen. De verpakking van het toestel is recyclebaar. Gebruikt kunnen zijn: •...
- Page 30 NL 30...
-
Page 31: Table Of Contents
CONTENTS Your ceramic hob Introduction GB 4 Control panel GB 5 Description GB 6 Safety instructions Cooking time limiter GB 7 Using the touch controls GB 8 Pans GB 8 Operation Switching on GB 10 Setting the power GB 10 Switching off GB 10 Residual heat indicator... -
Page 32: Your Ceramic Hob
YOUR CERAMIC HOB Introduction This hob has been designed for the real lover of cooking. The hob is equipped with ‘Cooklight’ elements. These are very rapid-heating, radiant elements with a high efficiency, which is very favourable for heating-up times. What’s more, these elements also have very good heat distribution. -
Page 33: Control Panel
YOUR CERAMIC HOB Control panel 1. Level indicator rear left 2. 3 Zone element indicator rear left 3. 2 Zone element indicator rear left 4. Zone selection button rear left 5. Zone selection button front left 6. Level indicator front left 7. - Page 34 YOUR CERAMIC HOB Description HL6271T HL6271G HL6271M HL7271G HL7271M Cooking zone Ø 145 1,2 kW Cooking zone Ø 140/210 1,0/2,2 kW Cooking zone Ø 160 1,5 kW Cooking zone Ø 170/170x265 1,5/2,4 kW Cooking zone Ø 180 1,8 kW Cooking zone Ø 120/180/210 0,8/1,6/2,3 kW Cooking zone Ø...
-
Page 35: Cooking Time Limiter
SAFETY Read the separate safety instructions before using the device! Cooking time limiter • The cooking time limiter is a safety function of your cooking appliance. It will operate if you forget to switch off your hob. • Depending on the setting you have chosen, the cooking time will be limited as follows: Setting The cooking zone switches off... -
Page 36: Use
Using the touch controls The touch controls may take some getting used to if you are used to other (rotary) controls. Place the tip of your finger flat on the control to achieve the best results. You do not have to apply any pressure. Pans Pans for ceramic cooking Ceramic cooking requires a particular quality of pan. - Page 37 Attention • Grains of sand may cause scratches which cannot be removed. Only put pans with a clean base on the cooking surface and always pick pans up to move them. • Always keep the lid on the pan when cooking, in order to avoid energy loss.
-
Page 38: Operation
OPERATION Switching on • Place a pan on a cooking zone. • Touch the On/Off button. You will hear a short beep and all displays show “0.”. If no further action is taken, the hob automatically switches off after 10 seconds. Setting the power •... -
Page 39: Residual Heat Indicator
OPERATION Residual heat indicator The zone can remain hot for some time after having been used. An “H” remains on the display as long as the cooking zone is hot. Zone function The ‘extra zone element’ function can be used to activate an extra zone element. -
Page 40: (Child) Lock
OPERATION (Child) lock You can secure the hob with the (child) lock. With this setting, the hob cannot be switched on and the cooking zone settings cannot be changed. The (child) lock button gives you access to the following two functions: (Standard) lock mode Child lock mode The (standard) lock mode... -
Page 41: Kitchen / Egg Timer
OPERATION Switch the hob to (child) lock mode before cleaning it to prevent it from accidentally switching on. Kitchen / Egg timer A kitchen timer can be set for each cooking zone. All of the kitchen timers can be used at the same time. The hob also has an egg timer. Both the kitchen timer and the egg timer can be set to a maximum of 99 minutes. - Page 42 OPERATION Switching off the egg timer (when 1 or more cooking zones are active) • Press the kitchen / egg timer button until the egg timer indicator starts blinking. • Touch and hold the - button until “01.” shows in the display. Then press the - button again, or press the + and - buttons simultaneously.
-
Page 43: Automatic Heat-Up Function
OPERATION • Touch and hold the - button for the kitchen timer/egg timer until “01.” shows in the display. Touch the - button again, or press the + and - buttons simultaneously. The kitchen timer is now in stand-by mode. The selected kitchen timer automatically switches off after 10 seconds. - Page 44 OPERATION The table below shows the duration of the automatic heat-up function for each power setting: Setting Seconds Switching off the automatic heat-up function The hob is switched on. ‘A.’ and the power setting flash alternately in the display. The cooking zone is active. •...
-
Page 45: Cooking
Healthy cooking Burning point of different types of oil To ensure your food is fried as healthily as possible, Atag recommends choosing the type of oil according to the frying temperature. Each oil has a different burning point at which toxic gasses are released. The below table shows the burning points for various types of oil. -
Page 46: Cooking Settings
COOKING Cooking settings Because the settings depend on the quantity and composition of the contents of the pan, the table below is intended as a guideline only. Use setting 9 to: • bring the food or liquid to the boil quickly; •... -
Page 47: Maintenance
MAINTENANCE Cleaning Set the (child) lock before you start cleaning the hob. Daily cleaning • Best for daily cleaning is a damp cloth with a mild cleaning agent. • Dry with kitchen paper or a dry teacloth. • Special cleaning agents for ceramic hobs have the advantage that a thin layer remains on the glass surface so that over-cooked food and lime scale are less likely to get burnt into the hob, making it easier to clean the next time. -
Page 48: Faults
FAULTS General If you notice a crack in the glass top (however small), switch the hob off immediately, unplug the hob, turn off the (automatic) fuse switch(es) in the meter cupboard or, in the event of a permanent connection, set the switch in the power supply lead to zero.) Contact the service department. - Page 49 FAULTS Symptom Possible cause Solution Spontaneous changing of the - The pan is too close to the - Keep the pan at a distance cooking setting. touch controls. of at least 2 cm from the touch controls. Fault code U400 Overvoltage, 400V appliance Connect appliance according connected incorrectly.
-
Page 50: Installation
• Damage caused by incorrect connection, installation or use, will not be covered by the guarantee. Clearance Sufficient all-round clearance is essential to the safe use of the hob. Check that there is enough clearance. HL6271T: 600 mm cooker hood HL6271G: 600 mm cabinet HL6271M: 640 mm... - Page 51 INSTALLATION Installation dimensions The dimensions and recesses are shown in the illustrations beneath. HL6271T/G min.50 HL6271M min.50 GB 23...
- Page 52 INSTALLATION HL7271G min.50 HL7271M min.50 GB 24...
- Page 53 INSTALLATION If the hob is wider than the cupboard, with a worktop less than 43 mm thick, saw a cut-out in both sides of the cupboard, so the appliance is detached from the cupboard. Installation dimensions inside the cabinet x<43 mm: y = 43 mm - x x>= 43 mm: y = 0 mm GB 25...
-
Page 54: Electrical Connection
INSTALLATION Electrical connection Common connections: • 3 phases with 1 zero connection (3 1N, 400 V ~ / 50 Hz): ▷ The voltage between the phases and the zero is 230 V ~. The voltage between the phases is 400 V ~. Fit a connecting bridge between connecting points 4-5. -
Page 55: Building In
INSTALLATION Building in Check that the cabinet and the cut-out meet the dimension and ventilation requirement Threat the sawn ends of wooden or synthetic worktops with sealing varnish if necessary, to prevent moisture causing the worktop to swell. Lay the hob upside down on the worktop. Remove the protective layer from the sealing tape and apply the tape in the groove of the aluminium profile or on the edge of the glass plate. -
Page 56: Technical Details
INSTALLATION Technical details This appliance complies with all relevant CE directives. Hob type HL6271T HL6271G HL6271M HL7271G HL7271M Ceramic Connection 230V - 50Hz 230V - 50Hz 230V - 50Hz 230V - 50Hz 230V - 50Hz Max. capacity cooking zones (kW) -
Page 57: Environmental Aspects
ENVIRONMENTAL ASPECTS Disposal of packaging and appliance In the manufacturing of this appliance durable materials were used. Make sure to dispose of this equipment responsibly at the end of its lifecycle. Ask the authorities for more information regarding this. The appliance packaging is recyclable. The following may have been used: •... - Page 58 GB 30...
Need help?
Do you have a question about the HL6271T and is the answer not in the manual?
Questions and answers