Table of Contents
Advertisement
Available languages
Available languages
Quick Links
Advertisement
Chapters
Table of Contents

Related Manuals for Atag HI9572SV


Summary of Contents for Atag HI9572SV
- Page 1 Gebruiksaanwijzing inductiekookplaat Instructions for use induction hob HI1272S HI8472SV HI9271SV HI6271SV HI9271SVI HI7271S HI7271SI HI9272SV HI9272SVI HI8271S HI9571SV HI8271SI HI9572SV HI8272S HI9571SVT HI8471SV...
- Page 2 Handleiding NL 3 - NL 36 Manual EN 3 - EN 36 Gebruikte pictogrammen - Pictograms used Belangrijk om te weten - Important information Tip - Tip...
-
Page 3: Table Of Contents
INHOUDSOPGAVE Uw inductiekookplaat Inleiding Bedieningspaneel Beschrijving Gebruik Werking van de aanraaktoetsen Inductiekoken Werking inductie Inductiegeluiden Pannen Bediening Inschakelen en vermogen instellen Automatische pan detectie (APd) Restwarmte-indicatie Boost Vermogen verdeling kookzones Bridge induction Uitschakelen Stand-by modus Eco stand-by modus Kinderslot Pauze Herkennen van een modus Timer / Kookwekker Geluidssignaal in- en uitschakelen... -
Page 4: Uw Inductiekookplaat
UW INDUCTIEKOOKPLAAT Inleiding Deze inductiekookplaat is ontworpen voor de echte kookliefhebber. Koken op een inductiekookplaat heeft een aantal voordelen. Het is comfortabel, omdat de kookplaat snel reageert en ook op een zeer laag vermogen is in te stellen. Dankzij het hoge vermogen gaat het aan de kook brengen zeer snel. -
Page 5: Bedieningspaneel
UW INDUCTIEKOOKPLAAT Bedieningspaneel Pauzetoets Pauze-indicatie Kinderslotindicatie/Eco stand-by indicatie Sleuteltoets (kinderslot- / eco stand-by functie) Menufuncties inductie Slide control (12 standen) Standen-indicatie Boost indicatie Tijd verlagen toets 10. Tijd ophogen toets 11. Timer/kookwekker 12. ‘Minuten achter de punt’ indicatie 13. Timer-/kookwekkertoets 14. -
Page 6: Beschrijving
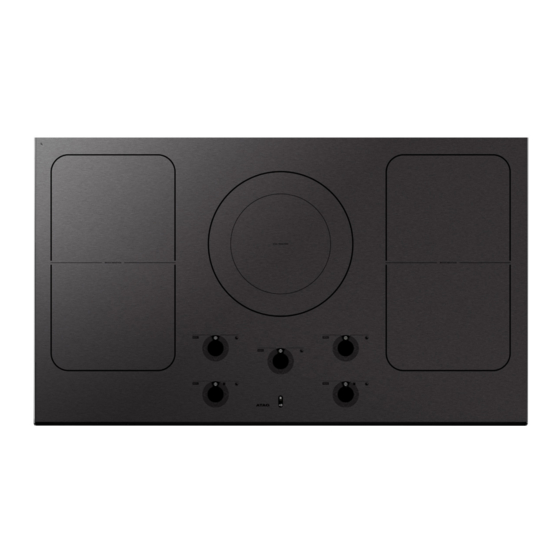
UW INDUCTIEKOOKPLAAT Beschrijving HI9271SV / HI9271SVI HI9272SV / HI9272SVI 3. Kookzone Ø 260 / 5,5 kW (dubbel ring) 4. Bridge induction zone 180 x 220 mm 3,7kW (koppelbare zones) NL 6... - Page 7 UW INDUCTIEKOOKPLAAT HI9571SV HI9572SV 2. Kookzone Ø 180 3,0 kW 3. Kookzone Ø 260 / 5,5 kW (dubbel ring) 4. Bridge induction zone 180 x 220 mm 3,7kW (koppelbare zones) NL 7...
- Page 8 UW INDUCTIEKOOKPLAAT HI9571SVT HI8471SV 1. Kookzone Ø 210 / 3,7 kW 2. Kookzone Ø 180 / 3,0 kW 4. Bridge induction zone 180 x 220 mm / 3,7 kW (koppelbare zones) 6. Kookzone Ø 260 / 3,7 kW NL 8...
- Page 9 UW INDUCTIEKOOKPLAAT HI8472SV HI8271S / HI8271SI 1. Kookzone Ø 210 / 3,7 kW 2. Kookzone Ø 180 / 3,0 kW 4. Bridge induction zone 180 x 220 mm / 3,7k W (koppelbare zones) NL 9...
- Page 10 UW INDUCTIEKOOKPLAAT HI8272S HI7271S / HI7271SI 1. Kookzone Ø 210 / 3,7 kW 2. Kookzone Ø 180 / 3,0 kW 5. Kookzone Ø 145 / 2,2 kW NL 10...
- Page 11 UW INDUCTIEKOOKPLAAT HI6271SV HI1272S 1. Kookzone Ø 210 / 3,7 kW 2. Kookzone Ø 180 / 3,0 kW 3. Kookzone Ø 260 / 5,5 kW (dubbel ring) 4. Bridge induction zone 180 x 220 mm / 3,7 kW (koppelbare zones) NL 11...
-
Page 12: Gebruik
GEBRUIK Werking van de aanraaktoetsen Het bedienen van de kookplaat door middel van de aanraaktoetsen en slider is even wennen als u andere bediening gewend bent. Leg uw vingertoppen plat op de toetsen voor het beste effect. U hoeft niet hard te drukken. -
Page 13: Werking Inductie
GEBRUIK Werking inductie In het toestel wordt een magnetisch veld opgewekt. Door een pan met een ijzeren bodem op een kookzone te plaatsen ontstaat in de panbodem een inductiestroom. Deze inductiestroom wekt warmte op in de panbodem. Comfortabel De spoel (1) in de kookplaat De elektronische regeling is nauwkeurig en eenvoudig in te stellen. -
Page 14: Pannen
GEBRUIK Ventilator maakt geluid Om de levensduur van de elektronica te vergroten, is het apparaat voorzien van een ventilator. Als u het apparaat intensief gebruikt, wordt de ventilator ingeschakeld en hoort u een zoemend geluid. Ook nadat u het apparaat heeft uitgeschakeld, kan de ventilator nog geluid maken. Automatische pandetectie Wanneer de automatisch pandetectie (APd) actief is, is een tikkend geluid waarneembaar ook als de zone niet in gebruik is. - Page 15 GEBRUIK Let op! Wees voorzichtig met dunne plaatstaal geëmailleerde pannen: • op een hoge stand kan het emaille er afspringen wanneer de pan te droog is; • door het hoge vermogen kan de panbodem gemakkelijk kromtrekken. Let op! Gebruik nooit pannen met een vervormde bodem. Een holle of bolle bodem kan de werking van de oververhittingsbeveiliging belemmeren.
-
Page 16: Bediening
BEDIENING Inschakelen en vermogen instellen 1. Druk op de sleuteltoets. Er klinkt een enkel geluidssignaal. 2. Plaats een pan op het midden van een kookzone. De APd registreert een pan en in de display verschijnt een knipperende ‘-’. Wanneer u geen verdere actie onderneemt, schakelt de kookzone na 10 seconden vanzelf uit. -
Page 17: Restwarmte-Indicatie
BEDIENING Restwarmte-indicatie Na gebruik van een kookzone kan de gebruikte zone nog een tijd heet blijven. Zolang de kookzone heet is, blijft er een ‘H’ in de display staan. Boost De ‘boost’ functie kunt u gebruiken om gedurende een korte tijd (maximaal 10 minuten) op het hoogste vermogen te koken. -
Page 18: Bridge Induction
De Bridge induction zones kunnen aan elkaar gekoppeld worden. Hierdoor ontstaat 1 grote zone die gebruikt kan worden voor bijvoorbeeld de ATAG grillplaat, de ATAG teppanyaki, een grote vispan of meerdere pannen op hetzelfde vermogen. • Indien de Bridge induction zones gekoppeld zijn kunnen deze niet op boost gezet worden en kunnen de menufuncties niet gebruikt worden. -
Page 19: Stand-By Modus
BEDIENING Alle kookzones tegelijk uitschakelen Druk kort op de sleuteltoets om alle kookzones gelijktijdig uit te schakelen. Er klinkt een enkel geluidssignaal. Naast de sleuteltoets blijft een rood lampje langzaam aan en uit gaan. • De kookplaat staat nu in de eco stand-by modus (zie ook ‘eco stand-by modus’). -
Page 20: Kinderslot
BEDIENING Wist u dat Na 30 minuten in de stand-by modus schakelt de kookplaat automatisch naar eco stand-by modus om onnodig energieverbruik te voorkomen. Kinderslot U kunt de kookplaat met het kinderslot vergrendelen. Onbedoeld inschakelen van de kookzones wordt hiermee voorkomen. De kookplaat naar kinderslot schakelen •... -
Page 21: Herkennen Van Een Modus
BEDIENING ▷ Alle kookzones worden automatisch teruggeschakeld naar stand 1 of 2. ▷ Alle toetsen zijn inactief behalve de sleuteltoets en de pauzetoets. Ook de aan-/uittoetsen van de afzonderlijke kookzones blijven actief, echter deze reageren met een vertraging van twee seconden zodat u het bedieningspaneel kunt schoonmaken. - Page 22 BEDIENING De timerfunctie De kookwekkerfunctie De timer is niet te koppelen aan De kookwekker is te koppelen aan een kookzone. een kookzone. Dit houdt in dat de kookzone uitschakelt als de ingestelde tijd afgelopen is. De timerfunctie schakelt na De kookwekkerfunctie is te het drukken op de timer-/ bereiken vanuit de timerfunctie kookwekkertoets na 3 seconden...
-
Page 23: Geluidssignaal In- En Uitschakelen
BEDIENING Let op! • De kookwekker is gekoppeld aan de kookzone indien de bijbehorende kookzone ingeschakeld is. • Indien de kookwekker gekoppeld is aan een kookzone zal de kookzone uitschakelen nadat de ingestelde tijd verstreken is. Het kookwekkeralarm gaat af en geeft gedurende een kwartier in afnemende mate een geluidssignaal, terwijl ‘0.00’... -
Page 24: Automatische Kookprogramma's
BEDIENING Automatische kookprogramma’s Uw kookplaat is voorzien van 6 automatische kookprogramma’s. De eventuele eindtijd van een automatisch kookprogramma kunt u zelf instellen met behulp van de kookwekkerfunctie (zie pagina 20). De kookprogramma’s zijn gebaseerd op gangbare hoeveelheden. De tabellen zijn bedoeld als richtlijn, door de ruime marges kunt u het gerecht naar uw eigen wensen aanpassen. - Page 25 3,5 l alleen water 1) Na het geluidssignaal kan de rijst of pasta worden toevoegd. * Deze functie werkt het best met pannen die door ATAG worden geadviseerd (zie hiervoor www.atagservice.nl). ** Deze menufuncties werken het best als ze worden opgestart aan het begin van het kookproces.
- Page 26 Hoge pan (Ø 200) Ø 210 / Vario 4000 g Grote pan (Ø 240) Ø 260 4000 g Grote pan (Ø 240) Ø 260 dubbel * Deze functie werkt het best met pannen die door ATAG worden geadviseerd (zie hiervoor www.atagservice.nl). NL 26...
- Page 27 500 - 600 g Koekenpan Ø 260 dubbel * Deze functie werkt het best met pannen die door ATAG worden geadviseerd (zie hiervoor www.atagservice.nl). ** Deze menufuncties werken het best als ze worden opgestart aan het begin van het kookproces.
-
Page 28: Gezond Koken
Ø 260 dubbel Gezond koken Rookpunt van verschillende oliesoorten Om gezond te bakken, adviseert Atag om de oliesoort af te stemmen op de baktemperatuur. Elke oliesoort heeft een ander rookpunt waarbij giftige gassen vrijkomen. In onderstaande tabel ziet u de rookpunten van verschillende oliesoorten. -
Page 29: Kookstanden
BEDIENING Kookstanden Het onderstaande overzicht is uitsluitend bedoeld als leidraad, omdat de instelwaarde afhankelijk is van de hoeveelheid en samenstelling van het gerecht en de pan. Gebruik ‘boost’ en stand 11 en 12 voor: • snel aan de kook brengen; •... -
Page 30: Onderhoud
ONDERHOUD Gebruik stand 1 t/m 3 voor: • trekken van bouillon; • pocheren; • warmhouden; • bereiden van stoofvlees; • smoren van groenten; • smelten van chocolade; • smelten van kaas. Reinigen Schakel, voordat u met schoonmaken begint, eerst het kinderslot in. Dagelijkse reiniging •... -
Page 31: Storingen
STORINGEN Algemeen Indien u een barstje of scheurtje (hoe klein ook) op de glasplaat ziet, schakel dan de kookplaat onmiddellijk uit, neem direct de stekker van de kookplaat uit het stopcontact, verbreek de (automatische) zekering(en) in de meterkast of zet de schakelaar in de meterkast op nul bij een vaste aansluiting. - Page 32 STORINGEN Symptoom Mogelijke oorzaak Oplossing De kookpannen maken lawaai Dit wordt veroorzaakt door de Bij een hoge kookstand is dit tijdens het koken. doorstroming van de energie normaal bij bepaalde pannen. van de kookplaat naar de Dit is niet schadelijk voor de kookpan.
- Page 33 STORINGEN Symptoom Mogelijke oorzaak Oplossing Foutcode F8 en F08 / Toestel oververhit. Het toestel laten afkoelen en het rode lampje naast de opnieuw beginnen met koken. kinderslottoets brandt en het lampje boven de pauzetoets knippert. Foutcode F9 en/of continu Spanning te hoog en/of niet Laat uw aansluiting wijzigen.
-
Page 34: Service
SERVICE Aanvullende service eisen voor het integreren (vlak inbouwen) van de kookplaat (‘SI’ en ‘SVI’ modellen) • Na het geïntegreerd inbouwen moet de kookplaat vanaf de onderkant toegankelijk blijven voor het verlenen van service. • Een eventuele lade of oven onder de kookplaat moet gemakkelijk te verwijderen zijn. -
Page 35: Informatie (Eu) 66/2014
INFORMATIE (EU) 66/2014 NL 35... -
Page 36: Milieuaspecten
MILIEUASPECTEN Afvoeren toestel en verpakking Bij de vervaardiging van dit toestel is gebruik gemaakt van duurzame materialen. Dit toestel moet aan het eind van zijn levenscyclus op verantwoorde wijze worden afgevoerd. De overheid kan u hierover informatie verschaffen. De verpakking van het toestel is recyclebaar. Gebruikt kunnen zijn: •... - Page 37 TABLE OF CONTENTS Your induction hob Introduction Control panel Description Operation of the touch-sensitive buttons Induction cooking How induction works Induction noises Pans Operation Switching on and power setting Automatic pan detection (APd) Residual heat indicator Boost Two cooking zones one in front of the other Bridge induction Switching off Stand-by mode...
-
Page 38: Your Induction Hob
YOUR INDUCTION HOB Introduction This hob has been designed for the real lover of cooking. Cooking on an induction hob has a number of advantages. It is easy, because the hob reacts quickly and can also be set to a very low power level. Because it can also be set to a high power level, it can bring dishes to the boil very quickly. -
Page 39: Control Panel
YOUR INDUCTION HOB Control panel Pause button Pause indication Child lock indication/Eco standby indication Key button (child lock/eco stand by function) Induction menu functions Slide control (12 levels) Level indication Boost indication Time reduction button 10. Time increase button 11. Timer / Kitchen timer 12. -
Page 40: Description
YOUR INDUCTION HOB Description HI9271SV / HI9271SVI HI9272SV / HI9272SVI 3. Cooking zone Ø 260 5.5 kW (double ring) 4. Bridge induction zone 180 x 220 mm 3.7kW (linkable zones) EN 6... - Page 41 YOUR INDUCTION HOB HI9571SV HI9572SV 2. Cooking zone Ø 180 3,0 kW 3. Cooking zone Ø 260 / 5,5 kW (double ring) 4. Bridge induction zone 180 x 220 mm 3,7kW (linkable zones) EN 7...
- Page 42 YOUR INDUCTION HOB HI9571SVT HI8471SV 1. Cooking zone Ø 210 / 3,7 kW 2. Cooking zone Ø 180 / 3,0 kW 4. Bridge induction zone 180 x 220 mm 3,7kW (linkable zones) Cooking zone Ø 260 / 3,7 kW EN 8...
- Page 43 YOUR INDUCTION HOB HI8472SV HI8271S / HI8271SI 1. Cooking zone Ø 210 / 3,7 kW 2. Cooking zone Ø 180 / 3,0 kW 4. Bridge induction zone 180 x 220 mm 3,7kW (linkable zones) EN 9...
- Page 44 YOUR INDUCTION HOB HI8272S HI7271S / HI7271SI 1. Cooking zone Ø 210 / 3,7 kW 2. Cooking zone Ø 180 / 3,0 kW 5. Cooking zone Ø 145 / 2,2 kW EN 10...
- Page 45 YOUR INDUCTION HOB HI6271SV HI1272S 1. Cooking zone Ø 210 / 3,7 kW 2. Cooking zone Ø 180 / 3,0 kW 3. Cooking zone Ø 260 / 5,5 kW (double ring) 4. Bridge induction zone 180 x 220 mm 3,7kW (linkable zones) EN 11...
-
Page 46: Use
Operation of the touch-sensitive buttons The operation of the hob by means of the touch-sensitive buttons takes a while getting used to when you’re used to a different operation. For the best effect, place your finger tips flat on the buttons. You don't have to press hard. -
Page 47: How Induction Works
How induction works A magnetic field is generated in the appliance. By placing a pan with an iron base on a cooking zone, a current is induced in the pan base. This induced current generates heat in the base of the pan. Easy The coil (1) in the hob (2) The electronic controls are accurate and easy to set. -
Page 48: Pans
The fan makes a noise The appliance is equipped with a fan in order to increase the service life of the electronic components. If you use the appliance intensively, the fan will be switched on and you will hear a buzzing noise. The fan may still make a noise after you have switched the appliance off. - Page 49 Note Be careful with enamelled thin sheet-steel pans: • the enamel may chip (the enamel comes loose from the steel), if you switch the hob on at a high setting when the pan is (too) dry; • the base of the pan may warp - due, for example, to overheating or to the use of too high a power level.
-
Page 50: Operation
OPERATION Switching on and power setting 1. Press the key button. A single audio signal sounds. 2. Place a pan in the middle of a cooking zone. The APd registers a pan and a flashing ‘-’ appears in the display. If you don’t do anything else, the cooking zone will switch off automatically after 10 seconds. -
Page 51: Residual Heat Indicator
OPERATION Residual heat indicator After a cooking zone has been used it may still remain hot for a while. As long as the cooking zone is still hot an “H” will be visible in the display. Boost You can use the ‘boost’ function to cook at the highest power level during a short period of time (max.10 minutes). -
Page 52: Bridge Induction
The Bridge induction zones can be linked to each other. This creates one large zone that can be used, for example, for the ATAG grill plate, the ATAG teppanyaki, a large fish pan or various pans on the same power. -
Page 53: Stand-By Mode
OPERATION Switching off all cooking zones Press key button to switch off all the cooking zones at the same time. A single beep will be heard. The red childproof lock indicator next to the button will blink very slowly. • The induction hob is now in eco stand-by mode (see also ‘eco stand-by mode’). -
Page 54: Child Lock
OPERATION Did you know that After 30 minutes in the stand-by mode the hob will automatically switch to the eco stand-by mode to prevent unnecessary energy consumption. Child lock Your induction hob is equipped with a childproof lock that lets you lock the appliance. -
Page 55: Recognising A Mode
OPERATION ▷ Any set timers/kitchen timers will stop. ▷ All active cooking zones are switched to setting 1 or 2. ▷ All buttons are inactive except for the key button and the pause button. The on/off buttons of the individual cooking zones also remain active, they do however react with a delay of two seconds so that you can clean the operating panel. - Page 56 OPERATION The timer function The kitchen timer function The timer cannot be linked to a The kitchen timer can be linked to cooking zone. a cooking zone. This means the cooking zone switches off if the set time has passed. When the timer/kitchen timer The kitchen timer function can be button is pressed, the timer...
-
Page 57: Switching The Audible Signal On And Off
OPERATION The kitchen timer alarm beeps for a quarter of an hour while decreasing as the time passes, while '0.00' and the red upwards arrow keep flashing. Press again the timer/kitchen timer button or remove the pan from the cooking zone to switch off the kitchen timer alarm again. -
Page 58: Automatic Cooking Programmes
OPERATION Automatic cooking programmes Your hob is fitted with 6 automatic cooking programmes. You can set any end time of an automatic cooking programme with the aid of the kitchen timer function (refer to page 20). The cooking programmes are based on regular quantities. The tables are meant as a guideline, because of the large margins you can alter the dish according to your wishes. - Page 59 3.5 l only water 1) After the beep the rice or pasta can be added. * This function works best with pans recommended by ATAG (please refer to www.atagservice.nl). ** These menu functions work best if they are started at the beginning of the cooking process.
- Page 60 High pan (Ø 200) Ø 210 / Vario 4,000 g Large pan (Ø 240) Ø 260 4,000 g Large pan (Ø 240) Ø 260 double * This function works best with pans recommended by ATAG (please refer to www.atagservice.nl). EN 26...
- Page 61 500 - 600 g Frying pan Ø 260 double * This function works best with pans recommended by ATAG (please refer to www.atagservice.nl). ** These menu functions work best if they are started at the beginning of the cooking process.
-
Page 62: Healthy Cooking
Healthy cooking Burning point of the various types of oil Burning point of separate kinds of oil. ATAG advises choosing an oil based on the baking temperature to bake in a healthy way. Every kind of oil has a different burning point at which toxic gases are released. You can see the burning points of different kinds of oil in the table below. -
Page 63: Cooking Settings
OPERATION Cooking settings Because the settings depend on the quantity and composition of the dish and the pan, the table below is intended as a guideline only. Use setting ‘boost’ and setting 11 and 12 to: • bring the food or liquid to the boil quickly; •... -
Page 64: Maintenance
MAINTENANCE Use settings 1-3 to: • simmer bouillon; • stew meats; • simmer vegetables; • melt chocolate; • poach; • keep warm; • melt cheese. Cleaning Activate the childproof lock before you start cleaning the hob. Daily cleaning • Regular maintenance straight after use prevents the food working its way in for a long period and causing stubborn stains which are hard to remove. -
Page 65: Faults
FAULTS General If you notice a crack in the glass top (however small), switch the hob off immediately, unplug the hob, turn off the (automatic) fuse switch(es) in the meter cupboard or, in the event of a permanent connection, set the switch in the power supply lead to zero. - Page 66 FAULTS Symptom Possible cause Solution The pans make a noise while This is caused by the energy This is normal for certain cooking. flowing from the hob to the pans at a high cooking saucepan. setting. This is not harmful for the pans or hob.
- Page 67 FAULTS Symptom Possible cause Solution Fault code F8 and F08 / the Appliance overheated. Allow the appliance to cool red lamp next to the child down and lock button is illuminated and start cooking once again. the lamp above the pause button is flashing.
-
Page 68: Service
SERVICE Additional service requirements for the integration (flush installation) of the hob (‘SI’ and ‘SVI’ models) • Once it has been integrated, the hob must remain accessible from underneath for service purposes. • If a drawer or oven is built in under the hob it must be easily removable. -
Page 69: Information (Eu) 66/2014
INFORMATION (EU) 66/2014 EN 35... -
Page 70: Environmental Considerations
ENVIRONMENTAL CONSIDERATIONS Disposing of the appliance and packaging Sustainable materials have been used when manufacturing this appliance. This appliance must be disposed of responsibly at the end of its service life. The government can provide you with information about this. The packaging of the appliance is recyclable. - Page 71 EN 37...
- Page 72 Het toestel-identificatieplaatje bevindt zich aan de onderkant van het toestel. The appliance identification card is located on the bottom of the appliance. Plak hier het toestel-identificatieplaatje. Stick the appliance identification card here. Houd, wanneer u contact opneemt met de serviceafdeling, het complete typenummer bij de hand.
Need help?
Do you have a question about the HI9572SV and is the answer not in the manual?
Questions and answers