
Subscribe to Our Youtube Channel
Related Manuals for Whistler WIC4750


Summary of Contents for Whistler WIC4750
- Page 1 OWNER’S MANUAL WIC4750 Wireless Inspection Camera With Recording Color LCD Monitor...
-
Page 2: Packing List
INTRODUCTION Welcome Thank you for choosing a Whistler product. We are dedicated to providing products that represent both quality and value. Please read the user manual carefully before using this product. If you have additional questions, please visit the FAQ page on our website at www.whistlergroup.com or call toll free 800-531-0004,... -
Page 3: Feature Description
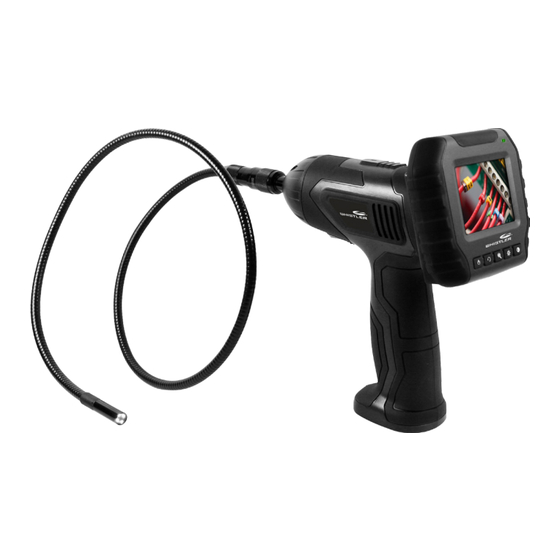
FEATURE DESCRIPTION Camera Unit Power Indicator 3.3 ft. Camera Tube Signal Output Power ON / OFF LED Brightness Control 9mm Camera Lens with LEDS Monitor Power Indicator 3.5in. LCD Display Menu Right Record Video Power ON / OFF Take Picture Image Rotation Delete/ Zoom... -
Page 4: Installation
INSTALLATION Installation Installing the Camera Flexible Tube When connecting the camera tube to the handheld unit, make sure that the keyed ends are properly aligned. Once they are lined up, finger tighten the knob to hold the connector in place. Keyed end plugs Finger tighten the into socket... - Page 5 INSTALLATION Install Monitor for Wired Use This product also supports wired use by connecting the monitor to the camera. Connect AC Adapter Connect the adapter to the monitor and then plug the adapter into a wall outlet. The power indicators on the handheld unit and the monitor will light red, which indicates the monitor and the handheld unit are charging at the same time and they will turn off after fully charged.
- Page 6 INSTALLATION Video Out Insert the video cable into the Video Out jack on the side of the unit. Insert the other end of the video cable to a video in on a TV or other video monitor system. The unit will provide high quality video to an external monitor.
- Page 7 INSTALLATION Insert SD Card (Optional) After the SD Card is inserted properly, the monitor will indicate icon; otherwise, icon will appear. Connect USB Cable Use the USB cable to connect the monitor to a PC. The USB online icon appears on the PC. Open My Computer, find the Mobile Disk icon.
-
Page 8: Operation
OPERATION Operation Rotate the ON/OFF switch to turn on the camera. The power indicator on top of the handheld unit will illuminate. The switch then acts as a dimmer of the LED’s, that surrounds the camera and provide high quality lighting. Press and hold on the Power ON/OFF button on monitor for 2 seconds, the power indicator will be green and the picture will display on LCD display. - Page 9 OPERATION Image orientation as below: Rotate the ON/OFF switch to adjust display brightness. Press the button to digital zoom the image. Zoom capacity of 1.5x, 2x and 3x.
- Page 10 OPERATION Gently guide the tube into the desired location. Slight adjustments can be made while maneuvering the head in a forward direction. IMPORTANT: The flexible tube can be bent to accommodate exploration in a variety of locations. The accessories can be used to retrieve small items such as screws or rings.
-
Page 11: Monitor Operation
MONITOR OPERATION Recording Video 1. In real-time monitoring mode, press the button to begin recording. 2. Press again to stop recording and save video. NOTE: The video will be automatically saved as an individual file every 30 minutes. “Memory Full” appears on the LCD screen to indicate that the SD card memory is full. - Page 12 MONITOR OPERATION NOTE: Icon next to a file name indicates that the file is a video. Icon next to a file indicates that the file is a picture. For playback video: Press the button to select your desired video, and then press OK button to playback.
- Page 13 MONITOR OPERATION Deleting Video/Picture 1. In real-time monitoring mode, press the button to toggle to the video/picture folder. 2. Press the button to select your desired folder, and then press OK button. 3. Press the button to select your desired file, and then press the button.
- Page 14 MONITOR OPERATION How to enter the Setting Mode In real-time monitoring mode, press the MENU button: Language Setting 1. In the setting mode, press the button to select ‘SYSTEM SETTING’, and then press OK button. 2. Press the button to select ‘Language’, and then press OK button, the following interface will appear: 3.
- Page 15 MONITOR OPERATION Video System Setting 1. In the setting mode, press the button to select ‘SYSTEM SETTING’, and then press OK button. 2. Press the button to select ‘Video System’ and then press OK button. 3. Press the button to toggle between NTSC and PAL. Once your desired system is selected, press OK button to confirm and press the MENU button to exit.
- Page 16 MONITOR OPERATION Default Setup 1. In the setting mode, press the button to select ‘SYSTEM SETTING’, and then press OK button. 2. Press the button to select ‘Default Setup’ and then press OK button. 3. Press the button to toggle between YES and NO, that is to restore default or cancel.
- Page 17 MONITOR OPERATION Date/Time Setting 1. In the setting mode, press the button to select ‘Date/ Time’ and then press OK button, The right interface will appear: 2. Press OK button to select Date or Time; Press the button to adjust selection; Press the MENU button to confirm and exit. Frame Rate Setting 1.
- Page 18 MONITOR OPERATION Time Stamp Setting 1. In the setting mode, press the button to select ‘RECORDER SETTING’, and then press OK button. 2. Press the button to select ‘Time Stamp’ and then press OK button. 3. Press the buttons to toggle between On and Off. Once your desired selection is made, press the OK button to confirm and press the MENU button to exit.
-
Page 19: Fcc Information
(2) this device must accept any interference received, including interference that may cause undesired operation. IMPORTANT: FCC requirements state that changes or modifications not expressly approved by Whistler could void the user’s authority to operate the equipment. FCC ID: TW5GB8863... -
Page 20: Troubleshooting
TROUBLESHOOTING Troubleshooting Why won’t the monitor turn on? • Make sure that the monitor has been charged at least overnight before first use. Press the reset button on the unit. Message on monitor says to “See Manual for Troubleshooting“. • Make sure that the handheld unit is turned on and that the camera tube is properly attached to the handheld unit. - Page 21 TROUBLESHOOTING Why does the video look “Scrambled”? • There are two video formats that the inspection camera can be set to: NTSC format which is used in North America. The PAL format is used in Europe and other overseas countries. Enter the menu selection and check the video format to make sure the monitor is in NTSC format.
-
Page 22: Specifications
SPECIFICATIONS WIC4750... -
Page 23: Consumer Warranty
All express or implied warranties for this product are limited to one (1) year. Whistler is not liable for damages arising from the use, misuse, or operation of this product including but not... - Page 24 1412 South 1st St. Rogers, AR. 72756 Please allow 3 weeks turnaround time. IMPORTANT: Whistler will not assume responsibility for loss or damage incurred in shipping. Therefore, please ship your unit insured with return receipt requested. CODs will not be accepted! 2.
- Page 25 WARRANTY The minimum out of warranty service fee for your Whistler WIC4750 is $75.00 (U.S.). If you require out of warranty service, please return your unit as outlined in the section “Service Under Warranty” along with a cashier’s check or money order in the amount of $75.00.
-
Page 26: Corporate Headquarters
1716 SW Commerce Dr. Ste. 8 Bentonville, AR 72712 Toll Free (800) 531-0004 TEL (479) 273-6012 FX (479) 273-2927 www.whistlergroup.com CUSTOMER RETURN CENTER 1412 South 1st St. Rogers, AR 72756 Customer Service Tel (800) 531-0004 Email: info@whistlergroup.com 04A15 © 2015 The Whistler Group, Inc.
Need help?
Do you have a question about the WIC4750 and is the answer not in the manual?
Questions and answers