
Related Manuals for R-Tech TIG180PDC


Summary of Contents for R-Tech TIG180PDC
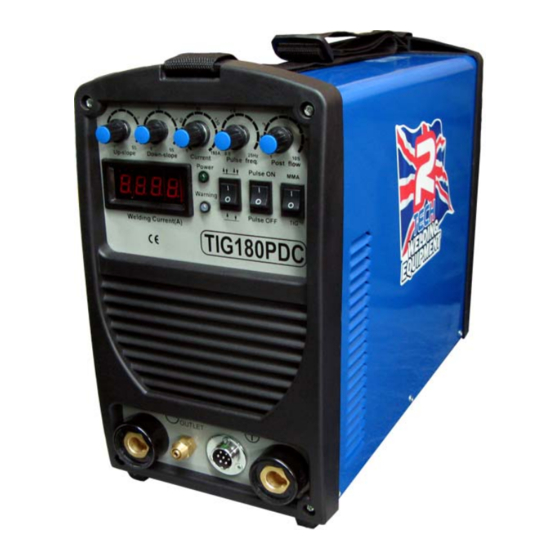
- Page 1 Tel: 01452 733933 Fax 01452 733939 TIG180PDC TIG WELDER OPERATION INSTRUCTIONS...
- Page 3 60% duty cycle. We want you to take pride in operating our Tig180PDC as much pride as we have taken in making this product for you. Please read all information in this manual before operation PLEASE EXAMINE CARTON AND EQUIPMENT FOR DAMAGE IMMEDIATELY When this equipment is shipped, title passes to the purchaser upon receipt from the courier.
- Page 4 Welding Capability – Duty Cycle The R-Tech Tig180PDC is rated at 180 Amps at 60% duty cycle on a ten minute basis. If the duty cycle is exceeded a thermal protector will shut machine off until the machine cools.
- Page 5 Safety Precautions Read entire section before starting installation WARNING! Electric Shock can kill – Only qualified personnel should perform this installation. Turn off input power at the fuse box before working on this equipment. Do not touch electrically live parts. Always connect the machine to an earthed mains supply as per national recommended standards.
-
Page 6: Electrical Installation
Electrical Installation WARNING! ELECTRIC SHOCK CAN KILL Machine grounding and High Frequency Interference Protection This welder must be grounded to earth. See national electrical codes fro proper grounding methods. The high frequency generator being similar to a radio transmitter may cause interference to radio, TV and other electronic equipment. - Page 7 Do not touch electrically live parts The TIG180PDC Inverter Tig Welder requires a 240V 50/60Hz supply. It requires a 16A supply for Tig operation and a 22A supply for MMA welding. It comes with a 3 metre mains cable attached.
- Page 8 Connections for Tig180PDC Rear machine connections Fig 1 1. On/Off Switch 2. Earth for chassis If experiencing localized interference when using machine, connect workbench to this point using correct graded earth wire (not normally used) 3. Gas input connector Connect input gas hose ensuring connection is tight 4.
-
Page 9: Connections For Tig (Gtaw) Welding
Connections for TIG (GTAW) Welding Fig 2 1. Negative power connector - Connect Tig Torch Dinze to power connector by inserting and twisting until tight 2. Gas outlet Connect the torch gas hose 3. Positive power connector + Connect the earth lead to by inserting and twisting until tight and the earth clamp to work/bench 4. -
Page 10: Connections For Stick Mma (Smaw) Welding
Connections for STICK MMA (SMAW) Welding Fig 3 1. Negative power connector - Connect the earth lead to by inserting and twisting until tight and the earth clamp to work/bench. 2. Positive power connector + Connect the electrode holder by inserting and twisting until tight... -
Page 11: Controls And Settings
Controls and Settings Fig 4 1. Up slope Adjustment 0-5 seconds. The main welding current raises from minimum amperage to main current selected in time selected when weld started 2. Down slope Down-Slope adjustment 0-5 seconds. The main welding current decreases from main amperage to minimum amperage in time selected when weld finished 3. - Page 12 5. Gas post flow adjustment Adjustable from 1 – 10 seconds. The gas keeps flowing after weld has finished, this cools & stops tungsten from getting contaminated. Note: Gas pre-flow time is fixed at 0.5 seconds in TIG mode but no pre-flow time will occur if the arc is restarted during post flow time as gas is already flowing.
- Page 13 When the trigger mode is in the 4 step position the following sequence will occur Press and hold the tig torch switch to start sequence. The machine will open gas valve to start flow of shield gas, after a 0.5 seconds pre-flow time to purge air from torch hose the welding output of machine will be turned on and the arc will be started.
-
Page 14: Operating Machine
Operating machine SAFETY PRECAUTIONS WARNING! ELECTRIC SHOCK CAN KILL Do not touch electrically live parts or electrode with skin or wet clothing. Insulate yourself from work and ground Always wear dry insulating gloves WARNING! FUMES AND GASES can be dangerous Keep your head out of fumes &... - Page 15 Welding in TIG mode – No Pulse – No remote foot pedal 1. Connect the Tig Torch to machine, connect earth lead to machine & work piece. 2. Set the TIG/MMA switch to TIG 3. Set Pulse Switch to Off position 4.
-
Page 16: Tig Tungsten Size / Amperage Guide
Tig tungsten size / amperage guide All values below are based on using pure argon shielding gas. Other current values may be employed depending on the shielding gas and application ELECTRODE RATINGS Electrode Diameter (mm) 2% Thoriated on DC Pure Tungsten on DC Zirconiated 0.8% Tungsten (amps) (amps) -
Page 17: Maintenance
The troubleshooting guide is provided to help you locate possible machine malfunctions If fault / problem is not listed below check our Tig Welder Support page on our website www.r-techwelding.co.uk/support.php or contact R-Tech by phone. Contact details can be found on front of this manual and our website... -
Page 18: Tig Welding Problems
• Machine keeps overheating - Warning light is lit on machine Check if fan is running – if not contact R-Tech for repair Check the cooling vents for obstruction, blow out machine with clean dry low pressure air supply. Check for adequate ventilation around machine •... - Page 19 • Machine stuck on minimum amps when welding although higher amperage has been Make sure machine has not been set to 4-way operation as when in this mode when you press torch switch you get minimum amps and when you let go of switch machine will go to maximum amps set.
- Page 20 • No HF when torch trigger pressed, no blue spark between HF points Examine and clean HF points with clean dry low pressure air line HF PCB faulty – Contact R-Tech for repair MMA Stick welding problems • Stick electrode ‘blasts off’ when arc is struck...
- Page 21 21 21...
Need help?
Do you have a question about the TIG180PDC and is the answer not in the manual?
Questions and answers