
Related Manuals for R-Tech TIG261


Summary of Contents for R-Tech TIG261
- Page 1 Tel: 01452 733933 Fax 01452 733939 R-TECH TIG261 TFT DIGITAL AC/DC TIG WELDER OPERATION INSTRUCTIONS Version 2023-11...
-
Page 3: Table Of Contents
Index Page Introduction Safety Precautions Electrical Installation Technical Specifications Connections Controls & Settings AC TIG EASY SETUP DC TIG EASY SETUP DC TIG Manual Mode AC TIG Manual Mode AC Amplitude Memory Storing MMA STICK EASY SETUP MMA STICK Manual Mode Fan Control Menu Water Cooler Control Menu Fault Finding... - Page 4 60% duty cycle. We want you to take as much pride in operating our TIG261-TFT Digital as much pride as we have in making this product for you. Please read all information in this manual before operation PLEASE EXAMINE CARTON AND EQUIPMENT FOR DAMAGE IMMEDIATELY When this equipment is shipped, title passes to the purchaser upon receipt from the courier.
-
Page 5: Introduction
Welding Capability – Duty Cycle The R-Tech TIG261-TFT Digital is rated at 260 Amps at 60% duty cycle on a ten minute basis. If the duty cycle is exceeded a thermal protector will shut machine off until the machine cools. -
Page 6: Safety Precautions
Safety Precautions Read entire section before starting installation. Warning! Electric Shock can kill – Only qualified personnel should perform this installation. Turn off input power at the fuse box before working on this equipment. Do not touch electrically live parts. Always connect the machine to an earthed mains supply as per national recommended standards. -
Page 7: Electrical Installation
Electrical installation WARNING ELECTRIC SHOCK CAN KILL Electric Shock can kill – Only qualified personnel should perform this installation. Turn off input power at the fuse box before working on this equipment. Do not touch electrically live parts. Always connect the machine to an earthed mains supply as per national recommended standards. - Page 8 Allow machine to sit for 5 minutes minimum to allow the power capacitors to discharge before working inside this equipment. Do not touch electrically live parts The TIG261-TFT DIGITAL Inverter Tig Welder requires a 240V 50/60Hz supply. It requires a 32A supply. It comes with a 2.5 metre mains cable attached.
-
Page 9: Technical Specifications
Technical specifications Input 240V AC 50/60Hz Input amperage 32A Gross weight 29 KG Dimensions 438H x 232W x 550L (mm) Insulation IP21S Current range AC 3A - 260A Current range DC 2A - 260A 80-90V No load voltage Duty cycle 60% @ 260A Arc starting modes HF, Lift and Live... - Page 10 Technical specifications cont.. TIG EASY SETUP DC - Programs for Metal type Mild & stainless steel Metal thickness programs 1, 1.2, 1.5, 2, 3, 4, 5, 6mm Joint type programs Tee, Lap, Butt, Corner, Edge Pulse level programs .05Hz, 1Hz, 2Hz, 50Hz & 200Hz Pulse amps Stainless 65 % Pulse Width Stainless...
- Page 11 Technical specifications cont. MMA Manual DC Amp range 10 - 210A AC Amp Range 10 - 210A Duty cycle MMA 35% @ 210A Anti stick Hot start time 0 - 2 seconds Hot start % 0 - 100% Arc Force 0 - 100% Cellulosic Rods V.R.D Voltage reduction...
-
Page 12: Connections
Connections Front panel connections TIG mode - negative con- Quick release gas 7 pin socket for torch TIG mode - connect nector for TIG torch torch connector switch or remote foot earth lead pedal MMA mode - connect MMA mode - connect earth to negative MMA lead Rear panel connections... - Page 13 Rear panel connections cont.. Gas connector & Extra earth connection Extra earth connection, used if you experience 3/8 BSP male connector for gas input local interference (not normally used)
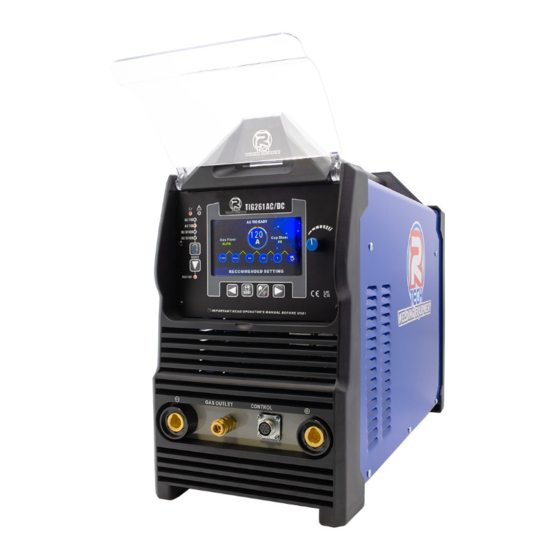
- Page 14 Front panel HD 5” Digital Colour Screen Easy to navigate menu system EASY SET mode - 100’s of pre-programmed weld settings AC,DC TIG & MMA 9 10 1 - SELECT button - Press to cycle through welding modes DC TIG, AC TIG, DC STICK, AC STICK 2 - EASY SET button - press to enable / disable EASY SET mode 3 - Control knob - Turn to change setting in small amounts, press and turn to change in larger steps 4 - LED indicator for weld mode selected...
-
Page 15: Controls & Settings
MMA (STICK) in Manual mode AC & DC EASY MODE R-Tech Easy mode takes the guesswork out of TIG welding. You normally had to enter all weld settings before beginning to weld on manual welders, we have done this for you. - Page 16 AC EASY MODE 6 easy steps are required to setup weld. Press left / right arrows to select setting which will be highlighted in red circle and description shown in bottom of screen. Then use control knob to select value required. In image below you can see TUNSGTEN SIZE is shown at bottom of screen and circle is highlighted in RED and showing 2.4mm size selected.
- Page 17 METAL TYPE (FILLER ROD TYPE USED) Then use control knob to select filler rod used. ALMG = 5356 Filler Rod, ALSI = 4043A Filler Rod Once correct material work thickness has been selected, press right arrow to move to next setting. JOINT TYPE Select from 5 joint types as below.
- Page 18 PULSE SETTING This is where you select pulse off, or settings as below by turning control knob Pulse welding was designed mainly for stainless steel and other exotic materials to control heat input to the metal and decrease heat deformation. It can be used on all materials including aluminium in AC.
- Page 19 REMOTE This is where you select how machine is triggered to start and remote control of amperage if required. 2T - Press trigger to start weld, release to finish weld. 4T - Press and hold trigger to start weld at start amps, release trigger to go to main amps.
- Page 20 RECOMMENDED SETTINGS OK will now turn RED, RECOMMENDED SETTINGS will now be loaded for you. Welding amps - shown in middle of display Post flow gas time - not shown The display will also show recommended Gas flow in LPM (set this on regulator or gas flow meter) Torch cup ceramic size (If not to hand, you can use a larger size) You are now ready to weld! Press trigger or foot pedal to weld.
- Page 21 DC EASY MODE 6 easy steps are required to setup weld. Press left / right arrows to select setting which will be highlighted in red circle and description shown in bottom of screen. Then use control knob to select value required. In image below you can see TUNSGTEN SIZE is shown at bottom of screen and circle is highlighted in RED and showing 2.4mm size selected.
- Page 22 METAL TYPE (BASE METAL) Then use control knob to select metal being welded STEEL = Mild Steel, SS = Stainless Steel Once correct metal type has been selected, press right arrow to move to next setting. JOINT TYPE Select from 5 joint types as below. Once correct joint type has been selected, press right arrow to move to next setting.
- Page 23 PULSE SETTING This is where you select pulse off, or settings as below by turning control knob Pulse welding was designed mainly for stainless steel and other exotic materials to control heat input to the metal and decrease heat deformation. Base amps is set to 75% in DC EASY mode for mild steel.
- Page 24 REMOTE This is where you select how machine is triggered to start and remote control of amperage if required. 2T - Press trigger to start weld, release to finish weld. 4T - Press and hold trigger to start weld at start amps, release trigger to go to main amps.
- Page 25 RECOMMENDED SETTINGS SCREEN OK will now turn RED, RECOMMENDED SETTINGS will now be loaded for you. Welding amps - shown in middle of display Post flow gas time - not shown The display will also show recommended Gas flow in LPM (set this on regulator or gas flow meter) Torch cup ceramic size (If not to hand, you can use a larger size) You are now ready to weld! Press trigger or foot pedal to weld.
- Page 26 DC MANUAL MODE R-Tech DC TIG manual mode gives you full control over every weld parameter available. DC Modes available DC Standard (No pulse) DC Pulse DC Tack weld DC Spot weld DC MANUAL - HOME SCREEN The above image shows the home page for DC manual mode.
- Page 27 DC MANUAL - HOME SCREEN cont.. REMOTE Options 2T - Press trigger to start weld, release to finish weld. 4T - Press and hold trigger to start weld at start amps, release trigger to go to main amps. To finish weld - Press and hold trigger to go to end amps, release and weld will stop.
- Page 28 Main welding settings screen. After setting home screen settings as required, now press the HOME button and the 2nd level screen will show as below. Pre-flow Gas Use control knob to adjust required Pre-flow gas time, then press arrow button to move to next setting. Adjustable between 0.0 - 60 seconds Start amps Use control knob to adjust required start amps then press arrow button to move to next setting.
- Page 29 Up slope Use control knob to adjust Up-slope time, then press arrow button to move to next setting. Adjustable between 0.0 - 30 seconds Down slope Use control knob to adjust Downslope time then press arrow button to move to next setting. Adjustable between 0.0 - 60 seconds...
- Page 30 End amps Use control knob to adjust end amps, then press arrow button to move to next setting. Adjustable between 2A - 260A Post flow gas time Use control knob to adjust post flow gas time then press arrow button to move to next setting. Adjustable between 0.0 - 60 seconds Once all settings have been set, you can start welding immediately or return to home screen by pressing home button and then you can adjust amperage or other settings if required.
- Page 31 DC Manual with PULSE ON After selecting PULSE on home screen you will now see 3 further options in DC manual 2nd screen. Pulse Time Use control knob to adjust required pulse time, then press arrow button to move to next setting. Adjustable between 5 - 95% Pulse Frequency Use control knob to adjust pulse frequency then press arrow button to move to next setting.
- Page 32 DC Manual with PULSE ON cont.. Pulse Amps Use control knob to adjust required pulse amperage, then press arrow button to move to next setting. Adjustable between 3 - 100% Now you have set the 3 required pulse settings you can start your weld. Brief explanation of pulse settings Pulse time When pulse welding you have the main (peak) and base (background) amperage.
- Page 33 DC TACK Mode Tack welding allows you to product one single fast tack weld for a selected time when trigger is pressed. You can also set a stitch time which will then set a delay time after first tack and then another tack weld will be started and this will be repeated for as long as trigger is pressed.
- Page 34 DC TACK Mode cont.. Stitch time Use control knob to adjust required stitch time, then press arrow button to move to next setting. If a stitch time of 0.0s is selected, then only one tack will happen on trigger press, once stitch time is above 0.0s then after first tack you will have this delay time and then another weld will be produced.
- Page 35 DC SPOT MODE SPOT welding allows you to product one single spot weld for a selected time when trigger is pressed. You can also set a stitch time which will then set a delay time after first spot and then another spot weld will be started and this will be repeated for as long as trigger is pressed.
- Page 36 AC MANUAL MODE R-Tech AC TIG manual mode gives you full control over every weld parameter available. AC Modes available AC Standard (No pulse) AC Pulse AC Advanced Pulse AC SPOT weld AC MANUAL - HOME SCREEN The above image shows the home page for AC manual mode.
- Page 37 AC MANUAL - HOME SCREEN cont.. REMOTE Options 2T - Press trigger to start weld, release to finish weld. 4T - Press and hold trigger to start weld at start amps, release trigger to go to main amps. To finish weld - Press and hold trigger to go to end amps, release and weld will stop.
- Page 38 Main welding settings screen. After setting home screen settings as required, now press the HOME button and the 2nd level screen will show as below. Pre-flow Gas Use control knob to adjust required Pre-flow gas time, then press arrow button to move to next setting. Adjustable between 0.0 - 60 seconds Start amps Use control knob to adjust required start amps then press arrow button to move to next setting.
- Page 39 Up slope Use control knob to adjust Up-slope time, then press arrow button to move to next setting. Adjustable between 0.0 - 60 seconds Waveform AC Use control knob to select AC waveform required then press arrow button to move to next setting. AC Wave modes available Squarewave - Most commonly used Sine...
- Page 40 AC Frequency Use control knob to adjust AC Frequency, then press arrow button to move to next setting. Adjustable between 20Hz - 400Hz AC Balance Use control knob to adjust AC balance %, then press arrow button to move to next setting. Adjustable between 5 - 70%...
- Page 41 Down slope Use control knob to adjust Downslope time then press arrow button to move to next setting. Adjustable between 0.0 - 60 seconds End amps Use control knob to adjust end amps, then press arrow button to move to next setting. Adjustable between 3 - 260A...
- Page 42 Post flow gas time Use control knob to adjust post flow gas time then press arrow button to move to next setting. Adjustable between 0.0 - 60 seconds Once all settings have been set, you can start welding immediately or return to home screen by pressing home button and then you can adjust amperage or other settings if required.
- Page 43 AC Manual with PULSE ON After selecting PULSE ON in home screen you will now see 3 further options in AC manual 2nd screen. Pulse Time Use control knob to adjust required pulse time, then press arrow button to move to next setting. Adjustable between 5 - 95% Pulse Frequency Use control knob to adjust pulse frequency then press arrow button to move to next setting.
- Page 44 AC Manual with PULSE ON cont.. Pulse Amps Use control knob to adjust required pulse amperage, then press arrow button to move to next setting. Adjustable between 3 - 100% Now you have set the 3 required pulse settings you can start your weld. Brief explanation of pulse settings Pulse time When pulse welding you have the main (peak) and base (background) amperage.
- Page 45 AC Manual with ADVANCED PULSE ON - MIXED AC/DC PULSE After selecting ADVANCED PULSE ON in home screen you will now see 1 changed option in AC manual 2nd screen - DC AMPS DC AMPS Use control knob to adjust required DC Amps, then press arrow button to move to next setting. Adjustable between 3 - 100%...
-
Page 46: Ac Amplitude
AC AMPLITUDE CONTROL Independent amplitude control is a very advanced feature and has many benefits, this allows the EN and EP amperage to be set independently allowing the user to direct more or less power into the workpiece and also take power / heat away from the tungsten. Increasing EN amperage while maintaining or reducing EP amperage narrows the arc allowing narrower welds and use of a smaller tungsten. - Page 47 Memory store save and load function 20 memory stores are available so you can save your preferred weld settings. To access program save menu, press the SAVE/LOAD button, the following screen will appear. Use the arrow buttons to move to required save slot. Now press and hold the SAVE button for 3 seconds, the saved program will turn YELLOW signalling the program has now been saved.
- Page 48 DC STICK in MANUAL mode DC & AC EASY MODE R-Tech EASY SET mode takes the guesswork out of MMA welding. You normally had to enter all weld settings before beginning to weld on manual welders, we have done this for you.
- Page 49 Selecting EASY SET parameters Use the left and right arrow buttons to move between each setting - once setting is highlighted in RED you use the control knob to change. Once you have entered all 5 parameters for weld, move onto OK so it goes RED (You can also press home button), the recommended welding amperage will be shown in middle of display.
- Page 50 MMA - STICK WELDING MANUAL MODE DC STICK in MANUAL mode AC STICK in MANUAL mode DC & AC MANUAL - HOME SCREEN The above image above shows the home page for STICK manual mode. In this menu press the arrow buttons to highlight in red the setting to be changed, then use control knob to select desired setting.
- Page 51 MMA - STICK WELDING MANUAL MODE cont.. After setting home screen settings as required, now press the HOME button and the 2nd level screen will show as below. DC MODE - STICK SETTINGS You can now select the following 3 parameters. User arrow buttons to highlight setting in red, then turn control knob to adjust.
- Page 52 AC MODE - STICK SETTINGS AC stick mode has 2 more settings when compared to DC mode. AC Frequency & AC Balance You can now select the following 2 parameters. User arrow buttons to highlight setting in red, then turn control knob to adjust. AC Frequency Hz Use control knob to adjust AC Frequency, then press arrow button to move to next setting.
- Page 53 Fan control system The machine has 3 intelligent fan control modes. ON - Fan on all the time. MODE1 - Fan by thermal sensor The machine has inbuilt inverter temperature monitoring and when a certain temperature is achieved the fan will switch on to cool machine down and stop when cooling has been sufficient. This saves on power consumption and also gives a quieter working environment especially when working on thin material, so only using low amperage power.
- Page 54 Water cooler control system The machine has 3 water cooler control modes. OFF - No power to rear 240V aux power outlet. ON - Water cooler on all the time The machine will give 240V continuous output to rear power outlet MODE1 - Water cooler turned on once arc is struck The machine will start the water cooler as soon as an arc has been established, it will continue to run for 1 minute after you have finished welding..
- Page 55 Allow machine to cool down and check fan vents for obstructions E02 - Overcurrent Reset machine and if problem persists contact R-Tech support team. E05 - Shorted Trigger This will show after the torch trigger or foot pedal has been pressed and the arc has not been established after 4 seconds.
Need help?
Do you have a question about the TIG261 and is the answer not in the manual?
Questions and answers