Beko WMI 71641 Installation & Operating Instructions And Washing Guidance
Automatic
fully integrated
washing machine
Hide thumbs
Also See for WMI 71641:
- Installation & operating instructions and washing guidanse (48 pages) ,
- User manual (56 pages)
Table of Contents
Advertisement
Quick Links
Advertisement
Table of Contents

Related Manuals for Beko WMI 71641


Summary of Contents for Beko WMI 71641
- Page 1 Automatic Fully Integrated Washing Machine WMI 71641 WMI 71441...
- Page 2 Please read this user manual first! Dear Customer, We hope that you get the best results from the product which has been manufactured in state-of-the-art plants and passed through a strict quality control procedure. Therefore, please read the entire user manual carefully before using the product and keep it as a reference for future use.
-
Page 3: Table Of Contents
TABLE OF CONTENTS 1 Your washing machine 5 Selecting a Program and Operating Your Machine Overview ..... . . 4 Technical specifications . -
Page 4: Your Washing Machine
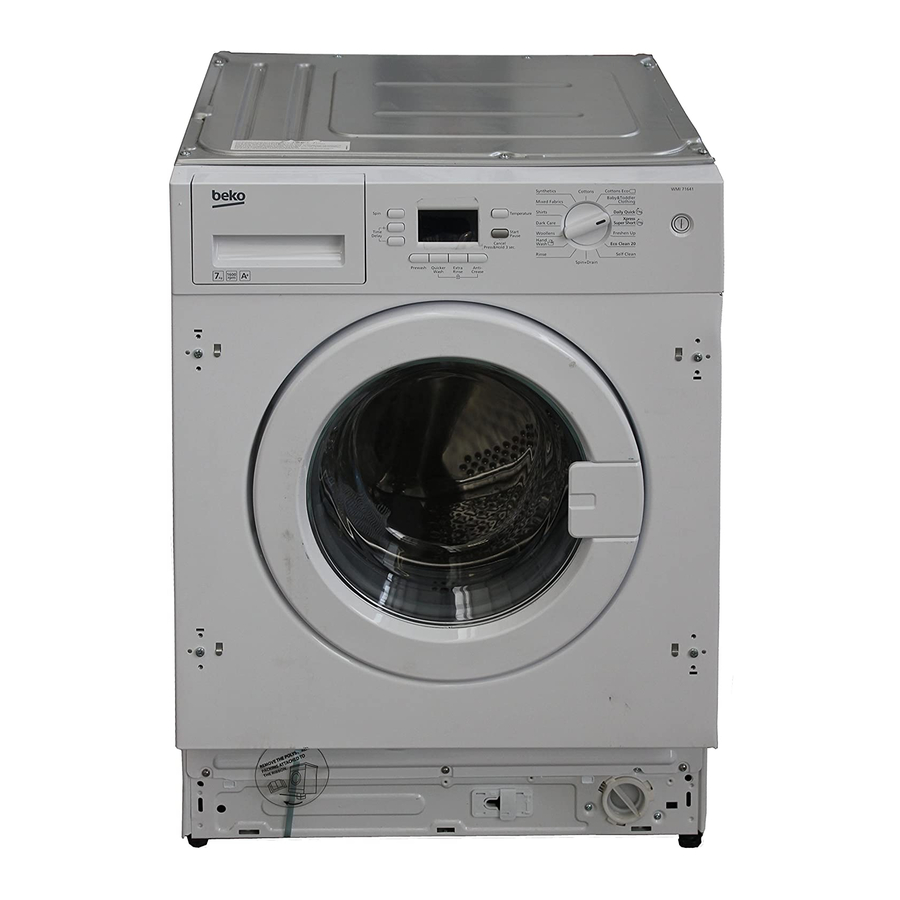
Your washing machine Overview 1- Power cable 5- Adjustable feet 2- Top lid 6- Loading door 3- Control panel 7- Detergent drawer 4- Filter cap 8- Drain hose... -
Page 5: Technical Specifications
Technical specifications Models (EN) WMI71641 WMI71441 Maximum dry laundry capacity (kg) Height (cm) Width (cm) Depth (cm) Net weight (±4 kg.) Electrical input (V/Hz) 230 V / 50Hz 230 V / 50Hz Total current (A) Total power (W) 2200 2200 Spin speed (rpm max.) 1600 1400... -
Page 6: Warnings
Warnings Please read the following information. First Use Otherwise, there may be the risk of • To prepare your machine for washing, personal injury or material damage. carry out your first washing process Moreover, any warranty and reliability without loading your machine and commitment will become void. -
Page 7: Safety Instructions
concerning use of the appliance by a it is operating. Do not let them tamper person responsible for their safety. with the machine. • Close the door when you leave the area where the machine is located. Safety instructions • Store all detergents in a safe place out •... -
Page 8: Installation
Installation Refer to the nearest Authorised Service Removing packaging Agent for installation of the product. To reinforcement make the product ready for use, review Tilt the machine backwards to remove the information in the user manual and the packaging reinforcement. Remove the make sure that the electricity, tap water packaging reinforcement by pulling the supply and water drainage systems are... -
Page 9: Connecting Water Supply
3. Attach the plastic covers supplied in the User Manual bag into the holes on the rear panel. (P) Keep the transportation safety bolts Ensure that the cold and hot water in a safe place to reuse when the connections are made correctly when washing machine needs to be moved installing the product. -
Page 10: Adjusting The Feet
Please call Beko Spare Part Department. well with an appropriate clamp as not (0845 6004911) and see built-in to come off and leak. -
Page 11: Electrical Connection
Electrical connection need to be replaced an ASTA approved BS1362 fuse of the same rating must Connect the product to a grounded outlet be used. Do not forget to refit the fuse protected by a fuse complying with the cover. In the event of losing the fuse values in the "Technical specifications"... -
Page 12: First Use
First use Transportation of the product Before starting to use the product, make 1. Unplug the product before sure that all preparations are made in transporting it. accordance with the instructions in 2. Remove water drain and water sections "Important safety instructions" supply connections. -
Page 13: Preparation
Preparation Things to be done for energy saving Following information will help you use the product in an ecological and energy- Wash with sensitive, efficient manner. Washing water .short programmes temperature • Operate the product in the highest capacity allowed by the programme you have selected, but do not overload;... -
Page 14: Correct Load Capacity
Correct load capacity The maximum load capacity depends on the type of laundry, the degree of soiling and the washing programme desired. The machine automatically adjusts the amount of water according to the weight of the loaded laundry. Follow the information in the “Programme and consumption table”. -
Page 15: Detergents And Softeners
Detergents and softeners Detergent Drawer Detergent drawer of your washing machine consists of four different compartments for powder main wash detergent, liquid main wash detergent, liquid softener and powder pre-wash detergent. Each of these laundry additives are dispensed automatically in the relevant time during the washing Programme. - Page 16 Particularly the concentrated softeners detergent. Since the bleach may cause must be diluted with warm water; irritation on skin, little amounts must be otherwise, the siphon may get clogged in used and rinsed thoroughly. Do not pour time. bleach directly onto the laundry and do not use it with colour laundry.
-
Page 17: Tips For Efficient Washing
Tips for efficient washing Clothes Light colours and Delicates/ Colors Dark colors whites Woolens/Silks (Recommended (Recommended (Recommended (Recommended temperature temperature temperature range temperature range range based range based based on soiling based on soiling level: on soiling level: on soiling level: level: 40-90C) cold-40C) cold-40C) -
Page 18: Selecting A Program And Operating Your Machine
Selecting a Program and Operating Your Machine Control panel Spin Speed Adjustment Button Display Temperature Adjustment Button Program Selection Knob On/Off Button Time Delaying Button (+/-) Auxiliary Function Buttons Start/Pause/Cancel Button... -
Page 19: Display Symbols
Display symbols Each of these main programs comprise of a complete washing process, including washing, rinsing and, if required, spin c d e cycles. When selecting the program you are going to use, always consider type of fabric, colour, degree of soiling and permissible water temperature. -
Page 20: Special Programs
• Cottons Eco • Shirts You may wash your normally soiled You can use this program to wash the durable cotton and linen laundry in this shirts made of cotton, synthetic and programme with the highest energy and synthetic blended fabrics. water saving compared to all other wash programmes suitable for cottons. -
Page 21: Temperature Selection
Spin Speed selection Use a lower spin speed for delicate Whenever a new program is selected, laundry. the maximum spin speed of the selected Temperature selection program is displayed on the spin speed Whenever a new program is selected, the indicator. -
Page 22: Program And Consumption Table
Program and consumption table Auxiliary functions Selectable Programme (°C) temperature range °C Cottons 2.30 1600 • • • • • • 90-Cold Cottons 1.50 1600 • • • • • • 90-Cold Cottons 0.85 1600 • • • • • •... - Page 23 • : Selectable * : Automatically selected, not cancellable. ** : Energy Label programme (EN 60456 Ed.3) *** If maximum spin speed of your machine is lower, selection may be made until maximum spin speed. - : See program description for maximum load. The auxiliary functions in the table vary according to the model of your machine.
-
Page 24: Auxiliary Functions
Auxiliary functions • Use this function for smaller amounts or slightly soiled laundry. Auxiliary Function Selection Buttons • Extra Rinse When this function (c) is selected, washing and rinsing is performed with plenty of water. “F3” symbol lights up on the display. -
Page 25: Starting The Program
2. Start symbol will fade. The standby symbol and the time delaying symbol Time delay will flash. With the “Time delay” function you can 3. Press time delaying button “-” to delay the program start up to 24 hours. decrease the desired time delay. Setting can be made in intervals of 30 Program duration after 30 minutes minutes. -
Page 26: Changing The Selections After The Program Has Started
• If the machine is not spinning, the Door lock program may be in rinse hold mode The Door Locked Symbol lights up when or the automatic spin correction the loading door is locked. This symbol system has been activated due to an will flash until the door is allowed to open. -
Page 27: Program In Rinse Hold Mode
corresponding step at which the cancellation was made will remain lit and “End” will appear on the screen. Program in rinse hold mode • This process is shown with the flashing Spin Symbol and the lit up Standby Symbol. If you wish to spin when the machine is in this mode: Adjust the spin speed. - Page 28 Maintenance and cleaning Detergent Drawer Remove any powder residue buildup in the drawer. To do this; • Open the hole in the bellow with the aid of a toothpick if it is clogged. Foreign metal substances in your machine can cause rust stains. In such cases: Clean the drum with a stainless steel cleaning agent.
- Page 29 machine. the filter must be cleaned only after the inside water is cooled down to avoid hazard of scalding. 2- Open the filter cap. The filter cap may be composed of one or two pieces according to the model of your machine. If it is composed of two pieces, press the tab on the filter cap downwards and pull the piece out towards yourself.
- Page 30 into their positions and pushing the upper • Place a large container at the end of part of it. the hose. Drain the water off into the container by pulling out the plug at the end of the hose. If the amount of water to be drained off is greater than the volume of the container, replace the plug, pour the water out and then...
-
Page 31: Troubleshooting
Troubleshooting Programme cannot be started or selected. • Washing machine has switched to self protection mode due to a supply problem (line voltage, water pressure, etc.). >>> Press and hold Start / Pause / Cancel button for 3 seconds to reset the machine to factory settings. (See "Canceling the programme") Water in the machine. - Page 32 Loading door cannot be opened. • Door lock is activated because of the water level in the machine. >>> Drain the water by running the Pump or Spin programme. • Machine is heating up the water or it is at the spinning cycle. >>> Wait until the programme completes.
- Page 33 Machine does not switch to spinning step. • There might be an imbalance of laundry in the machine. >>> Automatic unbalanced load detection system might be activated due to the unbalanced distribution of the laundry in the drum. Machine does not switch to spinning step when the laundry is not evenly distributed in the drum to prevent any damage to the machine and to its surrounding environment.
- Page 34 Colour of the clothes faded. • Excessive laundry was loaded in. >>> Do not load the machine in excess. • Detergent in use is damp. >>> Keep detergents closed in an environment free of humidity and do not expose them to excessive temperatures. •...
- Page 35 Detergent residue in the detergent drawer. • Detergent is put in wet drawer. >>> Dry the detergent drawer before putting in detergent. • Detergent has gotten damp. >>> Keep detergents closed in an environment free of humidity and do not expose them to excessive temperatures. •...
- Page 36 Laundry remains wet at the end of the programme • Excessive foam might have occurred and automatic foam absorption system might have been activated due to too much detergent usage. >>> Use recommended amount of detergent. Machine does not switch to spinning step when the laundry is not evenly distributed in the drum to prevent any damage to the machine and to its surrounding environment.
-
Page 37: Guarantee
Guarantee Your new Beko product is guaranteed • The product must be correctly against the cost of breakdown repairs installed, located and operated in for twenty four (24) months from the accordance with the instructions date of the original purchase. -
Page 38: Service
Should you experience any difficulty in You should also complete the details obtaining service please contact the below; it will help us assist you when Beko Customer Help-Line. requesting service. (The model number Tel: 0845 600 4911 is printed on the Instruction Booklet e-mail:service@beko.co.uk... -
Page 39: Built-In Installation
BUILT-IN INSTALLATION BUILT-IN INSTALLATION GUIDE 820 mm 10,4 mm 150,3 mm 2807110175.indd/040211.1720... - Page 43 IF THE CABINET DOOR OPENS TO RIGHT Use 35mm hinge cutting tool IF THE CABINET DOOR OPENS TO LEFT...
- Page 47 To increase height of product order optional part no: 1493...
Need help?
Do you have a question about the WMI 71641 and is the answer not in the manual?
Questions and answers