
Subscribe to Our Youtube Channel
Related Manuals for KCI infoV.A.C


Summary of Contents for KCI infoV.A.C
- Page 1 InfoV.A.C.® Therapy Unit Owner Service Manual Important Document File in your maintenance records.
-
Page 3: Table Of Contents
Important Safety Information Accompanies This Device ......................3 DISCLAIMER OF WARRANTY AND LIMITATION OF LIABILITY ......................3 Important Information For Users ................................4 InfoV.A.C.® Therapy Unit Feature Identification ..........................5 Introduction / About This Manual ................................6 Preparation For Use ...................................... 6 Unpack the Unit ...................................... - Page 4 Hanger Arm Rubber Block Replacement ............................29 Rubber V-Groove Anti-slip Pad Repair ..............................31 Specifications ........................................32 Spare Parts ........................................33 Symbols Used .......................................34 Service Manual ......................................34 Therapy Unit .......................................34 Customer Contact Information ................................34 Technical Report ......................................35 InfoV.A.C.® Therapy System Required Service Record ........................36...
-
Page 5: Warning
THE USE OR REPAIR OF THE PRODUCT OTHER THAN THOSE FOR WHICH DISCLAIMER OF WARRANTY OR LIMITATION OF LIABILITY IS EXPRESSLY PROHIBITED BY SPECIFIC, APPLICABLE LAW. NO PERSON HAS THE AUTHORITY TO BIND KCI TO ANY REPRESENTATION OR WARRANTY EXCEPT AS SPECIFICALLY SET FORTH IN THIS PARAGRAPH. -
Page 6: Important Information For Users
Important Information For Users In order for KCI products to perform properly, KCI recommends the following conditions. Failure to comply with these conditions will void any applicable warranties. • Use this product only in accordance with this manual, the device user manual and applicable product labeling. -
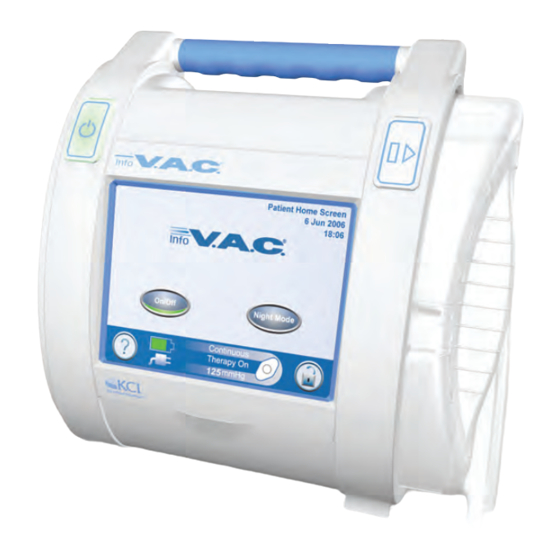
Page 7: Infov.a.c.® Therapy Unit Feature Identification
InfoV.A.C.® Therapy Unit Feature Identification Power On / Off Canister Release Button Button Touch Screen InfoV.A.C.® 500 mL Canister Stylus Canister Bellows UDI Door Memory Card Slot Infrared Data Port Patient Information USB Data Port Label Serial Number Label Carry Handle... -
Page 8: Introduction / About This Manual
Introduction / About This Manual This manual is designed to assist with routine service procedures for the InfoV.A.C.® Therapy Unit sold by KCI. Following these procedures ensures that the InfoV.A.C.® Therapy Unit is properly cleaned, fully functional and ready for patient use. These procedures include: •... -
Page 9: Serial Number Location
Follow institutional procedures used for the cleaning and disinfection of other hard surface durable electronic medical equipment. Ensure that the InfoV.A.C.® Therapy Unit and its power supply are not connected to AC power when using cleaning fluids of any nature. -
Page 10: Therapy Unit
Therapy Unit 1. Ensure therapy unit is unplugged from power supply. 2. Remove canister bellows from unit. Wipe / clean bellows with an antiseptic wipe. Ensure the bellows cavities and adjacent surfaces are clean of any foreign material. Use a cotton tipped applicator if necessary. Replace canister bellows when finished. -
Page 11: Power Supply
3. Inspect the power supply brick and cords for damage and cracked or exposed wiring. Contact KCI (see page 34) if replacement is necessary. 4. Inspect the caution labels attached to the power cords for legibility. Replace as necessary. -
Page 12: Service Procedures
Once these procedures are complete, the unit will be ready for patient use. These procedures should be performed as listed and in order: 1. When the unit is first received from KCI, as part of the initial inspection (starting at Inspect Unit for Damage). 2. Between each patient use. - Page 13 9. Check the touch screen for any visible signs of damage or excessive screen scuffing or scratches that could obscure screen elements. If damage is noted, contact KCI (see page 34). Deep or extensive screen scratches can be the source of intermittent erratic therapy unit operation.
-
Page 14: Hanger Arm And Rubber Anti-Slip Pad Inspection
16. If labels are missing or unacceptable damage is noted, KCI recommends placing a new label over the old. If necessary, carefully trim any damaged portions of the old label and then place the new label. KCI recommends that no attempt be made to completely remove the old label. -
Page 15: Battery Check / Change
The battery history label, located on the bottom of the unit, shows the battery install date and a calculated battery change date. Testing data has extended InfoV.A.C.® battery life to 60 months. The 60 month life is calculated from the original battery install date as long as the battery manufacturing date is within the previous 12 month period. - Page 16 11. Once the dates are verified, carefully examine the battery pack for any signs of damage, corrosion or overheating. KCI recommends replacing the battery pack if there is any doubt about its condition.
-
Page 17: Charge Battery
1. Set the unit in a secure place where it can be left while the battery is charging. 2. Plug the power supply cord into the InfoV.A.C.® Therapy Unit. 3. Plug the mains power cord into the power supply. 4. Plug the mains power cord into a grounded AC mains wall socket. -
Page 18: Power On / Screen Inspection
Power On / Screen Inspection All testing procedures from this point on will be done WITHOUT the InfoV.A.C.® Power Supply plugged into the unit to verify that the battery capacity is sufficient. Should the battery low alert be displayed at any point during the... -
Page 19: Canister Bellows Check
15. Combine the two files by copying and pasting one into the other. 16. Save the combined file to a permanent folder with the InfoV.A.C.® Therapy Unit serial number and download date as part of the file name. -
Page 20: Canister Fit
4. If the canister still will not easily fit and latch into place, substitute another canister and retry fitting the canister. 5. Once the canister fits properly, remove the canister and set aside. 6. If the canister will not fit the recess properly or latch into place, contact KCI (see page 34). -
Page 21: Verify Time And Date
Verify Time and Date The purpose of this procedure is to verify the unit displays the correct time and date and how to set it if it is incorrect. 1. With the unit powered on and the Clinician Home Screen visible, observe Clinician Home Screen the time and date in the upper right-hand corner of the screen. -
Page 22: Testing Procedures
Testing Procedures Pressure Transducer Check The purpose of this procedure is to perform the six month pressure transducer check. This check verifies that the InfoV.A.C.® Therapy Unit pressure transducers sense pressure correctly. Tools and Supplies: Calibrated digital manometer Locally sourced flexible tubing InfoV.A.C.®... -
Page 23: Unit Preparation
This procedure is performed with the InfoV.A.C.® Therapy Unit plugged into the InfoV.A.C.® Therapy Unit Power Supply. Unit Preparation 1. Ensure the canister seals are in place. Install the test canister, ensuring it locks into place, as shown. 2. Connect the calibrated digital manometer to the test canister tubing. -
Page 24: Sensor Accuracy Test
If the pump runs but the RPM Therapy Off 0mmHg display does not show a reading above zero, contact KCI to return the unit for repair. See page 5. Verify Pump Pressure and Wound Pressure on the screen read ± 6 mmHg of the set pressure. -
Page 25: Pressure Checks
Pressure Checks If the entire Pressure Transducer Check procedure was performed, ensure the InfoV.A.C.® Therapy Unit is unplugged from the InfoV.A.C.® Power Supply. The purpose of this procedure is to ensure the therapy unit pump responds to pressure setting adjustments. - Page 26 Alarm Tests. 28. Should the InfoV.A.C.® Therapy Unit fail any one of these pressure changes within 60 seconds, go to the Pressure Transducer Check section of this manual, enter the service screens via the access code and perform the Zero Pressure procedure.
-
Page 27: Alarm Tests
Tubing Cap, KCI PN M6275069, one each Canister Preparation These are normal InfoV.A.C.® canisters that can be reused for up to 6 months as a test canister. KCI recommends marking the canisters with Test Canister-Not For Human Use and the in-use date. -
Page 28: Unit Setup
All alarm tests should be performed under battery power. Unit Setup 1. Ensure the unit is not connected to the power supply. 2. Ensure the unit is operating in clinician mode. 3. Press the Therapy button. 4. Press the OK button. 5. -
Page 29: Canister Not Engaged
Canister Not Engaged 1. Release the canister from the unit by pressing the canister eject button. 2. Press the On/Off button to start therapy. 3. Press the Exit button to return to the Clinician Home Screen. 4. The Canister Not Engaged alarm should sound in approximately 30 seconds or less. -
Page 30: Final Settings
Recharge Battery The purpose of this procedure is to ensure the InfoV.A.C.® Therapy Unit is delivered to a patient placement with a fully charged battery. Depending on the initial battery charge level, this process may take up to six hours. -
Page 31: Hanger Arm Rubber Block Replacement
Cleaning cloth An appropriate sized tool for removing any residual old adhesive - a standard flat blade screwdriver may work. Protective gloves Rubber block (KCI PN M3240627), if required Procedure: 1. Using an appropriate tool, ensure all residual hot-melt adhesive is removed from the interior of the cast metal hanger arm hook. - Page 32 4. Insert the rubber block into the hook cavity, ensuring the adhesive remains inside the hook cavity. 5. Press the rubber block into place. 6. Immediately remove any excess adhesive on the block, hanger arm or cast metal hook. 7. Follow manufacturer directions to allow the adhesive to fully set before use.
-
Page 33: Rubber V-Groove Anti-Slip Pad Repair
The pad on the battery tray may be completely missing. There is no replacement PN for the battery tray V-groove anti-slip pad. KCI recommends replacing the entire tray if the pad is missing. If the pads on the rear case are missing, contact KCI, (see page 34). -
Page 34: Specifications
Specifications* InfoV.A.C.® Therapy Unit Dimensions............................... 9.05 x 8.6 x 6.8 in (23 x 22 x 17.5 cm) Weight.........................................6.37 lb (2.89 kg) Pressure Options ....................................50 to 200 mmHg Modes ....................................Continuous and Intermittent Medical Equipment with respect to electric shock, fire, and mechanical hazards only in accordance with UL 2601-1, EN60601-1, and CAN/CSA, C22.2 No. -
Page 35: Spare Parts
M6266106 InfoV.A.C.® Power Supply M6275069-5 T.R.A.C.™ Tubing Cap (5 Per Package) M7260522 Battery Box Screw - M4X12 Panhead M8275063/5 InfoV.A.C.® 500 mL Canister (with Gel) (box of 5 canisters) M8275071/5 InfoV.A.C.® 500 mL Canister (without Gel) (box of 5 canisters) -
Page 36: Symbols Used
This product is designated for separate collection at an appropriate collection point. Do not dispose of as household waste. Customer Contact Information For questions regarding this product, supplies, maintenance, or additional information about KCI products and services, please contact KCI or a KCI authorized representative, or: In the US call 1-800-275-4524 or visit www.kci1.com... -
Page 37: Technical Report
For the InfoV.A.C.® Therapy Unit, this means that the ground pin on the AC power supply cord has no functional or safety purpose and therefore has no connection whatsoever inside the device. -
Page 38: Infov.a.c.® Therapy System Required Service Record
Complete this form between each patient use and maintain as a permanent record. Date Service Completed: Circle any step not passed and return a copy of this sheet to KCI along with the unit. Inspector Name (Please Print): Signature: Unit cleaned and disinfected. - Page 39 PDI Sani-Cloth® Plus is a trademark of Nice-Pak Products, Inc. Loctite® 411™ is a trademark of Henkel Corporation. All other trademarks designated herein are proprietary to KCI Licensing, Inc., its affiliates, and / or licensors. © 2011 KCI Licensing, Inc. All rights reserved. 320857 Rev B 10/2011...
Need help?
Do you have a question about the infoV.A.C and is the answer not in the manual?
Questions and answers