KCI ActiV.A.C. Owner's Service Manual
Hide thumbs
Also See for ActiV.A.C.:
- User manual ,
- International user manual (60 pages) ,
- Owner's service manual (32 pages)

Related Manuals for KCI ActiV.A.C.


Summary of Contents for KCI ActiV.A.C.
- Page 1 ActiV.A.C. Therapy Unit ® Owner Service Manual Important Document File in your maintenance records 418474 Rev A February 2018...
-
Page 3: Table Of Contents
Table Of Contents Introduction / About This Manual ........................3 Preparation For Use ............................3 Unpack The Unit ............................3 Initial Inspection ............................3 Unit Features ..............................4 Serial Number Location ..........................5 Cleaning and Disinfection ..........................5 Infection Control ............................5 Supplies and Equipment Needed ......................... - Page 4 • Assembly, operations, extensions, re-adjustments, modifications, service or repairs must be performed by qualified personnel authorized by KCI. • Access codes to engineering screens are proprietary and remain property of KCI, and may only be used for the limited purpose as outlined in KCI copyrighted documentation.
-
Page 5: Introduction / About This Manual
3. Inspect all items for damage. If damage is noted, contact the shipping company for reporting/return procedures. 4. Inventory all items in shipping box against the packing slip. Contact KCI (see page 28) if there are any items missing. Initial Inspection The purpose of this inspection is to ensure the unit has arrived without any internal damage and that the battery is fully charged prior to the initial patient placement. -
Page 6: Unit Features
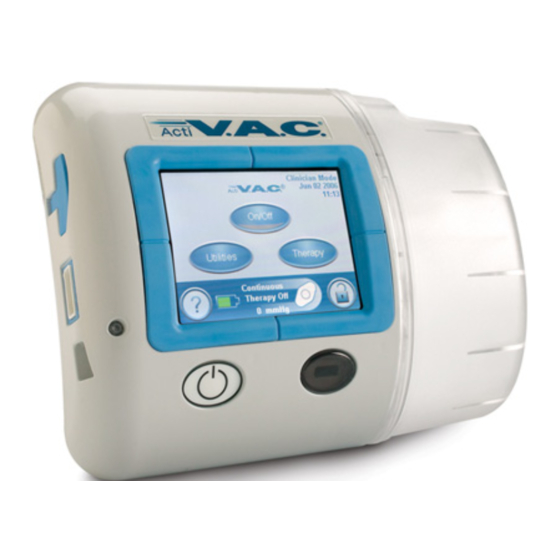
Unit Features Pump Port Wound Port Canister Seals Touch Screen Exhaust Filter Battery Cover Canister Stabilization Grommets Power On/Off Button Note: The compliance label Infrared Data Port and the manufacturer information and serial number label are located on the back of the unit. -
Page 7: Serial Number Location
® 1. If it becomes soiled during patient use. 2. Between each patient use. Infection Control Institutional policies regarding infection control may vary; however, KCI recommends the following regarding infection control when processing KCI V.A.C. ® Therapy devices: • Designate ‘contaminated’ and ‘clean’ areas for separating and storing equipment before and after transport, cleaning and disinfection. -
Page 8: Therapy Unit
Therapy Unit 1. Remove the unit from the plastic and/or fabric carrying case, as applicable. 2. Ensure therapy unit is unplugged from power supply. 3. Remove canister seals from unit. Wipe/clean seals with antiseptic. Ensure the seal cavities and adjacent surfaces are clean of any foreign material. -
Page 9: Power Supply
6. Place the clean power supply in a clear plastic bag and move it to the service area. Fabric Carrying Case The ActiV.A.C. Fabric Carrying Case (KCI P/N 340122) is designed as a single use item; do not launder or reuse. ®... -
Page 10: Service Procedures
Once these procedures are complete, the unit will be ready for patient use. These procedures should be performed as listed and in order: 1. When the unit is first received from KCI, as part of the initial inspection (starting at ‘Inspect Unit for Damage’). 2. Between each patient use. -
Page 11: Replace Exhaust Filter
The label manufacturer recommends NOT using any cleaning fluid or other cleaning material to remove any residual label adhesive. 8. Should the unit fail any of the above criteria, contact KCI (see page 28). 9. With the unit inspection complete, continue on to ‘Replace Exhaust ActiV.A.C. -
Page 12: Battery Check
• System Errors 7 and 8 are cleared by resetting patient defaults, see Final Settings section. • If the error recurs, contact KCI (see page 28). • If System Error 1 occurs, contact KCI (see page 28). 11. Press ‘Exit’ to return to the Clinician Home Screen. -
Page 13: Battery Change
Battery Change The purpose of this procedure is to change the battery. Ensure that the ActiV.A.C. unit is not connected to the ® power supply when removing or replacing the battery. Battery History Label 1. Verify that the Battery Change Due date on the Battery History label is at or exceeds the current date. -
Page 14: Pressure Checks
The ActiV.A.C. Therapy Unit battery must be replaced only ® with batteries supplied by KCI. Use of any other battery may compromise safety and/or cause erratic operation. 8. Obtain a new battery from KCI (KCI P/N 340079). 9. Obtain a new Battery History Label (KCI P/N 340168). - Page 15 2. Connect the PVC test fixture to the ActiV.A.C. unit as illustrated below. ® Hygroscopic Filter connected to Pump Port ActiV.A.C. ® Unit PVC Test Fixture Connected to Power Supply Needle Valve Power On/Off Switch 3. Ensure the calibrated manometer is connected as illustrated and powered on.
-
Page 16: 25 Mmhg Test
6. After acknowledging the warning screen, ensure the ActiV.A.C. unit is ® in Clinician Mode by observing the text in the upper right hand corner Clinician Mode of the screen, as illustrated. 6 Aug 2009 7. If not in Clinician Mode, press ‘?’, press ‘Clinician Mode’, press and 15:06 hold ‘OK’... -
Page 17: 200 Mmhg Test
3. On the Confirm screen, ensure that settings are Pressure: 125 mmHg; Confirm Mode: Continuous; Intensity: Low. If these settings are not correct, press ‘Back’ to change the incorrect setting. Pressure: 125 mmHg Mode: Continuous 4. Press ‘OK’. Intensity: Back Continuous Therapy Off 5. -
Page 18: 125 Mmhg Test
Therapy Unit fail any one of these pressure ® changes by not displaying the correct pressure within 60 seconds, contact KCI (see page 28). 9. With the Pressure Check complete, continue on to ‘Charge Battery and Six Hour Verification Test’. -
Page 19: Charge Battery And 6 Hour Unit Verification Test
Charge Battery and Six Hour Unit Verification Test The purpose of this procedure is to ensure the ActiV.A.C. unit is fully functional and the battery is fully charged. This six ® hour test is a minimum time. The process can be extended overnight or over a weekend if necessary. 1. - Page 20 Battery Charging Indicator LED and the ‘plug’ icon on the touch screen. Should either of these indicators flicker, repeat the wiggle test using a Utilities different power supply cord. 11. Should the ActiV.A.C. unit fail any of the above steps, contact KCI (see ® page 28). Continuous Therapy Off 0mmHg 12.
- Page 21 Continuous 30. Verify the ‘battery full’ icon appears. 31. Should the unit fail any of the above criteria, contact KCI (see page 28). Therapy Off 32. With the ‘Charge Battery and Six Hour Verification Test’ complete, continue on to ‘ Verify Time and Date‘.
-
Page 22: Verify Time And Date
Verify Time and Date The purpose of this procedure is to verify the unit displays the correct time and date and how to set it if it is incorrect. 1. With the unit powered on and the Clinician Home Screen visible, Clinician Mode 6 Aug 2009 observe the time and date in the upper right-hand corner of the screen. -
Page 23: Blockage Alert
Press’?’ or ‘Seal Check ™ for more information 8. Replace the tubing cap on the canister tubing. Continuous 9. Continue on to ‘Canister Not Engaged’ if the unit has correctly Blockage displayed this ‘Blockage Alert’, otherwise contact KCI (see page 28). 0mmHg... -
Page 24: Canister Not Engaged And Check Battery Level
7. Press ‘Reset’ to return to the Clinician Home Screen. Continuous 8. Remove this test canister from the unit. Therapy Off 9. Continue on to ‘Final Settings’ if the unit has correctly displayed this 0mmHg ‘Canister Full Therapy Interrupted’ alarm, otherwise contact KCI (see page 28). -
Page 25: Final Settings
Final Settings 1. With the ActiV.A.C. Therapy Unit still powered on with the Clinician ® Home Screen showing, press ‘?’, press ‘About’, press and hold the ‘Wrench Icon’ until the ‘Service Access’ screen appears. 2. Enter the code 772, press ‘OK’. 3. -
Page 26: Preparation For Transport And Patient Use
On-Premises Use Should the ActiV.A.C. Therapy Unit be used within a care facility without the patient leaving the premises, KCI ® recommends the following: Supplies needed: •... -
Page 27: Off-Premises Use
Off-Premises Use Should the ActiV.A.C. Therapy Unit be placed with a patient for use outside a care facility premises, KCI recommends the ® following: Supplies needed: • ActiV.A.C. ® Plastic Shipping Case • ActiV.A.C. ® Fabric Carrying Case • ActiV.A.C. -
Page 28: Specifications
Specifications Classification Equipment not suitable for use in the presence of a flammable anaesthetic mixture with air, oxygen or nitrous oxide. Medical Equipment • Type B, Applied Part • Class II or internally powered Equipment • IPX0 Dimensions and Therapy Options Dimensions..... -
Page 29: Spare Parts
Spare Parts This spare parts list is current as of December 2009. Contact KCI (see page 28) to verify current part numbers. Part Number Description 340024 ActiV.A.C. ® Battery Cover 340036 ActiV.A.C. Canister Stabilization Grommet (2 required) ® 340037 ActiV.A.C. -
Page 30: Symbols Used
Type B, Applied Part Conforms with the Waste Electrical and Electronic Equipment Directive (2002/96/EC). At the end of useful life, dispose of all waste according to local requirements, or contact your local KCI subsidiary or agent for advice. IPX0 Not protected against harmful effects of water. -
Page 31: Activ.a.c. ® Therapy System Required Service Record
Complete this form between each patient use and maintain as a permanent record. Date Service Completed: Circle any step not passed and return a copy of this sheet to KCI along with the unit. Inspector Name (Please Print): Signature: Verify Time and Unit cleaned and Date (pg 20) disinfected. - Page 32 Manufactured for: KCI USA, Inc. 12930 IH10 West San Antonio, Texas 78249 USA www.acelity.com...
Need help?
Do you have a question about the ActiV.A.C. and is the answer not in the manual?
Questions and answers