
Related Manuals for Gemini GWRVC15


Summary of Contents for Gemini GWRVC15
- Page 1 WIFI SMART ROBOT VACUUM CLEANER WIFI無線網絡 智能自動吸塵機 MODEL NO.: GWRVC15 A GILMAN GROUP BRAND...
- Page 2 Please read and retain for future reference. SAFETY INSTRUCTION - GENERAL • Use this appliance solely in accordance with these instructions. • This appliance is for household use only, not for commercial purpose. • Remove all packaging material from the appliance before use. •...
- Page 3 SAFETY INSTRUCTION - DURING OPERATION • Make sure your hands are dry before touching the appliance, power cord or plug. • Do not pick up the appliance if it falls into water. Remove the plug from the socket immediately. Do not use the appliance again. •...
-
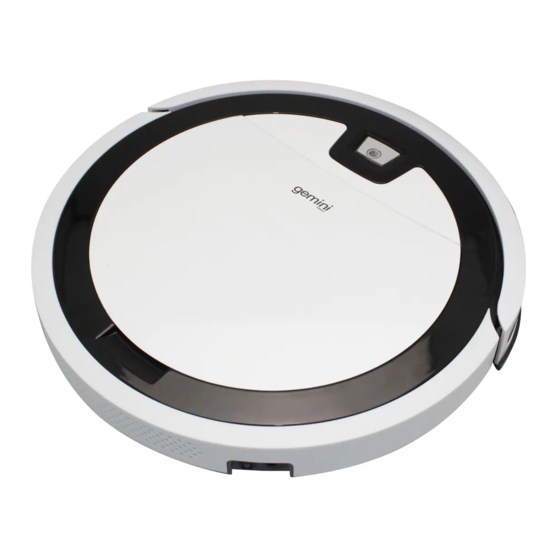
Page 4: Product Overview
PRODUCT OVERVIEW Main unit 26 25 1. Top cover 16. 2 Sets of Cleaning cloth 2. On/Off button 17. Dust box inlet 3. Obstacle avoidance device 18. Right Wheel 4. Signal window 19. Anti-drop sensor 5. Charging Socket 20. Right side brush (orange) 6. Main power On/Off switch 21. Charging contact of unit (Left) 7. Combined container 22. Anti-drop sensor (Dust & water compartment box) 23. Adaptor 8. Shell 24. Remote control 9. Universal wheel 25. Charging station 10. Anti-drop sensor 26. Charging connector 1 (Charging station) 11. Charging contact of unit (Right) 27. Charging connector 2 (Charging station) 12. Left side brush (white) 28. Signal window 13. Anti-drop sensor 29. Left side brush (white) (additional) -
Page 5: Remote Control Function
Remote Control Function Top view of Remote control IR emitter (Distance: 3 metres) Auto back On / Off mode Auto Charging to charging station ON / OFF AUTO CHARGING Start / Stop cleaning Direction button Start / Pause Automatic cleaning mode Start / Pause Edge cleaning mode Start / Pause Spot cleaning mode STRONG... - Page 6 CHARGING 1. Manual Charging • Connect the adapter at one end of the vacuum cleaner; • Connect the socket to the power light flashing. • Successful charging connection. Vacuum cleaner’s green indicator is flashing and hear “charging” response sound, means the vacuum cleaner is charging; •...
- Page 7 Important note for usage • For wipe clean function, suitable for hard floor, wooden floor, tile. DO NOT use it on carpet. • Before usage, it is recommended to remove the hair and dust of the two side brushes to avoid affecting the machine operation/performance. •...
- Page 8 Turn on the vacuum cleaner Turn on the main power ON/OFF switch (Item 6 in page 4) (“I”power on,“O”power off). The AUTO button on top panel turn on with green light and always bright with “Hello, Glad to serve you” response sound means successful opening. Start cleaning Short press AUTO button when operation, hear “Auto Cleaning”...
-
Page 9: Mode Selection
MODE SELECTION In order to adapt to different ground conditions and realize deep cleaning, this product has a variety of cleaning modes. User can use the mobile APP and remote control different cleaning mode, and users can also adjust use the APP direction by using remote control to help machine get out of barrier situation. - Page 10 MOBILE APP USAGE Scan the QR code, download and install the Tuya Smart App for mobile control function, please reference the APP interface below. Vacuum cleaner WiFi setting Turn on main power switch (Item 6: I power on) and press AUTO button on top panel about 5 seconds (or remote controller press the WiFi button), hear “WiFi Setting”...
- Page 11 Picture 1 Picture 2 Picture 3 • Open Tuya Smart App and press to create New Account. (Picture 1) • Enter the privacy policy interface and press Agree. (Picture 2) • Input your phone number or email address to get a verification code to register.
- Page 12 Picture 7 Picture 8 Picture 9 • Tap the “+ ” icon on the right corner of APP to enter into “Select Device Type” (Picture 7) • After tap the “+ ” icon on the right corner of APP , interface choose “Small Home Appliances”, select “...
- Page 13 Picture 12 Picture 13 Picture 14 • If EZ mode (default mode) connect to WiFi is failed. Please try to select “AP mode” in the interface. (Picture 12) • Turn on machine main power switch and press and hold AUTO button on the top cover about 5 seconds (or use remote controller WiFi button), hear “DingDong”...
- Page 14 Picture 18 Picture 19 Schedule Picture 20 Picture 21 • Press Schedule (Time: 1-24 hours ; Date: Monday to Sunday) to pre-set timer on and select the mode (Auto Cleaning or return charging) or press Cleaning route to check the cleaned area. (Picture 18-21) Note: •...
-
Page 15: Cleaning And Storage
CLEANING AND STORAGE Combined container (dust box and water compartment box) & Filter • Remove the combined container and clean up the garbage in dust compartment. • Remove the filter component and rinse the filter and combined container with water gently, let it air-dry completely before reassemble. Cleaning Cloth •... - Page 16 Universal wheel Pic.1 Pic.2 Pic.3 Push down Universal wheel Use a screw to push down and remove the universal wheel as the picture, then clean the runner and spindle with a dry cloth. Charging Contact Charging contect of unit Charging contect of unit (right) (left) : Surface on station...
-
Page 17: Troubleshooting
TROUBLESHOOTING PROBLEM CAUSE SOLUTION Vacuum cleaner not Vacuum cleaner (both Turn on the main power working main ON/OFF switch and switch (Item 6) and AUTO button on the AUTO button (Item 2). top panel) not turn on Run out of battery Ref to page 6, “Charging”... -
Page 18: Product Specifications
If the above investigation fails to solve the problem, please contact our after- sales service. Do not disassemble the machine by yourself. PRODUCT SPECIFICATIONS Model no.: GWRVC15 Voltage: 14.6V Power: Battery: Li-ion 2150mAh... - Page 19 閱讀下列說明事項並請妥善保管,以供日後參考。 安全指引 - 一般安全 - 請按照這些說明事項,使用本產品。 - 本產品僅供家用,不作商業用途。 - 使用前,請將所有包裝材料拆除。 - 0至8歲的兒童不應使用本產品。 - 超過8歲的兒童可使用本產品,但請勿由肢體不健全、感覺或精神上有障礙或 缺乏相關經驗和知識的人使用,除非有負責他們安全的人對他們使用本產品進 行監督或指導。 - 請務必看顧好兒童,以確保他們不玩耍本產品。 - 兒童不應清潔或維修本產品。 - 當需進行任何維修,必須由專業維修人員進行維修。永遠不要嘗試自己修理本 產品。 - 手濕時不可以接觸電源插頭或本機。 - 主機不可以浸入水中。 - 兒童不可以把玩本機。 - 只使用隨機附送的配件。 安全指引 - 電子和熱能產品 - 請把本產品放置在平穩的表面上使用。 - 使用相符的電源和電壓,以防止觸電。 - 本產品只能使用帶接地線的電源插座。 - 當本產品不使用時,請從牆上的插座中拔掉插頭。...
- Page 20 安全指引 - 操作期間 - 請勿用潮濕的手插拔電源插頭或接觸本產品。 - 如果本產品落入水中,立即從插槽中拔下插頭,並且不要再次使用本產品。 - 切勿將本產品、電源線或插頭浸入水中或其他液體中。 - 使用後徹底清潔本產品 (請參閱“清潔和保養”) - 不可吸入任何可能產生泡沫的洗滌劑或水溶液。 - 產品運作時,不可拆卸本產品。 - 確保過濾網組件安裝好,才可使用本產品,否則可能造成損壞。 - 吸塵口不得遮蓋或堵塞。吸塵口被阻塞時不可使用。 - 不可使用本產品吸入任何正在燃燒/燃點的物品,如燃點的香煙或煙灰。不 可吸入任何爆炸性物質、易燃性物品、可燃性液體、高溫物品、毒性物質、有機 溶劑、腐蝕性或強酸性物質。 - 不可吸入如玻璃碎片、釘子、石頭、針頭或刀片等邊緣銳利的物品。以免過濾器 受損。...
- Page 21 部件示意圖 主機 26 25 1. 頂蓋 16. 抹布 x 2塊 2. 開/關按鍵 17. 吸塵口 3. 前撞 18. 右輪 4. 透視窗 19. 地檢感應器 5. 充電插孔 20. 右邊刷 (橙色) 6. 主機電源開關 21. 充電極片2 (主機左方) 7. 組合容器盒 22. 地檢感應器 (塵箱及水箱分隔設計) 23. 火牛 8. 面蓋 24. 遙控器 9. 方向輪 25. 回充座 10. 地檢感應器 26. 充電極片1 (回充座) 11. 充電極片1 (主機右方) 27. 充電極片2 (回充座) 12. 左邊刷 (白色) 28. 訊號發射窗 13. 地檢感應器 29. 左邊刷 (白色) (附加配件) 14. 左輪...
- Page 22 遙控器 遙控器頂部 紅外線發射器 (距離:3米) 開 / 關機模式 自動回充電座功能 ON / OFF AUTO CHARGING 開啟/ 暫停清潔 方向按鍵 開啟/ 暫停自動清潔模式 開啟/ 暫停沿邊清潔模式 開啟/ 暫停點/旋轉模式 STRONG / NORMAL 強力/ 正常吸力模式 手機APP聯網按鍵...
- Page 23 充電 手動充電 - 將火牛一端與吸塵機充電插口連接,另一端與電源連接,機頂按鍵指示燈閃爍, 並聽到“Charging” 聲響,充電連接成功。 - 吸塵機頂蓋上綠色指示燈閃爍,代表充電中; - 吸塵機頂蓋上綠色指示燈常亮,充電完成。(約5小時充滿電) 注意 : 首次使用,請連續充電 8小時以上。 注意 : 在充電前,請取下濕了的抹布,以避免衛生問題。 重要提示 : 吸塵機充電時,確保組合容器上盒內的水箱分隔盒中沒有水。 自動充電 0.5米 訊號發射窗 火牛插口 1.5米 回充極片 - 將回充座平坦靠牆放置,左右0.5米 及前方1.5米內不要放置物品,且不能有鏡子 等反射面較強物體。 - 將火牛連接電源,並與連接回充座上的火牛插口。 - 在電量不足時, 並聽到“Find charging station”聲響,吸塵機會自動尋找回充 座並進行充電。 - 用戶也可以通過手機APP和遙控器上 (自動回充電座功能)的返回充電功能,控制 吸塵機尋找回充座進行充電。...
- Page 24 使用注意事項 - 抹地功能適用於硬地板,木地板,瓷磚。不適合在地毯上使用。 - 使用前,建議把兩邊毛刷纏繞的毛髮及塵埃先取走/消走以免影響產品。 - 為了避免魔術貼與地板磨擦,建議在使用吸塵時,也貼上抹布。 - 打開頂蓋,取出組合容器盒 。 - 打開水箱的塞子加水(125毫升)。 - 裝好塞子,把組合容器盒裝回原位,合上頂蓋。 - 每次使用後必須移除半濕的清潔抹布和清空水箱中的水才充電,避免抹布長時 間直接接觸地板,影響衛生及機件效能。 注意 : 進行抹地功能時,請將抹布緊貼在機器底部。 安裝及使用說明 邊刷圖示 左邊刷 右邊刷 (中心為白色) (中心為橙色) 主機正面 - 邊刷分左右 (如圖以中心顏色區分) 且左右不能互換; - 邊刷周圍可能纏繞毛髮等雜物,而減弱清潔功能。需要及時清理邊刷 - 用戶在更換邊刷時,須按照圖示左右進行更換 (取下邊刷用十字螺絲刀固定位置); - 為使用戶有良好的清潔效果,請謹慎使用本機。清潔前,您可以取去地板上較多的纏 繞物。(例如,毛髮,電源線) 以避免吸塵器堵塞,影響吸力效能。...
- Page 25 打開主機 打開主機側面主電源開關(第17頁第6項)(“I”為開機,“O”為關機),並聽 到“Hello, Glad to serve you”聲響,頂蓋上的AUTO按鍵綠色指示燈亮起,並且 常亮,代表開機成功。 啟動清潔 短按一次頂蓋上主機AUTO按鍵 ,並聽到“Auto Cleaning”聲響,即可啟動自 動清掃模式。 暫停工作 吸塵機在工作中,短按一次頂蓋上主機AUTO按鍵 ,並聽到“叮噹”聲響以及 綠色指示燈長亮,吸塵機將停止工作。再按一次鍵,主機即恢復自動清潔。 關機 暫停工作後,關閉主機側面電源開關,按鍵指示燈熄滅,關機成功。...
- Page 26 模式選擇 為適應不同地面狀況,並有效地清潔,本產品設有多種清潔模式,可按需要通過手 機APP和遙控器進行選擇,當機器異常停止工作時,用戶也可通過手機APP和遙 控器上的方向鍵移動機器。 使用注意事項 - 本機適用於硬地板,木地板,瓷磚,地毯(短絨毛高度必須小於0.8厘米, 否則吸 塵機不能正常運作)。 - 使用前,建議把兩邊毛刷纏繞的毛髮及塵埃先取走/消走以免影響產品。 自動清潔模式 (自動導航) 智能自動吸塵機 選擇自動清潔模式,並聽到“Auto Cleaning”聲響, 吸塵機將自動進行隨機式清潔。 沿邊清潔模式 選擇自動清潔模式,並聽到“Edge Cleaning”聲響,吸塵機將針對室 內邊角處進行清潔,吸塵機固定物體(如牆壁)周邊進行清掃。 重點/旋轉型清潔模式 選擇自動清潔模式,並聽到“Spot Cleaning”聲響,吸塵機將針對特 定區域進行隨機旋轉型清潔掃,在完成清潔後會暫停,重點/旋轉清潔 模式,使清潔得更徹底,建議在客廳等障礙物較少的大面積區域使用。 強力/正常吸力模式 按強力/正常吸力模式,聽到“Strong mode”聲響,這表示強力吸力模 式下的自動清潔, 也可切換至沿牆或重點/旋轉清潔模式,再按強力/正常 吸力模式一次,聽到“Normal mode”聲響,這代表正常吸力模式下的 自動清潔, 也可切換至沿牆或重點/旋轉清潔模式。 自動返回充電模式 選擇自動返回充電模式,並聽到“Find charging station”聲響,吸塵機 將自動尋找回充座進行充電,或於低電量時,吸塵機也會自動尋找回充 座進行充電。...
- Page 27 手機APP使用 手機APP下載及說明 掃描圖中QR,下載並安裝Tuya Smart App ,更多功 能,請參考APP介面提示。 主機WiFi設置 開啟吸塵機主電源(機側),長按機頂蓋上AUTO按鍵 約五秒 (或通過短按遙控器 上的“WiFi”按鍵),提示“WiFi Setting”語音響起,代表“Wi-Fi 快連 (默認) 模 式”。若聽到聲到“叮噹”聲響,代表熱點配網“兼容模式”。主機進入WiFi設 置後,依提示進行WiFi配網連接。...
- Page 28 圖1 圖2 圖3 - 打開Tuya Smart App,然後按創建新帳戶。 (圖1) - 進入隱私策略界面,然後按同意。 (圖2) - 輸入您的電話號碼或電子郵件以獲取驗證碼進行註冊。(圖3) 圖4 圖5 圖6 - 輸入驗證碼。(圖4) - 設置密碼(1-20個字符,包括字母和數字)(圖5) - 按“我”添加家庭帳戶(家庭名稱和家庭位置)如需要。(圖6)
- Page 29 圖7 圖8 圖9 - 點擊APP右上角的“ +”圖標,進入“選擇設備類型”界面。(圖7) - 點擊APP右上角的“ +”圖標後,選擇“小家電”,選擇“掃地吸塵機”,進 入“添加設備”界面。(圖8) - 選擇一個2.4GHz Wi-Fi網絡並輸入密碼。(圖9) 圖10 圖11 - 進入指示燈狀態界面。選擇“指示燈未閃爍 ?” ,如沒有此介面,請直接去下一步。 (圖10) - 點擊手機APP右上角“配網模式”。 選擇“Wi-Fi 快連 (默認) 模式” (圖11) - 開啟吸塵機主電源(機側),長按機頂蓋上AUTO按鍵 約五秒 (或通過短按遙控 器上的“WiFi”按鍵),提示“WiFi Setting”語音響起,代表“Wi-Fi 快連 (默認) 模式”。這時侯在介面上選取“確認指示燈在快閃”,再按下一步連接。...
- Page 30 圖12 圖13 圖14 - 若“WiFi快連 (默認)模式”連接WiFi失敗,可選擇熱點配網“兼容模式”連接 WiFi。(圖12) - 開啟吸塵機主電源(機側),長按機頂蓋上AUTO按鍵約五秒 (或通過短按遙 控器上的“WiFi”按鍵),提示“叮咚”語音響起,代表熱點配網“兼容模式” ,這時侯在介面上選取“確認指示燈在慢閃”,再按下一步連接。 - 查找熱點 smartlife-XXXX,按去連接。(圖13) - 連接熱點 smartlife-XXXX,連接成功後,然後點擊手機上的返回鍵。(圖14) 圖15 圖16 圖17 - 添加設備直到100%完成。(圖15) - 等待設備添加成功,然後在按“完成” 。(圖16) - 您可以通過控制面板選擇所需的清潔模式(自動/強力/重點/邊牆), 語音提示(開/關)和回充 (圖17)
- Page 31 圖18 圖19 圖20 圖21 - 按預約開機時間設定(時間:1-24小時;日期:週一至週日)或按清潔路線查看 已清潔的區域。(圖18至圖21) 重要註意事項: - 設備必須連接電源和WiFi。 - 由於本產品及手機軟件程式使用界面會不斷改良及更新,以提升用戶使用體驗。 以上文中列出的軟件使用界面內容及數據只供參考。最新的使用界面需按當時下 載的軟件版面為實,不會另行通知。...
- Page 32 清潔和保養 組合容器盒 (塵箱及水箱分隔設計)及過濾網 - 取出組合容器盒,清理塵箱中的垃圾。 - 拆下過濾網部件,用乾淨水輕輕地沖走灰塵,以及沖洗組合容器盒,待完全清潔 及完全風乾才裝回過濾網。 抹布 - 每次抹地完畢後,輕輕地從主機底部取下抹布進行清洗並風乾。 - 每次使用後必須移除半濕的清潔抹布和清空水箱中的水才充電, 避免抹布長時間直接接觸地板,影響衛生及機件效能。 吸麈口和邊刷 右邊刷 (橙色) 左邊刷 (白色) 吸塵口 為保持清潔效能, 建議定時清理吸塵口和邊刷 : 1. 清理吸塵口: 可用濕布輕擦吸塵口軟膠。 2. 清理邊刷: 先用十字螺絲刀拆下邊刷,清理纏繞邊刷上的毛髮或灰塵,然後注意裝配方向, 裝回原位。...
- Page 33 萬向輪 圖 1 圖 2 圖 3 萬向輪 向下推 轉輪 轉軸 萬向輪 如圖所示,使用螺絲刀向下推並取下萬用輪,然後用乾布清潔流道和主軸。 充電極片 充電極片(主機右方) 充電極片(主機左方) 訊號發射窗 充電極片 (回充座) 用乾布抹擦充電極片、回充極片和訊號發射窗,以確保證吸塵機自動充電過程順 暢。 吸塵機外殼 用乾布抹擦外殼。 注意 : 所有部件必須風乾完成後, 才裝回機身。...
- Page 34 疑難排除 問題 原因 解決方法 吸塵機不能工作 未開啟吸塵機機側主電源 開啟主機電源開關鍵 及機蓋頂AUTO鍵 (配件6)及頂蓋AUTO鍵 電源(配件2) 吸麈機電量耗盡 請參考第23頁“充電” 部分 吸塵機不能充電 充電連接不良 確保火牛有效地連接 擦拭回充和主機極片 吸塵機持續後退 地檢感應器有異物 用清潔布擦拭感應器 吸塵機原地打圈 吸塵機信號發射窗有異物 用清潔布擦拭信號發射窗 左/右輪異常,並聽到“Left 輪子被異物纏繞 清除異物 wheel error” or “right wheel error”聲響 左/右邊刷異常,並聽 左/右邊刷安裝錯誤 將邊刷正確安裝。請參考 到“Left brush error” or 第24頁“邊刷圖示” “right brush error”聲響...
- Page 35 產品規格 型號: GWRVC15 電源: 14.6V 功率: 20瓦 電池: 2150mAh 產品尺寸:325 (闊) x 56 (高) x 325(深) 毫米 * 相關產品的規格,可能會因配件批次或實際使用地區的電壓差異而有所不同。...
- Page 36 太平家庭電器...
Need help?
Do you have a question about the GWRVC15 and is the answer not in the manual?
Questions and answers