
Subscribe to Our Youtube Channel
Summary of Contents for Weston ARROWSAW 52-0601-W
- Page 1 ARROWSAW DUE TO CONSTANT FACTORY IMPROVEMENTS, THE PRODUCT PICTURED MIGHT DIFFER SLIGHTLY FROM THE PRODUCT IN THIS BOX.
-
Page 2: Table Of Contents
IMPORTANT SAFEGUARDS COMPONENT LIST MOUNTING INSTRUCTIONS VACUUM ATTACHMENT INSTRUCTIONS MEASURING TAPE APPLICATION OPERATING INSTRUCTIONS THROUGH CUTS 9-10 ROLL CUTS 11-12 USING THE SPIN TESTERS ARROWSAW BLADE REPLACEMENT WARRANTY PRÉCAUTIONS IMPORTANTES 20-21 DESCRIPTION DE LA PIÈCE INSTRUCTIONS D’ASSEMBLAGE INSTRUCTIONS DE FIXATION SOUS VIDE APPLICATION DU RUBAN À... -
Page 3: Important Safeguards
IMPORTANT SAFEGUARDS When using electrical appliances, basic safety precautions should always be followed to reduce the risk of fire, electric shock, and/or injury to persons, including the following: 9. WEAR EYE PROTECTION. 1. Read all instructions. Wear safety glasses. Everyday 2. - Page 4 Vacuum and vacuum hose not included...
-
Page 5: Component List
If any components of this unit are broken, the unit does not operate properly or you need a replacement instruction manual, visit us on the web at WestonBrands.com 1-800-814-4895 Or call Weston Brands, LLC Toll Free at Monday thru Friday 8:00am-5:00pm ET. Outside the U.S. call 1-216-901-6801... -
Page 6: Mounting Instructions
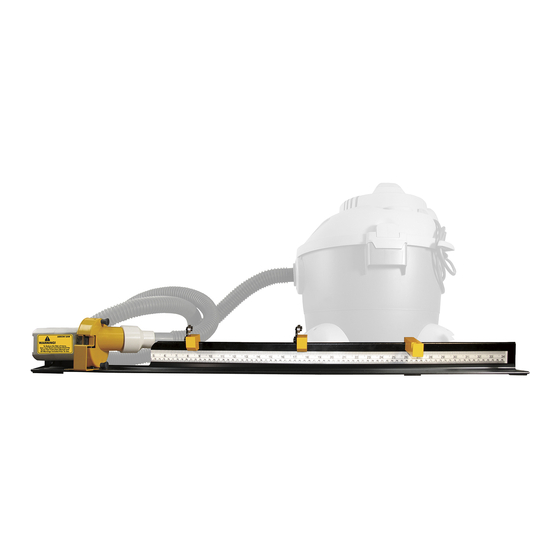
MOUNTING INSTRUCTIONS For best results, mount the Arrowsaw to a solid, level surface to prevent excess vibration and movement during use. There are two holes in the Base for this purpose (FIGURE 1). As an alternative, c-clamps (Not Included) may be used. FIGURE 1 Mounting Holes VACUUM ATTACHMENT INSTRUCTIONS... -
Page 7: Measuring Tape Application
MEASURING TAPE APPLICATION Electrical Shock Hazard. Before cleaning, assembling, or w WARNING disassembling the appliance, make sure the appliance is OFF( ) and the plug is removed from the outlet/power source. The Arrowsaw with Dust Collecting Attachment comes without the Measuring Tape applied. -
Page 8: Operating Instructions
OPERATING INSTRUCTIONS Sharp Blade. To avoid severe injury keep fingers, hands w CAUTION and other foreign objects clear of the saw opening Blade and Moving Parts of the Arrowsaw. Wear approved Safety Glasses and Kevlar Gloves when using the Arrowsaw. 1. -
Page 9: Through Cuts
There are two methods you can employ to cut arrow shafts. One method is a THROUGH CUT, for quickly cutting arrow shafts. The other is a ROLL CUT, for more precise, cleaner cuts. THROUGH CUTS Sharp Blade. To avoid severe injury keep fingers, hands w CAUTION and other foreign objects clear of the saw opening Blade and Moving Parts of the Arrowsaw. - Page 10 12. Place the nock/insert end of the arrow shaft into the notch in the Shaft Position Bracket (FIGURE 8). 13. Gently guide the end of the arrow shaft to be cut into the Cutting Blade until it is completely cut (FIGURE 8). 14.
-
Page 11: Roll Cuts
ROLL CUTS Sharp Blade. To avoid severe injury keep fingers, hands w CAUTION and other foreign objects clear of the saw opening Blade and Moving Parts of the Arrowsaw. Wear approved Safety Glasses and Kevlar Gloves when using the Arrowsaw. 1. - Page 12 8. Secure the Blade Shield to the Arrowsaw with the Thumb Screws. 9. Check cutting depth to verify no movement occurred while securing the Arrow Shaft Guide or replacing the Blade Shield. 10. Verify the On/Off Power Switch is in the “OFF” position and connect the Arrowsaw to the power source.
-
Page 13: Using The Spin Testers
USING THE SPIN TESTERS The Arrowsaw comes with 2 Spin Testers that allow you check the straightness of arrow shafts. 1. Place the Spin Testers onto the Base. Using an arrow shaft as a guide, position the Spin Testers within 1” of each end of the shaft. 2. -
Page 14: Arrowsaw Blade Replacement
ARROWSAW BLADE REPLACEMENT Electrical Shock Hazard. Before cleaning, assembling, or w WARNING disassembling the appliance, make sure the appliance is OFF( ) and the plug is removed from the outlet/power source. FIGURE 13 Your Arrowsaw comes complete with two, Blade Shield reinforced Cutting Blades. -
Page 16: Warranty
ONE-YEAR LIMITED WARRANTY This warranty applies to products purchased and used in the U.S. and Canada. This is the only express warranty for this product and is in lieu of any other warranty or condition. This product is warranted to be free from defects in material and workmanship for a period of one (1) year from the date of original purchase. - Page 17 ARROWSAW PARCE QUE NOS PRODUITS BÉNÈFICIENT DE PERFECTIONNEMENTS CONSTANTS APPORTÉS EN USINE, LES ILLUSTRATIONS PRÉSENTES PEUVENT ÊTRE LÉGÈREMENT DIFFÉRENTES DU PRODUIT REÇU.
-
Page 18: Précautions Importantes
PRÉCAUTIONS IMPORTANTES Pour utiliser un appareil électroménager, vous devez toujours prendre des mesures élémentaires de sécurité pour réduire le risque d'incendie, d'électrocution et/ou de blessure corporelle, en particulier les mesures suivantes: 1. Lire toutes les instructions. 9. PORTER UNE PROTECTION OCULAIRE. - Page 20 Aspiration et tuyau d’aspiration non inclus...
-
Page 21: Description De La Pièce
N’hésitez pas à visiter notre site Web WestonBrands.com/support si un composant est cassé, l’outil fonctionne mal, ou pour commander un nouveau mode d’emploi. WestonBrands.com 1-800-814-4895 Veuillez appeler Weston Brands, LLC au numéro sans frais : Du lundi au vendredi: de 8h00 à 17h00 ET. En dehors des États-Unis, veuillez appeler le 1-216-901-6801... -
Page 22: Instructions D'assemblage
INSTRUCTIONS D’ASSEMBLAGE Pour obtenir de meilleurs résultats, installer l’Arrowsaw sur une surface plane et solide, afin d’éviter les vibrations excessives et les mouvements pendant l’utilisation. Il y a deux trous dans la base à cet effet (FIGURE 1). Comme autre option, les serre-joints en C (non inclus) peuvent être utilisés. FIGURE 1 Trous de montage INSTRUCTIONS DE FIXATION SOUS VIDE... -
Page 23: Application Du Ruban À Mesurer
APPLICATION DU RUBAN À MESURER Risque de choc électrique. Avant de nettoyer, w AVERTISSEMENT d’assembler ou de démonter l’appareil, assurez-vous que l’appareil est éteint ( ) et que la fiche est retirée de la prise / de la source d’alimentation. L’Arrowsaw avec l’attachement de collecte de poussière est livrée sans le ruban à... -
Page 24: Instruction D'utilisation
INSTRUCTION D’UTILISATION Lame tranchante. Utiliser avec précaution. Pour éviter w ATTENTION des blessures graves, garder les doigts, les mains et les autres objets étrangers loin des ouvertures de la scie et des pièces mobiles de l’Arrowsaw. Porter des lunettes de sécurité et des gants Kevlar approuvés lors de l’utilisation de l’Arrowsaw. -
Page 25: Coupe En Biais
Il existe deux méthodes pour couper les arbres de la flèche. Une méthode est par COUPE EN BIAIS, pour couper rapidement les axes de flèche. L’autre est une COUPE ROULANTE, pour obtenir des coupes plus précises et plus propres. COUPE EN BIAIS Lame tranchante. - Page 26 12. Placer l’encoche/l’extrémité d’insertion de l’arbre de flèche dans l’encoche du support de position d’arbre (FIGURE 8). 13. Guider l’extrémité de l’axe de flèche à couper dans la lame tranchante jusqu’à ce qu’elle soit complètement coupée (FIGURE 8). 14. Retirer soigneusement l’arbre de flèche coupé du guide d’arbre de flèche et le support de position d’arbre.
-
Page 27: Coupes Roulantes
COUPES ROULANTES Lame tranchante. Utiliser avec précaution. Pour éviter w ATTENTION des blessures graves, garder les doigts, les mains et les autres objets étrangers loin des ouvertures de la scie et des pièces mobiles de l’Arrowsaw. Porter des lunettes de sécurité et des gants Kevlar approuvés lors de l’utilisation de l’Arrowsaw. - Page 28 8. Attacher le bouclier de lame à l’Arrowsaw avec les vis de serrage. 9. Vérifier la profondeur de coupe pour s’assurer qu’aucun mouvement ne s’est produit en fixant le guide d’arbre de flèche ou en remplaçant le bouclier de lame. 10.
-
Page 29: Utilisation Des Testeurs De Rotation
UTILISATION DES TESTEURS DE ROTATION L’Arrowsaw est livrée avec 2 testeurs de rotation qui permettent de vérifier la rectitude des arbres de flèche. 1. Placer les testeurs de rotation sur la base. À l’aide d’un arbre de flèche comme guide, positionner les testeurs de rotation afin qu’ils se trouvent à l’intérieur de 1 po de chaque extrémité... -
Page 30: Remplacement De Lame D'arrowsaw
REMPLACEMENT DE LAME D’ARROWSAW Risque de choc électrique. Avant de nettoyer, w AVERTISSEMENT d’assembler ou de démonter l’appareil, assurez-vous que l’appareil est éteint ( ) et que la fiche est retirée de la prise / de la source d’alimentation. FIGURE 13 Votre Arrowsaw est livrée complète avec deux Bouclier de lame... -
Page 33: Information Sur La Garantie
GARANTIE LIMITÉE D’UN AN Cette garantie s’applique aux produits achetés et utilisés aux États-Unis et au Canada. Il s’agit de l’unique garantie explicite pour ce produit et elle remplace toute autre garantie ou condition. Ce produit est garanti comme étant exempt de tout vice matériel ou de main-d’œuvre pendant une période d’un (1) an à... - Page 34 COMMUNIQUER AVEC LE DÉTAILLANT POUR OBTENIR DE L’AIDE. Pour toutes les autres questions concernant l’utilisation du produit, les pièces manquantes, les problèmes ou l’activation de la garantie, veuillez communiquer avec l’équipe du service clientèle des produits Weston: de 8:00 à 17:00 HNE, du lundi au vendredi.
Need help?
Do you have a question about the ARROWSAW 52-0601-W and is the answer not in the manual?
Questions and answers