Table of Contents
Advertisement
Available languages
Available languages
Quick Links
Questo manuale d'istruzione è fornito da trovaprezzi.it. Scopri tutte le offerte per
Ardes AR4W03P
o
cerca il tuo prodotto tra le
migliori offerte di Elettrodomestici per Riscaldamento
ISTRUZIONI PER L'USO
INSTRUCTIONS FOR USE
TERMOVENTILATORE CERAMICO DA
PARETE
CERAMIC HEATER FOR WALL
MOUNTING
AR4W03P
Advertisement
Table of Contents

Related Manuals for ARDES AR4W03P


Summary of Contents for ARDES AR4W03P
- Page 1 Questo manuale d’istruzione è fornito da trovaprezzi.it. Scopri tutte le offerte per Ardes AR4W03P cerca il tuo prodotto tra le migliori offerte di Elettrodomestici per Riscaldamento ISTRUZIONI PER L’USO INSTRUCTIONS FOR USE TERMOVENTILATORE CERAMICO DA PARETE CERAMIC HEATER FOR WALL...
- Page 3 L’apparecchio può essere utilizzato da bambini di età non inferiore a 8 anni e da persone con ridotte capacità fisiche, sensoriali o mentali, o prive di esperienza o della necessaria conoscenza, purché sotto sorveglianza oppure dopo che le stesse abbiano ricevuto istruzioni relative all’uso sicuro dell’apparecchio e alla comprensione dei pericoli ad esso inerenti.
- Page 4 tra i 3 e gli 8 anni non devono inserire la spina, regolare o pulire l’apparecchio né eseguire la manutenzione a cura dell’utilizzatore. ATTENZIONE — Alcune parti del presente prodotto possono diventare molto calde e provocare ustioni. Bisogna prestare particolare attenzione laddove sono presenti bambini e persone vulnerabili.
- Page 5 ATTENZIONE: Non utilizzare in stanze piccole quando queste sono occupate da persone non in grado di lasciare la stanza da soli, a meno che non siano sotto costante sorveglianza. L’apparecchio deve essere installato ad una distanza minima da terra di mt. 1,80 e di 15cm dal soffitto.
- Page 6 nella presa di corrente, corrisponda a quella indicata nei dati di targa. Nel caso in cui la spina e la presa non siano compatibili, far sostituire la presa con un tipo adatto da personale professionalmente qualificato. Non utilizzare adattatori o prolunghe che non siano rispondenti alle vigenti normative di sicurezza o che superino i limiti delle portate in valore della corrente.
-
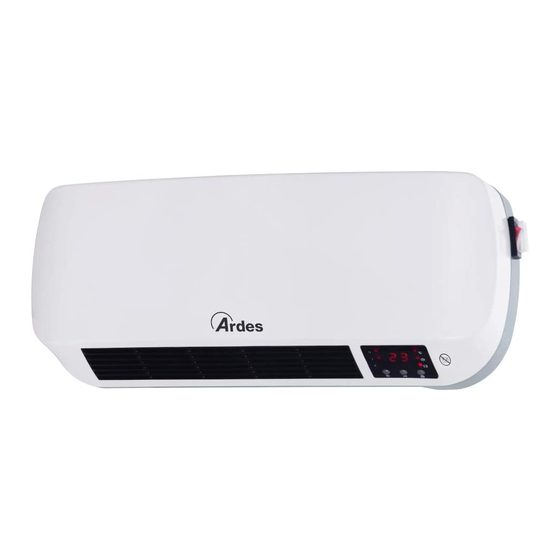
Page 7: Informazioni Tecniche
Informazioni tecniche 1 - Interruttore generale On/Off 2 - Griglia di uscita dell’aria 3 - Display e pannello di controllo 4 - Comando a distanza Dati tecnici : vedere etichetta sull’apparecchio Istruzioni d’uso ISTRUZIONI DI MONTAGGIO Kit di montaggio composto da: 2 viti Ø 8 mm - 2 tasselli a muro. INSTALLAZIONE A MURO Fissare a muro i due tasselli con le rispettive viti tenendo conto che la distanza corrisponda a quella fra i due fori di aggancio sul retro... - Page 8 display visualizza “- -” e l’indicatore luminoso “I” è acceso) o potenza massima (il display visualizza “- -” e gli indicatori luminosi “I” e “II” sono accesi). -Premere il pulsante Timer quando l’apparecchio è in funzione per programmare lo spegnimento automatico (funzione timer off) in un intervallo da 1 a 12 ore dal momento della programmazione.
- Page 9 3. Premere nuovamente il pulsante “SET”: il display visualizza i minuti correnti lampeggianti (impostazione di default “30”). 4. Premere i tasti + o - per impostare i minuti correnti 5. Premere per la terza volta il pulsante “SET”: il display visualizza il giorno della settimana (impostazione di default “d7”).
- Page 10 impostare l’ora in cui l’apparecchio deve entrare in funzione (Time/On) e tornare in stand-by (Time/Off). Inoltre, per ogni giorno è possibile impostare la temperatura desiderata. 1. Premere il pulsante “P” per attivare l’impostazione del programma settimanale. La relativa icona si accende sul display. 2.
- Page 11 Impostazione rilevamento finestre aperte (con l’apparecchio in funzione): Questa funzione interrompe il funzionamento dell’apparecchio nel caso in cui la temperatura ambiente si discosti da quella desiderata di 5°C-10°C, in meno di 10 minuti. Quando questa funzione è attiva, l’apparecchio attiva anche la modalità automatica.
-
Page 12: Manutenzione
Manutenzione Disinserire la spina dalla presa di corrente prima di effettuare qualsiasi operazione di pulizia e manutenzione. L’apparecchio non necessita di particolari manutenzioni; è sufficiente una regolare pulizia. Pulire l’apparecchio solamente quando è freddo. La pulizia dell’apparecchio, deve essere effettuata con un panno morbido e leggermente umido. - Page 13 Informazioni obbligatorie per gli apparecchi per il riscaldamento d’ambiente locale elettrici Identificativo del modello: AR4W03P Simbolo Valore Unità Unità Dato Dato Tipo di potenza termica, solo per gli Potenza termica apparecchi per il riscaldamento d'ambiente locale elettrici ad accumulo (indicare una sola...
- Page 14 This appliance can be used by children aged from 8 years and above and persons with reduced physical, sensory or mental capabilities or lack of experience and knowledge if they have been given supervision or instruction concerning use of the appliance in a safe way and understand the hazards involved.
- Page 15 less than 8 years shall not plug in, regulate and clean the appliance or perform user maintenance. CAUTION — Some parts of this product can become very hot and cause burns. Particular attention has to be given where children and vulnerable people are present.
- Page 16 WARNING: Do not use this heater in small rooms when they are occupied by persons not capable of leaving the room on their own, unless constant supervision is provided. The appliance must be installed at least 1.80m above ground and 15 cm from the ceiling.
- Page 17 with a suitable type by skilled persons. Do not use adapters or extension cables which do not meet current safety standards or that exceed the current carrying capacity limits. When you don’t use the appliance disconnect it from the power supply and assure that the interruptor is off.
-
Page 18: Technical Informations
Technical informations 1 - Main switch On/Off 2 - Air outlet grid 3 - Control panel and indicator light 4 - Remote control Technical data indicated on the appliance. Instructions for use ASSEMBLY INSTRUCTIONS Assembly kit composed of: 2 screws Ø 8 mm - 2 wall plugs. WALL INSTALLATION Fix the two plugs to the wall with the respective screws, taking into consideration that the distance between them must correspond to that... -
Page 19: Remote Control Operation
display will show “- -”), minimum power (the display will show “- -” and the indicator light “I” will be on in the display) or maximum power (the display will show “- -” and the indicators light “I” and “II” will be on in the display). -Push Timer pushbutton when unit is on to set the automatic shutdown (timer off function) from 1 to 12 hours. - Page 20 Attention: the settings of time and day will be stored till the unit is in stand-by mode or working status. In case of power failure, removing the plug from the wall socket, or switching off the appliance using the On / Off switch (1), all settings will be lost.
- Page 21 Once the working period has been set, it’s possible set the desired temperature for each day: 1. Push “DAY” pushbutton to select the day 2. Push “EDIT” and after push + o - pushbuttons to select the desired temperature 3. Push “DAY” pushbutton to confirm the settings and select the next day 4.
-
Page 22: Maintenance
WARNING: on first use or when turning on after a long period of inactivity, it is normal for the unit to emit a bad smell or a trace of smoke: this will disappear after a short working time. Maintenance This appliance does not require any special maintenance. Disconnect the plug from the socket and let the appliance cool down well before cleaning it. - Page 23 Information requirements for electric local space heaters Model identifier(s): AR4W03P Symbol Value Unit Unit Item Item Heat output Type of heat input, for electric storage local space heaters only (select one) Nominal heat Manual heat charge control, with integrated thermostat...
-
Page 24: Garanzia
GARANZIA Condizioni La garanzia ha validità 24 mesi dalla data d’acquisto. La presente garanzia è valida solo se viene correttamente compilata ed accompagnata dallo scontrino fiscale che ne prova la data di acquisto. L’apparecchio deve essere consegnato esclusivamente presso un nostro Centro Assistenza autorizzato. - Page 25 GUARANTEE Terms and Conditions The guarantee is valid for 24 months. This guarantee applies only if it has been duly filled in and is submitted with the receipt showing the date of purchase. The guarantee covers the replacement or repair of parts making up the appliance which were faulty at source due to manufacturing faults.
- Page 28 POLY POOL S.p.A. Via Sottocorna, 21/B 24020 Parre (Bergamo) - Italy Tel. 035703244 r.a. - Fax 035702716 http://www.ardes.it - e-mail:info@ardes.it MADE IN CHINA...
Need help?
Do you have a question about the AR4W03P and is the answer not in the manual?
Questions and answers