jotron Tron AIS TR-8000 MkII Operator And Installation Manual
Ais class a / inland ais transponder
Hide thumbs
Also See for Tron AIS TR-8000 MkII:
- Operator and installation manual (38 pages) ,
- Technical manual (33 pages) ,
- Quick reference manual (12 pages)

Related Manuals for jotron Tron AIS TR-8000 MkII


Summary of Contents for jotron Tron AIS TR-8000 MkII
- Page 1 Tron AIS TR-8000 MkII AIS Class A / Inland AIS Transponder Operator and Installation Manual...
-
Page 3: Table Of Contents
10.4 Alarms ............................73 10.5 Indicators ........................... 74 10.6 Advanced ............................ 75 11 Alarms ............................. 87 12 Menu Tree ............................89 13 List of VHF Channels ........................90 14 Complied Standards ......................... 91 jotron.com Doc. No.: 103839 Rev. A Page 3 of 104... - Page 4 16 Abbreviations and Definitions ......................96 17 Service and Warranty ........................99 17.1 Registration form ........................100 17.2 Trouble Description Form ......................101 18 Service Agents ..........................102 19 List of Figures ..........................102 jotron.com Doc. No.: 103839 Rev. A Page 4 of 104...
-
Page 5: Manual Revision History
Both Transponder and Display are delivered with SW versions according to the table below. When SW update is done, a record shall be filed in the” Tron AIS TR-8000 MkII Quick Reference Guide”, to reflect the latest changes. There will be no need for retraining after SW upgrade is performed. -
Page 6: Introduction
The content of this manual is furnished for informational use only, is subject to change without notice, and should not be constructed as a commitment by Jotron AS. Except as permitted by such license, no part of this publication may be reproduced, stored in a retrieval system, or transmitted, in any form or by any means, electronic, mechanical, recording, or otherwise, without the prior written permission by Jotron AS. -
Page 7: Disposal Instructions
Jotron AS reserves the right to make changes without further notice to any products or modules described herein to improve reliability, function or design. Jotron AS does not assume any liability arising out of the application or use of the described product Disposal Instructions The Transponder and Display shall be disposed according to local regulations regarding Electronic Waste Recycling in the country the equipment is taken ashore. -
Page 8: Operation General Introduction
Thank you for purchasing this Jotron AIS Class A transceiver. The Jotron AIS Class A transceiver has been developed to offer you the highest level of performance and durability and we hope that it will provide many years of reliable service. This product has been designed to meet the highest possible quality standards and should you encounter any problems with this product, please contact your local dealer who will be pleased to offer any assistance. -
Page 9: Equipment List
Optional accessories For an overview of the available optional accessories, please refer to our website. Spare parts For an overview of the available spare parts, please refer to our website. jotron.com Doc. No.: 103839 Rev. A Page 9 of 104... -
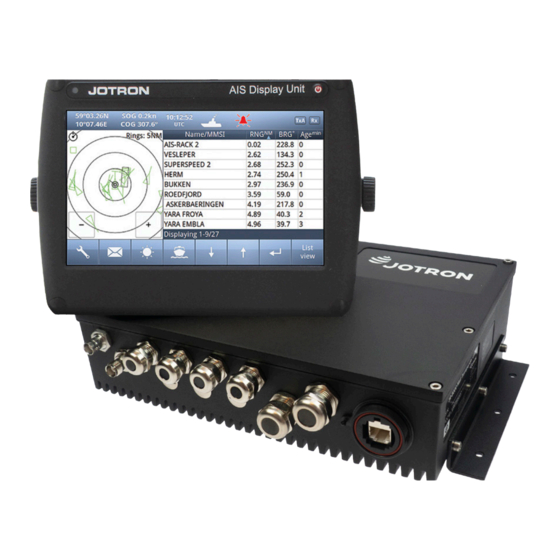
Page 10: Description
AIS functionality, including sensors and RF functions, while the Display unit is used for setup and display of the AIS data. TR-8000 MkII Transponder Figure 6-1 Block diagram of TR-8000 MkII system jotron.com Doc. No.: 103839 Rev. A Page 10 of 104... -
Page 11: Functionality
Course over ground (COG). Speed over ground (SOG). Heading. Navigation status (manual input). Rate of turn (where available). Voyage related data: Ships draught. Hazardous cargo (type). Destination and ETA (at masters discretion). jotron.com Doc. No.: 103839 Rev. A Page 11 of 104... -
Page 12: Transponder Unit
10.8V – 31.2V. A backup power source can be connected if available. Automatically switching to backup power source will take place if the main source of power is lost. jotron.com Doc. No.: 103839 Rev. A... - Page 13 6.2.4 GNSS Antenna Connector This is a TNC type antenna connector to be connected directly to an external GNSS antenna to receive GNSS information. For more information see section 8.2.1 jotron.com Doc. No.: 103839 Rev. A Page 13 of 104...
- Page 14 Min Cable Outer Ø Max Cable Outer Ø Minimum Ø above Max Quantity Recommended use [mm] [mm] braiding [mm] Sensors Communication 12.5 Power Table 1: Quantity and specification of multipurpose cable glands. jotron.com Doc. No.: 103839 Rev. A Page 14 of 104...
-
Page 15: Display Unit
Alert the user about alarms from the AIS system. Pilot Port connection directly to the Display Unit. Certified to IP54 and IEC 60945 Ed.4 “Protected”. Operating temperature from -25°C to +55°C and storage temperature from -30°C to +70°C jotron.com Doc. No.: 103839 Rev. A Page 15 of 104... -
Page 16: Operational Description
Operational Description The operational description chapter assumes that the Transponder is fully installed using the instructions found in the Installation chapter. Inland Operation is described in a separate manual “Tron AIS TR-8000 MkII – Inland User Manual” On/Off button ON/OFF button handles 3 different options When the ON/OFF button is pushed and released, a popup menu is displayed with some display options. -
Page 17: Display Unit Menu System
Dynamic navigational data Clock Other informative icons The Status bar is visible in all the sub menus. Note that the status bar is mostly left out from the screenshots in this manual. jotron.com Doc. No.: 103839 Rev. A Page 17 of 104... - Page 18 Contains all the functional buttons for above window: Config Messages Display Voyage Down Enter List The functionality of the buttons on the Button Bar is dependent on the content of the Content Section. jotron.com Doc. No.: 103839 Rev. A Page 18 of 104...
- Page 19 Some of the functions cannot be altered without entering a password. There are two levels of passwords, a user password and an administrator password. The default passwords are “OP” and “SE”. jotron.com Doc. No.: 103839 Rev. A Page 19 of 104...
- Page 20 Acknowledged warnings(s) or active caution(s) caused by one or more incidents from Table 7. Navigation Status: Under way using Engine At Anchor Not Under Command Restricted Manoeuvrability Constrained by her draught Moored Aground Fishing Sailing Push ahead towing along jotron.com Doc. No.: 103839 Rev. A Page 20 of 104...
- Page 21 Silent Mode - Transmission is turned OFF (ch 10.6.2.3) Normal transmission mode (12.5W) Low Power (1 W) if Vessel type = “Tanker” Speed is below 3 knots Navigation Status = “Moored” jotron.com Doc. No.: 103839 Rev. A Page 21 of 104...
- Page 22 TCPA : Time To Closest Point of Approach : The time (in Minutes) until you reach the CPA : Shows how many minutes since last reception from this vessel jotron.com Doc. No.: 103839 Rev. A Page 22 of 104...
- Page 23 The setup is done in the Display Settings menu. In this menu, it is also possible to toggle between Graphical and List view as default. In the display menu, the user can choose not to return to the graphical view when exiting menus. jotron.com Doc. No.: 103839 Rev. A Page 23 of 104...
- Page 24 A symbol provided from typically a base station, to indicate fixed objects important to navigation. AIS-SART, EPIRB, MOB Will be displayed with a red color NB: Will be displayed with normal color if device in test mode SAR Aircraft jotron.com Doc. No.: 103839 Rev. A Page 24 of 104...
-
Page 25: Voyage Settings
AIS stations, both vessels and base stations, so it is important to keep these parameters up to date. You may use one of these buttons: Navigational Status Destination ETA (Estimated Time of Arrival) Draught Cargo Category Persons Aboard to set correct information for the Voyage jotron.com Doc. No.: 103839 Rev. A Page 25 of 104... - Page 26 Push ahead towing along is used by tugs when the other vessel is one either side or in front. When this option is selected the extended dimensions menu is visible under Voyage Settings. jotron.com Doc. No.: 103839 Rev. A Page 26 of 104...
- Page 27 If only the general area of destination is known the name or accepted abbreviation of the area preceded by “===” (“three equals signs”) should be entered. See example below: “ NL RMT> === US WC ” Indicating a destination on the United States West Coast. jotron.com Doc. No.: 103839 Rev. A Page 27 of 104...
- Page 28 The Draught parameter specifies the maximum depth of the ship in meters and decimeters. 7.3.5 Cargo category Identifies Hazardous cargo, depending on the ship class. See chapter 10.1.1 <Type of Vessel> for reference. jotron.com Doc. No.: 103839 Rev. A Page 28 of 104...
- Page 29 The extended dimensions are added to your vessel existing physical dimensions creating a larger virtual vessel. Other vessels will see your vessel as larger, as this virtual size is broadcast in message 5. This features requires a software with support for IEC 61993 ed3. jotron.com Doc. No.: 103839 Rev. A Page 29 of 104...
-
Page 30: Messages
‘heard’ (via text messaging) by other AIS users within VHF radio range (Ref: USCG Safety Alert 05-10). The messages Icon opens the messages menu. jotron.com Doc. No.: 103839 Rev. A Page 30 of 104... - Page 31 When you select one of the messages in the list, you will see the content in the right window There is also a “Status” field on each line showing: Message SENT OK Message transmission in PROGRESS Message transmission FAILED jotron.com Doc. No.: 103839 Rev. A Page 31 of 104...
- Page 32 For this reason, this functionality is protected by a user password. Default Password = OP Select here message recipients: From list (Of received ships) Enter MMSI (directly) Broadcast (to all) jotron.com Doc. No.: 103839 Rev. A Page 32 of 104...
- Page 33 1. Select preference 2. Press send buton 7.4.4.2 Message recipients “Enter MMSI” 1. Enter MMSI 2. Confirm with 3. Write Text (as described above) 4. Select Channel and Send (-“”-) jotron.com Doc. No.: 103839 Rev. A Page 33 of 104...
- Page 34 7.4.4.3 Message recipients “Broadcast” 1. Write Text (as described above) 2. Select Channel and Send jotron.com Doc. No.: 103839 Rev. A Page 34 of 104...
-
Page 35: Display Settings
Restoring of 50% brightness level is also accessable by pressing the on/off button (see chapter 7.1) Press “Home” to return to Main Window again jotron.com Doc. No.: 103839 Rev. A Page 35 of 104... -
Page 36: Installation
For detailed mechanical drawings, see chapter 15,”Outline Drawings” Figure 8-1 Transponder unit: exploded view jotron.com Doc. No.: 103839 Rev. A Page 36 of 104... - Page 37 Do not mount transponder unit too close to a magnetic compass : Compass safe distance: Standard Compass: 30cm Steering Compass: 14cm 8.1.2.1 Desktop Mounting Figure 8-2 Desktop mounted Display Unit For detailed mechanical drawings, see chapter 15,”Outline Drawings jotron.com Doc. No.: 103839 Rev. A Page 37 of 104...
- Page 38 Display Settings. For detailed mechanical drawings, see chapter Outline Drawings Figure 8-3 Roof mounted Display Unit 8.1.2.3 Flush/ Panel Mounting Figure 8-4 Flush mounted Display Unit, exploded view. For detailed mechanical drawings, see chapter Outline Drawings jotron.com Doc. No.: 103839 Rev. A Page 38 of 104...
- Page 39 >0,5 meter >0,5 meters Figure 8-6 Vertical separation and distance from mast or other object of metal For best isolation between antennas, place directly underneath with no horizontal separation. jotron.com Doc. No.: 103839 Rev. A Page 39 of 104...
- Page 40 For detailed description of this antenna, see chapter 15.4. TR-8000 MkII Transponder Figure 8-7 GPS antenna connection Calculation of cable length/attenuation etc is described in chapter 8.2 jotron.com Doc. No.: 103839 Rev. A Page 40 of 104...
-
Page 41: Cabling
The cables should be kept as short as possible to minimize signal attenuation. The type of cables used onboard vessels should be: Halogen free Fire resistant or Flame retardant type Low smoke jotron.com Doc. No.: 103839 Rev. A Page 41 of 104... - Page 42 If the units are mounted indoors in a warm dry environment without any need for water tightness, a standard CAT-5 or CAT-6 network cable may be used between the Transponder and the Display unit jotron.com Doc. No.: 103839 Rev. A Page 42 of 104...
-
Page 43: Wiring And Connections
Wiring and Connections TR-8000 MkII Transponder Figure 8-10 Block diagram of typical connections Wiring and connection of Antennas (GNSS + VHF) are described in chapter 8.1.3 jotron.com Doc. No.: 103839 Rev. A Page 43 of 104... - Page 44 8.3.1 Dual Display connection Network switch * Figure 8-11 Block diagram of Dual Display connection Wiring and connection of Antennas (GNSS + VHF) are described in chapter 8.1.3 jotron.com Doc. No.: 103839 Rev. A Page 44 of 104...
- Page 45 When the lid is off, the connections to sensors, ECS etc can be made. The inner lid shall not be removed by user. Figure 8-12 Transponder with lid removed, lid screws highlighted jotron.com Doc. No.: 103839 Rev. A Page 45 of 104...
- Page 46 8.3.2.1 Typical connections to the transponder Figure 8-13: Typical Transponder connections, dashed lines shows options jotron.com Doc. No.: 103839 Rev. A Page 46 of 104...
- Page 47 Test signal Test signal (not isolated) Do not connect Optoisolated Bluesign BLUESIGN (-) (Connect together (Inland BLUESIGN (+) for activation) functionality) Do not connect Figure 8-14: TR-8000 MkII transponder connection label jotron.com Doc. No.: 103839 Rev. A Page 47 of 104...
- Page 48 (Connect + and – for Bluesign BLUESIGN + ( ---“--- ) activation) 1PPS - (Don’t connect) ( ---“--- ) 1PPS 1PPS + ( ---“--- ) Figure 8-15: TR-8000 (previous version) transponder connection label jotron.com Doc. No.: 103839 Rev. A Page 48 of 104...
- Page 49 Allowed voltage levels of the power supply to be connected with the transponder: Minimum = 10.8 volt Maximum = 31.2 volt Recommended cable diameter: 2.5 – 4 mm Figure 8-8-16 Use the supplied orange screwdriver to open the terminals. jotron.com Doc. No.: 103839 Rev. A Page 49 of 104...
- Page 50 “Port monitor” which will display all raw sensor data in the Display Unit. How to use this monitor, is described in chapter 10.6.1.8 jotron.com Doc. No.: 103839 Rev. A Page 50 of 104...
- Page 51 Display 1 See also chapter 10.6.1.2 which describes how to configure “External Display” options and table in chapter 8.3.2.2 for details of pinouts. Default speed on this port is 38400 baud. jotron.com Doc. No.: 103839 Rev. A Page 51 of 104...
- Page 52 Figure 8-17 Ethernet RJ45 connector The “Ethernet” interface is auto detecting RX and TX similar as a network switch. No need to consider if the cable is crossed or not. jotron.com Doc. No.: 103839 Rev. A Page 52 of 104...
- Page 53 8.3.2.6 Pilot / External Display connection On some vessels there might be mandatory to have a pilot port plug. A Pilot plug with cable can be bought from your Jotron dealer. The pilot port cable can be either conneted to the Transponder or the Display.
- Page 54 Figure 8-24 Typical Alarm connection The alarm relay is only activated for unacknowledged warning alerts. Caution alerts does not affect the alarm relay. This is a change from IEC 61993-2 Ed2 to Ed3. jotron.com Doc. No.: 103839 Rev. A Page 54 of 104...
- Page 55 The connection of the Blue Sign should be done after CESNI «Test Standard Inland AIS» Edition 2021/3.0, § 6.1.1.2. single switch. Below is a drawing showing how to connect the Blue Sign for the Jotron AIS TR-8000 MkII unit: Blue sign is triggered/activated when connection 45 and 46 is shorted.
- Page 56 Replace fuses with identical fuses only. Use of other fuses or such will make all warranty void. 4. The SD card reader is used for Software upgrades provided by Jotron only. This must be performed by Jotron trained Dealers/Distributors/Service Agents 5.
- Page 57 Bulgin Ethernet Buccaneer in each ends. 86145 Jotron See 8.2.3 Power Buccaneer PX0410/06/S Bulgin Jotron made cable, Partno: 86581 Pilot Buccaneer PX0410/12/P Bulgin Jotron made cable, Partno: 86870 Table 2 Display connector details jotron.com Doc. No.: 103839 Rev. A Page 57 of 104...
- Page 58 Shield BACKUP, 12 - 24 VDC Yellow Brown BACKUP, 0 VDC (common with 5) Brown MAIN, 0 VDC (common with 4) Do Not connect Table 4 Power connector (86851) pinout jotron.com Doc. No.: 103839 Rev. A Page 58 of 104...
- Page 59 Figure 8-28 AMP 206486-1 Pinout Name Connects to AMP 206486-1 Pin no: Floating Ground TDA Out TDB Out Floating Ground RDA In RDB in 7-12 Do Not Connect Table 5 Pilot connector (86870) pinout jotron.com Doc. No.: 103839 Rev. A Page 59 of 104...
-
Page 60: Initial Configuration
Capable of instant presentation of target course alternations. Not subject to target swap. Not subject to target loss in clutter. Not subject to target loss due to fast manoeuvres. Able to detect ships within VHF/FM coverage. jotron.com Doc. No.: 103839 Rev. A Page 60 of 104... -
Page 61: Erroneous Information
Erroneous information implies a risk to other ships as well as your own. Incorrectly configured or calibrated sensors might lead to transmission of incorrect information. It is the user’s responsibility to ensure that all information entered into the system is correct and up to date. jotron.com Doc. No.: 103839 Rev. A Page 61 of 104... -
Page 62: Operating Instructions
(Default: SE). Password not required for Type of Vessel. Vessel name, Call sign, MMSI and IMO are all text or numbers and may entered easily jotron.com Doc. No.: 103839 Rev. A Page 62 of 104... - Page 63 Voyage settings dialog (see 7.3.5). If such a selection is not done, the ship will have it’s second digit set to 9 (No additional info.) jotron.com Doc. No.: 103839 Rev. A Page 63 of 104...
- Page 64 A and B may be maximum 511 metres each, while C and D may be maximum 63 metres each. jotron.com Doc. No.: 103839 Rev. A Page 64 of 104...
-
Page 65: Display Settings
Output Power is chosen between High or Low setting (1W or 12.5W) Transitional zone defines the area surrounding an area in order to switch the frequencies in a step by step order. The transitional zone defined between 1 and 8 NM jotron.com Doc. No.: 103839 Rev. A Page 65 of 104... - Page 66 It is possible to view the settings of a given region by selecting a region in the regions list and pushing the View Region button. Example of standard Transponder without any extra Regions defined Example configuration with one extra Region defined jotron.com Doc. No.: 103839 Rev. A Page 66 of 104...
- Page 67 Channels, Tx/Rx Mode, Power and Transition zone are configured, but all these parameters may be altered together with defining position of the North East and South West corners of the Region. jotron.com Doc. No.: 103839 Rev. A Page 67 of 104...
- Page 68 88B used previously as Coast Station frequencies on 161.975 MHz and 162.025 MHz. See complete list in Chapter 13 and for updates of this list from ITU RR, Appendix 18 jotron.com Doc. No.: 103839 Rev. A Page 68 of 104...
- Page 69 Tx/Rx Mode allows you to change setting in which the transponders will use the two regional channels for transmission (Tx) and reception (Rx) When you press the button “Tx/Rx Mode” it will toggle between the valid configurations: Default – will transmit/receive on both channels jotron.com Doc. No.: 103839 Rev. A Page 69 of 104...
- Page 70 (settings) of the new region. When leaving a region, frequency transition is performed back to default values. To change the value of this “Transition Zone”, select the button and input value between 1 and 8 (Nautical miles) jotron.com Doc. No.: 103839 Rev. A Page 70 of 104...
- Page 71 South West corner If the values are within 20 – 200 NM, they will be accepted, and you will be asked if you want to save it: Otherwise you may experience errors: jotron.com Doc. No.: 103839 Rev. A Page 71 of 104...
- Page 72 ILLEGAL COORDINATES Example: Too large value for Latitude REGION WIDTH /HEIGHT PROBLEM Example: Too large value for “Region width” jotron.com Doc. No.: 103839 Rev. A Page 72 of 104...
-
Page 73: Alarms
And the “Warning” popup must be acknowledged by pressing the button below Alarm window When a caution alert occurs, a separate popup will be shown with the status of Cautions. Cautions, however, may not be acknowledged. jotron.com Doc. No.: 103839 Rev. A Page 73 of 104... -
Page 74: Indicators
Message 23 Returned to default operations No longer assigned by base station MMSI not defined MMSI set to 0. Confgiure MMSI on Own Ship page. Jotron custom Table 6: Indicators jotron.com Doc. No.: 103839 Rev. A Page 74 of 104... -
Page 75: Advanced
Because Ethernet is used between transponder unit and display, an IP addresses must be correctly configured All parameters /buttons are “grayed out” as they are not accessible without “Admin Pswrd” When “Admin pswrd” button is selected, the following window appear: jotron.com Doc. No.: 103839 Rev. A Page 75 of 104... - Page 76 If Ethernet is used, an external Ethernet switch is required for simultaneously connection of the display unit and a remote computer, see also chapter 8.3.2.5 which describes the External Display physical connections. jotron.com Doc. No.: 103839 Rev. A Page 76 of 104...
- Page 77 10.6.1.3 Dual Display configuration The first Display shall be configured as described above in chapter 10.6.1.1 and 10.6.1.2. The dual display shall be configured as follows: First Display: Adress: 10.0.0.11 Mask: 255.255.0.0 jotron.com Doc. No.: 103839 Rev. A Page 77 of 104...
- Page 78 Press one of the 5 Port buttons to change the baud rate of that port. It will then jump between the legal options: 4800 (default: Sensor) 9600 19200 38400 (default: Long-Range) jotron.com Doc. No.: 103839 Rev. A Page 78 of 104...
- Page 79 The “Port monitor” acts as a Terminal window, showing raw data received on a sensor, similar to Windows “Hyperterminal” First select which “Sensor port” you want to “listen” to And if a Sensor is connected it could look similar to these: jotron.com Doc. No.: 103839 Rev. A Page 79 of 104...
- Page 80 The Polled Long-Range system can be configured to reply automatically or wait for acknowledgement from the user. An indication of received LR messages is displayed for the user in either case. jotron.com Doc. No.: 103839 Rev. A Page 80 of 104...
- Page 81 Observe that here are “2 popups” received from 2 different AIS-SARTs and each “popup” must be acknowledged. Also observe that locating devices are displayed in top of the list in the background, and with RED color. jotron.com Doc. No.: 103839 Rev. A Page 81 of 104...
- Page 82 If not, we can continue with the test: 1. Select Target 2. Press “Test” 3. Wait until test finished Success: Failure: If the TEST fails, we can select another target and redo the test jotron.com Doc. No.: 103839 Rev. A Page 82 of 104...
- Page 83 It is possible to inspect the functionality of the internal GNSS receiver by the following parameters: Satellites in view Signal strength (SNR on Y-axis) Satellite ID (X-axis) Position Pos. accuracy Precision Differential mode jotron.com Doc. No.: 103839 Rev. A Page 83 of 104...
- Page 84 In this window you can read information about : Serial number Software Hardware of both Display and Transponder unit In addition you may select the buttons: Change password Update firmware Inland jotron.com Doc. No.: 103839 Rev. A Page 84 of 104...
- Page 85 Update Firmware If you select “Update firmware”, you can select between Display unit firmware Transponder unit firmware Update of Firmware shall only be done by Jotron trained dealers, distributors & service agents. 10.6.7.3 Inland If you select the “Inland”, you can change the Transponder to operate in the European Inland Waterways mode.
- Page 86 Navigational status Destination MMSI IMO number Call sign Ship name Ship type as integer Current GNSS antenna reference Max draguth Special manoeuvre indicator jotron.com Doc. No.: 103839 Rev. A Page 86 of 104...
-
Page 87: Alarms
11 Alarms The following table list all the alerts defined in IEC 61993-2:Ed3 in addition to some Jotron specific ones. The alerts are part of the Bridge Alert Management system. The legacy alarms are still triggered in parallel with the BAM alerts, but the display only shows the BAM alerts. - Page 88 Check for firewall error or such if connected through a local network. The following alarms are Jotron specific, and not part of IEC 61993-2:Ed3 Validation of internal configuration failed on boot, and configuration has been reset. Attempt to re-configure unit and...
-
Page 89: Menu Tree
Resend a selected Sent message (if any) or reply on a selected Received message (if any) Display options Day / Night mode Dimming Voyage Data Configuration of Navigation Status, Destination, ETA, Draught, Cargo category and number of Persons aboard. jotron.com Doc. No.: 103839 Rev. A Page 89 of 104... -
Page 90: List Of Vhf Channels
2206 160.9125 1019 156.9500 1266 156.3375 2207 160.9625 1020 157.0000 1278 156.9375 2218 161.5125 Channel 2087 = Channel 87B Channel 2088 = Channel 88B Channel 75 & 76 = Long-Range jotron.com Doc. No.: 103839 Rev. A Page 90 of 104... -
Page 91: Complied Standards
IEC 62923-1, 2018 – Bridge alert management: Operational and performance requirements, methods of testing and required test results IEC 62923-2, 2018 – Bridge alert management: Alert and cluster identifiers and other additional features jotron.com Doc. No.: 103839 Rev. A Page 91 of 104... -
Page 92: Outline Drawings
15 Outline Drawings 15.1 Transponder unit Figure 15-1 Transponder unit: mechanical dimensions jotron.com Doc. No.: 103839 Rev. A Page 92 of 104... -
Page 93: Display Unit: Desktop Or Overhead Mount
15.2 Display unit: Desktop or Overhead mount Figure 15-2 Display unit: mechanical dimensions jotron.com Doc. No.: 103839 Rev. A Page 93 of 104... -
Page 94: Display Unit: Flush/Panel Mount
15.3 Display unit: Flush/Panel mount Figure 15-3 Display unit: flush mount cut-out dimensions jotron.com Doc. No.: 103839 Rev. A Page 94 of 104... -
Page 95: Sanav - Gps Marine Antenna
External flagpole mount (11cm-height threaded mast), an optional accessory kit 1. Cabin roof-mount with stainless steel base & shaft Optional mounting plate: 2. Rail side mount with stainless rod Figure 15-5 GPS Antenna dimensions jotron.com Doc. No.: 103839 Rev. A Page 95 of 104... -
Page 96: Abbreviations And Definitions
24 satellites plus 3 active spare satellites in six orbital planes about 20,200 kilometers above the earth. GLONASS A satellite navigation system developed and operated by Russia. Greenwich Mean Time jotron.com Doc. No.: 103839 Rev. A Page 96 of 104... - Page 97 ROOT MEAN SQUARED – A statistical measure of probability stating that an expected event will happen 68% of the time. In terms of position update accuracy, 68 position updates out of 100 will be accurate to within specified system accuracy. Rate Of Turn jotron.com Doc. No.: 103839 Rev. A Page 97 of 104...
- Page 98 Universal Time Coordinated – Greenwich mean time corrected for polar motion of the Earth and seasonal variation in the Earth's rotation. Volt DC VHF Data Link Very High Frequency – A set of frequencies in the MHz region VSWR Voltage standing wave ratio jotron.com Doc. No.: 103839 Rev. A Page 98 of 104...
-
Page 99: Service And Warranty
WARRANTY CLAIM The warranty period for a new TR-8000 MkII is 24 months from the date of delivery (from Jotron). If you have a product and are unclear about your warranty period contact your sales partner. All Jotron products are warranted against factory defects in materials and/or workmanship during the warranty period, unless otherwise stated in writing. -
Page 100: Registration Form
Place Date Signature Please fill in with capital letters This form must be sent to Jotron AS, support@jotron.com or Fax.: + 47 33 12 67 80 (Att: Service department) in order to have a valid 24 months product warranty jotron.com Doc. -
Page 101: Trouble Description Form
Hardware revision Transponder Unit Connections: Equipment: Sensor 1 Sensor 2 Sensor 3 Ext Display Port (RS-422/RS-232/LAN)? Pilot Port Long-Range Port DGNSS Data Port Display Unit Connections: Equipment: Pilot Port Trouble Description: jotron.com Doc. No.: 103839 Rev. A Page 101 of 104... -
Page 102: Service Agents
18 Service Agents Please look at https://www.jotron.com for Marine Service Agents. 19 List of Figures Figure 6-1 Block diagram of TR-8000 MkII system ........................10 Figure 8-1 Transponder unit: exploded view ..........................36 Figure 8-2 Desktop mounted Display Unit ..........................37 Figure 8-3 Roof mounted Display Unit ............................ - Page 104 NORWAY / HEADQUARTERS CHINA Jotron AS Jotron USA, Inc Norway Jotron AS Beijing Ringdalskogen 8 6300 Rothway Street, Suite C Representative Office (ATC business) 3270 Larvik, Norway Houston, TX 77040, USA No. 1204 room, building D Tel: +47 33 13 97 00...
Need help?
Do you have a question about the Tron AIS TR-8000 MkII and is the answer not in the manual?
Questions and answers