Advertisement
Quick Links
sauder.com
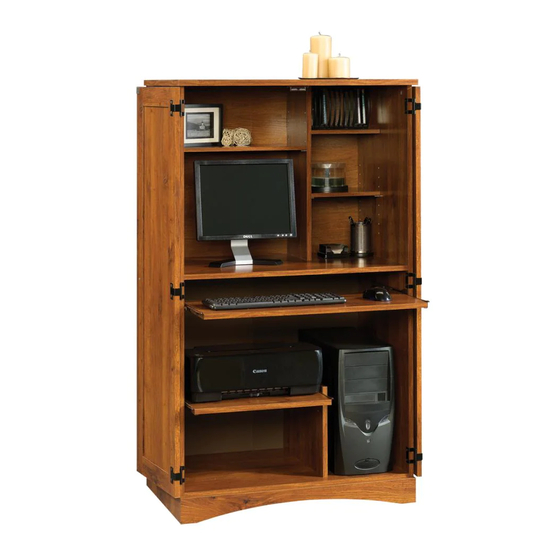
Computer Armoire
Harvest Mill Collection | Model 404958
Need help? Visit Sauder.com to view video assembly tips or chat with a live rep.
Prefer the phone? Call 1-800-523-3987.
Share your journey!
Hidden printing,
browsing, clicking,
lounging.
NOTE: THIS INSTRUCTION
BOOKLET CONTAINS IMPORTANT
SAFETY INFORMATION.
PLEASE READ AND KEEP FOR
FUTURE REFERENCE.
English pg 1-17
Français pg 18-20
Lot # 385856
10/22/15
Purchased: __________________
Be sure to give us a ring before
making any returns. 1-800-523-3987
Advertisement

Related Manuals for Sauder Harvest Mill 404958


Summary of Contents for Sauder Harvest Mill 404958
- Page 1 Harvest Mill Collection | Model 404958 NOTE: THIS INSTRUCTION BOOKLET CONTAINS IMPORTANT SAFETY INFORMATION. Need help? Visit Sauder.com to view video assembly tips or chat with a live rep. PLEASE READ AND KEEP FOR FUTURE REFERENCE. Prefer the phone? Call 1-800-523-3987.
-
Page 2: Table Of Contents
Table of Contents Assembly Tools Required Part Identifi cation No. 2 Phillips Screwdriver Tip Shown Actual Size Hardware Identifi cation Assembly Steps 5-17 Hammer Not actual size Français 18-20 Safety 21-22 Skip the power trip. Warranty This time. Page 2 404958 www.sauder.com/services... -
Page 3: Part Identifi Cation
LEFT END (1) DOOR (2) CD SHELF (1) UPRIGHT (1) KEYBOARD SHELF (1) UPPER BACK (1) SHORT UPRIGHT (1) LARGE ADJUSTABLE SHELF (1) LOWER BACK (1) TOP (1) ADJUSTABLE SHELF (1) BOTTOM (1) PRINTER SHELF (1) www.sauder.com/services 404958 Page 3... -
Page 4: Hardware Identifi Cation
Hardware Identifi cation å Screws are shown actual size. You may receive extra hardware with your unit. 35AW CABINET RIGHT - 2 35AX CABINET LEFT - 2 35AY DRAWER RIGHT - 2 35AZ DRAWER LEFT - 2 HIDDEN CAM - 14 CAM DOWEL - 14 HINGE - 6 MAGNETIC... -
Page 5: Assembly Steps
Hardware Identifi cation å Screws are shown actual size. You may receive extra hardware with your unit. MM BROWN 1" FLAT HEAD SCREW - 8 BLACK 1-7/8" FLAT HEAD SCREW - 4 BLACK 9/16" LARGE HEAD SCREW - 36 GOLD 1" MACHINE SCREW - 2 BLACK 1/2"... - Page 6 Look for this icon. It means a Step 1 video assembly tip is available at www.sauder.com/services/tips Assemble your unit on a carpeted fl oor or on the empty å carton to avoid scratching your unit or the fl oor. Push fourteen HIDDEN CAMS (X2) into the ENDS (A and B), å...
- Page 7 There are three optional sets of holes to Short fi nished edge attach the RAILS for the PRINTER SHELF. Be sure the RAILS are in the same level of holes that are best suited for the size of your printer. www.sauder.com/services 404958 Page 7...
- Page 8 Tighten Risk of damage or Arrow injury. HIDDEN CAMS must be completely Arrow Maximum tightened. HIDDEN 210 degrees CAMS that are not completely tightened may loosen, and parts may separate. To Minimum completely tighten: 190 degrees Page 8 404958 www.sauder.com/services...
- Page 9 H I D D E N i t h S u r f a c H I D D E N i t h BLACK 1-7/8" FLAT HEAD SCREW (2 used in this step) www.sauder.com/services 404958 Page 9...
- Page 10 å help a friend, don't SHELF (Q) into the holes in the UPRIGHT (C). leave without a bite. Finished edge S u r f a c w i t h o u t h o l Page 10 404958 www.sauder.com/services...
- Page 11 Minimum NOTE: Be sure the METAL PINS in the CD SHELF insert 190 degrees å into the holes in the RIGHT END. Finished edge Finished edge BLACK 1-7/8" FLAT HEAD SCREW (2 used in this step) www.sauder.com/services 404958 Page 11...
- Page 12 ENDS and BOTTOM. Fasten the SKIRT (O) to the ENDS (A and B) and BOTTOM (F). Use å fi ve BLACK 9/16" LARGE HEAD SCREWS (OO). BLACK 9/16" LARGE HEAD SCREW (12 used in this step) Page 12 404958 www.sauder.com/services...
- Page 13 NOTE: Perforations have been provided for access through the å NAIL LOWER BACK (S). Carefully cut out the rectangle for proper (48 used in this step) ventilation of your CPU. These holes must line up over the UPRIGHTS (C and D). Cut-out www.sauder.com/services 404958 Page 13...
- Page 14 å BLACK 1/2" FLAT HEAD SCREWS (PP). NOTE: The surfaces of the STRIKE PLATES with å "SAUDER" should be facing up. BLACK 9/16" LARGE HEAD SCREW (12 used for the HINGES) BLACK 1/2" FLAT HEAD SCREW (2 used for the STRIKE PLATES)
- Page 15 NOTE: To make adjustments to the DOORS, loosen the å SCREWS in the HINGES, make needed adjustments, and BLACK 9/16" LARGE HEAD SCREW tighten the SCREWS. (12 used for the HINGES) GOLD 1" MACHINE SCREW (2 used in this step) www.sauder.com/services 404958 Page 15...
- Page 16 Repeat this process to insert the PRINTER SHELF (N). NOTE: The DOORS should be open å Roller end completely to pull out the KEYBOARD and PRINTER SHELVES. Finished edge Roller end BROWN 1" FLAT HEAD SCREW (8 used in this step) Page 16 404958 www.sauder.com/services...
- Page 17 This completes assembly. Clean with your favorite furniture polish or a damp cloth. Wipe dry. å And to celebrate, why not share your success story? 10 lbs. 10 lbs. 50 lbs. 25 lbs. (8 used) 15 lbs. 40 lbs. 60 lbs. total www.sauder.com/services 404958 Page 17...
-
Page 18: Français
EXTRÉMITÉ DROITE ..........1 35AW ÉLÉMENT DROITE............2 pour future référence. 35AX ÉLÉMENT GAUCHE ..........2 EXTRÉMITÉ GAUCHE ..........1 Pour contacter Sauder en ce qui concerne cet 35AY TIROIR DROIT ..............2 MONTANT................1 élément, faire référence 35AZ TIROIR GAUCHE ............2 COURT MONTANT .............1... - Page 19 Utiliser cinq VIS NOIRES TÊTE LARGE 14 mm (OO). Fixer le DESSOUS (F) et la TABLETTE (G) à l’EXTRÉMITÉ GAUCHE (B). Serrer quatre EXCENTRIQUES ESCAMOTABLES. Fixer la TABLETTE (G) au MONTANT (C). Utiliser deux VIS NOIRES TÊTE PLATE 48 mm (LL). www.sauder.com/services 404958 Page 19...
- Page 20 REMARQUE : Les surfaces des PLAQUES DE BUTÉE comportant POUR CD (Q), puis faire pivoter l’ a utre bord du PORTE CD vers l’inscription « SAUDER » devraient être dirigées vers le haut. le DESSUS (E). Maintenant, courber légèrement le PORTE CD et insérer les montants du PORTE CD dans les trous du DESSUS.
-
Page 21: Safety
à Les téléviseurs peuvent être particulièrement un téléviseur. cet eff et. lourds. De plus, le poids et l’emplacement du tube image ont tendance à rendre les téléviseurs instables et enclins à tomber vers l’ a vant. www.sauder.com/services 404958 Page 21... - Page 22 Además, el peso y la ubicación del tubo de imagen tienden a causar la inestabilidad de televisores y propensa a volcarse hacia adelante. Page 22 404958 www.sauder.com/services...
-
Page 23: Warranty
à compter de la date d'achat la première fois et qui sont signalés à Sauder dans les limites de couverture de la contre tout défaut de matériaux ou de fabrication des composantes de mobilier Sauder. - Page 24 Dear Valued Customer: So, how did it go? Thanks so much for choosing Sauder® furniture. I hope the Set a world record for speed? purchase and assembly process was a positive experience Feeling good about yourself? and you feel good about the furniture you just built. If you Nice.
Need help?
Do you have a question about the Harvest Mill 404958 and is the answer not in the manual?
Questions and answers