
Related Manuals for KAP TC2018-180413


Summary of Contents for KAP TC2018-180413
- Page 1 Instruction Manual TOYOTA CAMRY 2018 PATD for PANASONIC + CarPlay Video Interface + CarPlay TC2018-180413 NV17-AV_MODULE_C_V001 MODEL. MODEL. 2019.01.18 2019.01.14 D A T E . D A T E . Korea Auto Parts www.kaptrade.com...
- Page 2 Serviceable Model PANASONIC HEADUNIT TOYOTA Camry (2018~2019) Panasonic 8” Model...
- Page 3 Spec 1. Input Spec. (MULTI VIDEO INTERFACE) Interface • 1 x Digital RGB Input (Navigation System source) • 1 x Analog RGB Input (Navigation System source) • 1 x CVBS(REAR CAMERA) Input. (Rear camera source) • 1 x CVBS(FRONT CAMERA) Input. (Front camera source) ...
-
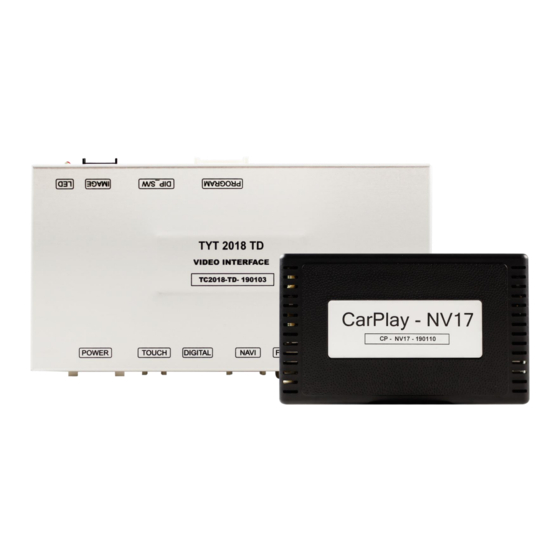
Page 4: External Appearance
External Appearance Interface + CarPlay IMAGE DIP S/W PROGRAM Power/CAN R-Touch Digital Analog Video Rear LCD-OUT Camera Microphone In Made Switch To Enter Setting Touch LVDS&UART OUT Smartphone Connection POWER/CAN... -
Page 5: Connector Pin Assignment
Connector Pin Assignment Interface + CarPlay Power/CAN R-Touch Analog NAVI Connect Touch Connect POWER Connect ① ② ③ ④ ① ② ③ ④ ⑤ ⑥ ⑦ ① Y- ① R DATA (Red) 9. KEY (Pink) 1. ACC (Red) 10. N.C ②... -
Page 6: Product Composition
Product Composition 68*100*0.5*P6 Reverse 30*100*0.5*P6 Reverse Interface SUB Board (REV00) LVDS FFC Cable Power Cable LVDS Cable(800mm) OSD Board CarPlay HDMI Cable CarPlay Power Cable AUX Cable... -
Page 7: Dip Switch Setting
Dip Switch Setting OFF : ▲UP ON : ▼DOWN FUNCTION DIP S/W Selection ON : Not Used NAVI OFF : Used ON : Not Used DVB-T(AV1) OFF : Used ON : Not Used DVD(AV2) OFF : Used Car Type Select Bottom Picture Car Type Select CAMRY(2018 - 2019) - Page 8 Mode Change (to Interface) Mode Change Button HOME / MAP • Long press to switch to interface screen • Short press to switch to OEM screen • If there is no navigation option (No MAP Button), you can change the mode only with the "HOME"...
- Page 9 Mode Change (to OEM) PWR·VOL • Display OEM screen for 4 seconds and return TUNE·SCROLL / SEEK> / <TRACK • Display OEM screen for 2 seconds and return MENU / AUDIO / PHONE / APPS • Display OEM screen for 2 seconds and return •...
-
Page 10: Touch Control
Touch Control Touch Calibration Method 1 • Press and hold for more than 11 seconds on NAVI, DVB-T, DVD screen. • (Note that it only works the first time after switching screens) Method 2 • OSD menu ▶ Utility ▶ Calibration Touch Calibration •... - Page 11 Touch Control DVBT / DVD Control DVBT Press Touch Press Icon (Anywhere) Press Touch Press Icon (Anywhere)
-
Page 12: Osd Control
OSD Control OSD(On Screen Display) Control Board MENU DOWN When there is no OSD screen, pressing OSD ON MENU When OSD screen is displayed, press OSD EXITT Item Selection, Value Selection Item up Increase selected value Item down DOWN Decrease selected value Mode State First Menu Second Menu... - Page 13 OSD Control Option First Menu Second Menu Third Menu Description + 12V continuous supply RearCam-Power AUTO + 12V supply only in Rear camera mode + 12V off Detected by CAN RearCam-Det WIRE Detected by Rear-Det Wire Option Video(REAR) Input (If RearCam-Type is OEM) AV Mode Disable feature Original Camera...
- Page 14 OSD Control Option First Menu Second Menu Third Menu Description + 12V continuous supply FrontCam-Power AUTO + 12V supply only in Front camera mode + 12V off Detected by CAN FrontCam-Det WIRE Detected by Front-Det Wire After RearCam shows FrontCam and returns to previous state FrontCam- RcvOpt...
- Page 15 OSD Control Option First Menu Second Menu Third Menu Description · When selecting SEEK, TRACK, TUNE- SCROLL button Switch back to OEM screen for 2 seconds and return · When PWR-VOL button is selected Switch ScrChg-Btn back to OEM screen for 4 seconds and return Disable feature Option...
- Page 16 OSD Control Option ▶ FrontCam-RcvOpt Front Camera Auto Mode 0 second = FrontCam-RcvOpt menu OFF 1~30 second = FrontCam-RcvOpt menu ON & time control OEM or REAR FRONT OEM or INTERFACE CAMERA CAMERA INTERFACE Select time of display 1~30 second...
- Page 17 OSD Control Image NAVI – RGB Menu First Menu Second Menu Third Menu Description Brightness Adjust the value of brightness Contrast Adjust the value of contrast Color-RED Adjust the value of RED Image Color-GREEN Adjust the value of GREEN Color-BLUE Adjust the value of BLUE Reset Excute...
- Page 18 OSD Control Screen First Menu Second Menu Third Menu Description Horizontal Output screen horizontal movement Vertical Output screen vertical movement Scale X Up Reduce / increase output screen width Screen Scale X Down Scale Y Up Reduce / Increase Output Screen Height Scale Y Down Reset Screen menu all reset...
- Page 19 OSD Control Parking First Menu Second Menu Third Menu Description Show parking line Line Display Do not show parking lines Warnings Lang Set warning text language Parking Horizontal Moving a parking line horizontally Vertical Moving a parking line vertically Transparency Parking line transparency Reset Parking menu all reset...
- Page 20 OSD Control Parking – Change warning language...
- Page 21 OSD Control Parking – Adjust position of parking guide line MENU DOWN • Pressing this Horizontal / Vertical menu, The OSD screen automatically disappears. • Possible to adjust the position of parking guide line by Keypad in Horizontal / Vertical menu •...
- Page 22 OSD Control First Menu Second Menu Third Menu Description value Horizontal OSD Menu Horizontal Shift value Vertical OSD menu vertical Shift value Display Time OSD Menu Display Time (in seconds) value Transparency OSD menu transparency Language OSD menu display language Reset Execute Initialize OSD settings...
- Page 23 OSD Control Utility First Menu Second Menu Third Menu Description Factory Reset Execute Initialize all settings Calibration Execute Run Calibration mode Utility FDS302KRX-171004 Version (Check for future upgrades) • Last Source : FDS302KRX-171004 FD S3 02 KR X - 17 10 04 Motor Model Hardware National...
-
Page 24: Video Interface
Install Manual 1-1. Installation CarPlay Connection TYT 2018 TD VIDEO INTERFACE REAR LVDS-OUT POWER/CAN TOUCH DIGITAL NAVI FRONT Voice Control External speaker CarPlay – NV17 LVDS&UART SmartPhone Connection iPhone ANDROID Phone (CarPlay) (Android Auto App) Your Phone... -
Page 25: Interface Settings
Install Manual 1-2. Installation CarPlay Connection • OSD setting must be done before CarPlay can be used INTERFACE Settings Config ▶ NAVI RGB ▶ DIGITAL-ROIK Option ▶ NAVI COM ▶ NV17... - Page 26 CarPlay Setting Touch Press the setting button for 3 seconds. When the above menu appears, press the setting button for 3 seconds. Correct the touch when the screen changes. Vehicle must be powered on without OEM touch display.
- Page 27 Install Manual 2. Installation DVB-T Remote Control Connection TYT 2018 TD VIDEO INTERFACE POWER/CAN TOUCH DIGITAL FRONT REAR LVDS-OUT NAVI DVD-IR DVBT-IR SYNC BLUE GREEN DVB-T-IR GEX-909DTV TUE-T440...
- Page 28 Install Manual 3. Installation DVD Remote Control Connection TYT 2018 TD VIDEO INTERFACE POWER/CAN TOUCH DIGITAL FRONT REAR LVDS-OUT NAVI DVD-IR DVBT-IR SYNC BLUE GREEN DVD-IR DHA-S690...
- Page 29 Install Manual 4. Installation External Reverse(Rear) Camera Connection OSD Screen selection WIRE TYT 2018 TD VIDEO INTERFACE POWER/CAN TOUCH DIGITAL FRONT REAR LVDS-OUT NAVI 16. GND (Black) 15. GND (Black) 14. Mode (Green) 13. Front-Power (Red) 12. Rear-Power (Red) 11. N.C REAR-POWER (Red) 10.
- Page 30 Install Manual 5. Installation External Front Camera Connection OSD Screen selection WIRE TYT 2018 TD VIDEO INTERFACE POWER/CAN TOUCH DIGITAL FRONT REAR LVDS-OUT NAVI 16. GND (Black) 15. GND (Black) 14. Mode (Green) 13. Front-Power (Red) 12. Rear-Power (Red) 11. N.C REAR-POWER (Red) 10.
- Page 31 Install Manual 6. LVDS FPC Cable Connection ▲ Remove the bolts ▲ Genuine FPC cable removal ▲ Connecting the Supplied FFC Cable ▲ Connecting the supplied FFC cable to the supplied SUB board. ▲ With the marked hole Insert one end ▲...
- Page 32 A-912 RM Tera-Tower2, 201 Songpa-Daero, Songpa-gu, Seoul, Korea T. (+82) 6204-0912 F. (+82) 6204-0913 E. kap@kaptrader.com...
Need help?
Do you have a question about the TC2018-180413 and is the answer not in the manual?
Questions and answers