Advertisement
LSC-2448-4SD
Receiving instructions:
After delivery, immediately remove the packaging from the product in a manner that preserves the packaging and
maintains the orientation of the product in the packaging; then inspect the product closely to determine whether it
sustained damage during transport. If damage is discovered during the inspection, immediately record a complete
description of the damage on the bill of lading. If the product is undamaged, discard the packaging.
NOTES:
1) Compliance with laws, regulations, codes, and non-voluntary standards enforced in the location where the product
is used is exclusively the responsibility of the owner/end-user.
2) Vestil is not liable for any injury or property damage that occurs as a consequence of failing to apply either:
a) Instructions in this manual; or
b) Information provided on labels affixed to the product. Neither is Vestil responsible for any consequential
damages sustained as a result of failing to exercise sound judgment while assembling, installing, using or maintaining
this product.
Table of Contents
Hazard identification: explanation of signal words.............................................................................. 2
Product Specifications by Model..................................................................................................... 2
Safety Guidelines ...............................................................................................................................................2
Components.............................................................................................................................. 3 - 4
Assembly instructions.............................................................................................................. 5 - 10
Limited warranty......................................................................................................................... 10
Copyright 2017 Vestil Manufacturing Corp.
2999 North Wayne Street, P.O. Box 507, Angola, IN 46703
Telephone: (260) 665-7586 -or- Toll Free (800) 348-0868
www.vestilmfg.com e-mail: sales@vestil.com
A
I
SSEMBLY
NSTRUCTIONS
V
M
ESTIL
ANUFACTURING
Fax: (260) 665-1339
L
ANDSCAPE
LSC-2448-4SD, manual.doc
C
.
ORP
C
ART
Page 1 of 10
Advertisement
Table of Contents

Related Manuals for Vestil LSC-2448-4SD


Summary of Contents for Vestil LSC-2448-4SD
-
Page 1: Table Of Contents
Table of Contents Hazard identification: explanation of signal words…………………………………………………………………… 2 Product Specifications by Model………………….…………………………………...………………………………. 2 Safety Guidelines ...............................2 Components………………………………………….………………………………………………………………….. 3 - 4 Assembly instructions……………………………………………………………………………………………….. 5 - 10 Limited warranty…………………………………………………………………………………………………………. 10 Page 1 of 10 Copyright 2017 Vestil Manufacturing Corp. -
Page 2: Hazard Identification: Explanation Of Signal Words
If this product is used improperly or carelessly, the user and/or bystanders might sustain serious personal injuries. To reduce the likelihood of injury: DO NOT modify the product in any way UNLESS you first obtain written approval from Vestil. Unauthorized modifications automatically void the Limited Warranty and might make the product unsafe to use. ... -
Page 3: Components
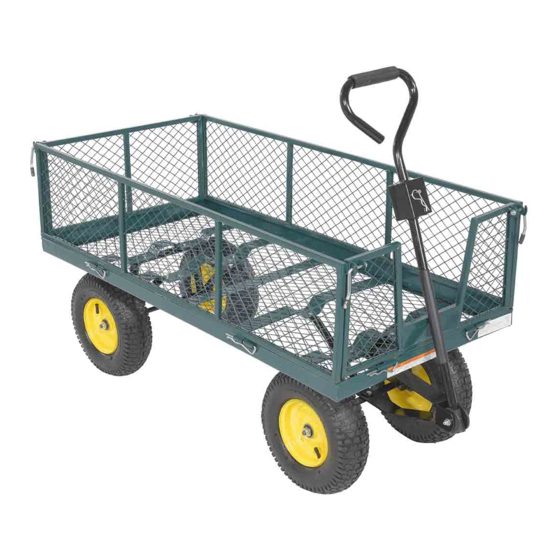
Item Description Molded Plastic handle Coupler R-Pin Cotter pin Hex Head Bolt (M8x60), washer & lock nut Hex Head Bolt (M8x20), washer & lock nut M12 Washer M12 Lock Nut Hex Head Bolt (M8x20), washer & lock nut Deck Steering Assembly Stabilizer Link Wheel Linkage Steering Assembly Rear Axle Weldment Left Link Right Link Steering Yoke Side Panel Rear Panel Front Panel Pneumatic Tires Part # F is not in 2017 manual Copyright 2017 Vestil Manufacturing Corp. Page 3 of 7... - Page 4 LSC-2448-4SD, manual.doc J (Base) O (L) P (R) Copyright 2017 Vestil Manufacturing Corp. Page 4 of 7...
-
Page 5: Assembly Instructions
(G). 3. Put together the rear wheel FIG. 2A: Rear wheel assembly assembly: a) Slide the right and left rear link arms Pneumatic tire (U) onto the ends of the rear axle weldment (N) as shown in Fig. 2; then b) Slide the axle receiver of a wheel onto Rear axle weldment (N) each end of the axle. Be sure to orient the wheels such that the valve stems are on the outer sides of the wheels (see FIG. 2B). Axle FIG. 2B: Wheels Valve receiver stem Right rear link arm (P) Left rear link arm (O) Outer face Inner face Page 5 of 10 Copyright 2017 Vestil Manufacturing Corp. - Page 6 Next, align the bolt holes in the steering assembly (M) with the bolt holes in strap “c” (indicated by white arrows below) and the bolt holes in the stabilizer link (K) with the holes in strap “d” (see FIG.3C). FIG.3: Link arm Steering assembly Rear wheel assembly FIG. 3C: Fasten stabilizer arm to deck FIG. 3B: Link arm connection Bolt Handle to strap b Bracket Hex nut Flat Hex washer Bolt Flat Yoke washer Copyright 2017 Vestil Manufacturing Corp. Page 6 of 10...
- Page 7 Insert wheels on each axle valve stem facing out. b) Use M12 washer and M12 lock nut to secure the wheels on the axle Valve stem facing out FIG.4A Wheel axle M12 washer M12 lock nut Page 7 of 10 Copyright 2017 Vestil Manufacturing Corp.
- Page 8 Slide the coupler (A) and align the bolt holes in the handle with the bolt holes in the coupler; then c) Slide the handle bolt through one side of the handle bracket of the yoke (also identified in FIG. 3 on p. 6), through the coupler and handle, and through the other side of the bracket; d) Secure the handle bolt with a flat washer and hex nut. Handle Handle Adapter Handle coupler Hex nut Handle bolt Flat washer Handle bracket Page 8 of 10 Copyright 2017 Vestil Manufacturing Corp.
- Page 9 Align tabs on the panels with tabs on the base panel b) Attach front panel (T), back panel (S) and side panels (R) to the trolley base (J) using R pins. FIG.6 Page 9 of 10 Copyright 2017 Vestil Manufacturing Corp.
-
Page 10: Limited Warranty
(you) for warranty service. Who may request service? Only a warrantee may request service. You are a warrantee if you purchased the product from Vestil or from an authorized distributor AND Vestil has been fully paid.
Need help?
Do you have a question about the LSC-2448-4SD and is the answer not in the manual?
Questions and answers