
Related Manuals for FREEWAY Transactive Xtra 130


Summary of Contents for FREEWAY Transactive Xtra 130
- Page 1 Transactive Xtra Ceiling Track Hoist User Manual Doc No. 999075 Revision of document: B Revision Date: 09.06.2021...
-
Page 2: Table Of Contents
Contents Safety Instructions and Warnings ......................4 Introduction............................4 Manufacture ............................8 European Authorised Representative ....................8 Symbols Used ............................9 Contraindications/Limitations ......................10 Intended Use ............................ 10 Additional Warnings and Safety Notices ................... 12 Operating Environment ........................12 Essential Performance ........................13 EMC Statement .......................... - Page 3 Specifications............................. 33 Expected Product Lifetime ........................ 34 Standards Applied ..........................34 Environmental - Storage and Operating Conditions ................35 Normal operating conditions ......................35 Shipping and storage conditions ....................... 35 Disposal ..............................36 10.0 Fault Finding ............................37 11.0 General Inspection, Maintenance and Cleaning ................... 37 Service ............................
-
Page 4: Safety Instructions And Warnings
1.0 Safety Instructions and Warnings Introduction This manual includes the Transactive Xtra 130/160/200/270 Hoist, along with all variants for various track types. Below a list of all track profiles that the Transactive Xtra can be installed into through the different configurations. The below profiles must match your pre-installed track for the Transactive Xtra to be installed. - Page 5 Freeway Transactive Xtra - 130kg - 2 Way - Manual - Track Type 14 - Euro Plug Track Type 14 134014 Freeway Transactive Xtra - 130kg - 2 Way - Manual - Track Type 1 - Euro Plug - QRT Track Type 1 134015...
- Page 6 Freeway Transactive Xtra - 160kg - 2 Way - Manual - Track Type 14 - Euro Plug Track Type 14 134114 Freeway Transactive Xtra - 160kg - 2 Way - Manual - Track Type 1 - Euro Plug - QRT Track Type 1 134115...
- Page 7 Freeway Transactive Xtra - 200kg - 4 Way - Manual - Track Type 1 - Euro Plug - Powered Pivot Carry 134260 Track Type 1 Freeway Transactive Xtra - 200kg - 4 Way - Manual - Track Type 1 - Euro Plug - QRT - Powered Pivot 134261 Carry Bar...
-
Page 8: Manufacture
As hoisting and transferring a person presents a potential risk, the information in this manual is important to your safety. Please read and understand this manual in its entirety before using your Transactive Xtra Hoist. The information in this manual is important for the safety of anyone near the Transactive Xtra Hoist and must be read and understood to help prevent injuries. -
Page 9: Symbols Used
Symbols Used The Table below includes all Symbols from BS EN ISO 15223-1:2016 that can be found in this Manual and on the Product and what they represent. Refer back to this Table when you are unsure of what a symbol represents. Consult instructions before use Caution –... -
Page 10: Contraindications/Limitations
Contraindications/Limitations There are no known “contraindications” associated with the usage of the Transactive Xtra Hoist and its accessories, provided they are used as per manufacturer’s recommendations and guidelines. However, it is recommended that a client specific assessment is completed by a trained and knowledgeable health care professional to determine the method of transfer. Prism does not recommend a required number of care givers for the use of our products. - Page 11 • The Transactive Xtra Hoist must be installed on the ceiling track prior to use. • The Transactive Xtra Hoist must be installed only by persons authorized by Prism who have had the training to do so. Under no circumstance should the Transactive Xtra Hoist, track, sling or entire system be put in control of a person who •...
-
Page 12: Additional Warnings And Safety Notices
To reduce the risk of unintended use, when the Hoist is not in use remove the sling(s) from the product to prevent • entrapment or strangulation should the device be tampered with. • The Hoist batteries are not a user serviceable part. Contact your local authorised dealer to arrange for replacement. Before initial use, the Hoist unit must be charged for approximately 8 hours. -
Page 13: Essential Performance
Essential Performance The essential performance of the Hoist is defined as: Raise up, lower down, traverse left, and traverse right and emergency lower. These functions may be interrupted if the Hoist is subjected to any electromagnetic field created by other electrical devices which are located nearby. - Page 14 Section Specification Test Description Results Comments/ Base Standard Clause Configuration and Mode: Test setup standby 4.4.1 General Requirement; Risk Management Pass Process for ME Equipment and ME Systems Identification, Marking and documents Pass Configuration and Mode: Test setup charging 7.1.1 Mains Terminal Disturbance Voltage Pass CISPR 11: 2009 A1:2010 EN 55016-2-...
-
Page 15: Components/Key Parts
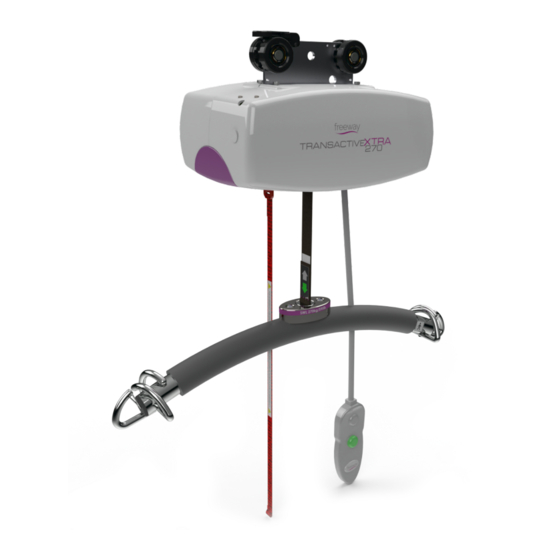
2.0 Components/Key Parts Please see below to familiarise yourself with the components of the Freeway Transactive Xtra Hoist. The images below show the contents of the Ceiling Track Hoist. If you have not received all the components contact your local Prism dealer immediately –... -
Page 16: Unpacking
Unpacking The Hoist will arrive to you in a robust box, please be careful when removing the components from the box. Please read the user guide in full before operating. This user manual should be kept safe for future reference. The Hoist has been specifically designed to be installed in both the professional and home health care environments. -
Page 17: Installation
3.0 Installation The Transactive Xtra Hoist has been specifically designed to be installed in both the professional and home health care environments. No matter the environment, health and safety factors should be considered to ensure the safety and essential performance of the Hoist and to avoid unnecessary damage or injuries to people within the area of the Hoist. -
Page 18: Type 'Bf' Applied Parts
4.0 Type ‘BF’ Applied parts Below shows the two parts of the hoisting system, which are classed as Body Floating (BF) applied parts. The carry bar is a complete assembled unit which allows approved Prism slings to be attached, to lift and assist patient. See section 5.1 to attach an approved sling to the carry bar. - Page 19 To remove the sling, simply reverse the process – pull back on the spring locking mechanism, lift the loop out of the hook and release the locking mechanism. We recommend the use of Prism Medical UK manufactured sling range (type ‘B’ applied part) to be utilised with the Transactive Xtra Hoist.
- Page 20 Large 1201HZ7320 1201HZ8320 1201HZ3320 1201HZ5320 1201HZ4320 1201HZ7220 1201HZ8220 1201HZ3220 1201HZ5220 1201HZ4220 1201HZ7120 1201HZ8120 1201HZ3120 1201HZ5120 1201HZ4120 XXXL 1201HZ7020 1201HZ8020 1201HZ3020 1201HZ5020 1201HZ4020 Prism Willow Small 1201WL7500 This sling is made up of a single quilted material backed with solid polyester material.
- Page 21 Size Care-Ability Sling Range - Product Material and Code Polyester Mesh Spacer CA300 Universal CA300PP1 CA300MP1 CA300SP1 CA300PP2 CA300MP2 CA300SP2 CA300PP3 CA300MP3 CA300SP3 CA300PP4 CA300MP4 CA300SP4 CA300PP5 CA300MP5 CA300SP5 X Small CA300PXS CA300MXS CA300SXS Small CA300PS CA300MS CA300SS Small/Medium CA300PSM CA300MSM CA300SSM Medium...
- Page 22 CA501PP4 CA501MP4 CA501SP4 CA501PP5 CA501MP5 CA501SP5 X Small CA501PXS CA501MXS CA501SXS Small CA501PS CA501MS CA501SS Small/Medium CA501PSM CA501MSM CA501SSM Medium CA501PM CA501MM CA501SM Medium/Large CA501PML CA501MML CA501SML Large CA501PL CA501ML CA501SL X Large CA501PXL CA501MXL CA501SXL CA502 Toilet Access with head support CA502PP1 CA502MP1 CA502SP1...
- Page 23 CA600PP3 CA600MP3 CA600SP3 CA600PP4 CA600MP4 CA600SP4 CA600PP5 CA600MP5 CA600SP5 X Small CA600PXS CA600MXS CA600SXS Small CA600PS CA600MS CA600SS Small/Medium CA600PSM CA600MSM CA600SSM Medium CA600PM CA600MM CA600SM Medium/Large CA600PML CA600MML CA600SML Large CA600PL CA600ML CA600SL X Large CA600PXL CA600MXL CA600SXL CA700 Classic Hammock CA700PP1 CA700MP1 CA700SP1...
- Page 24 Small/Medium CA701HSPSM CA701HSMSM CA701HSSSM Medium CA701HSPM CA701HSMM CA701HSSM Medium/Large CA701HSPML CA701HSMML CA701HSSML Large CA701HSPL CA701HSML CA701HSSL X Large CA701HSPXL CA701HSMXL CA701HSSXL CA702 Comfort In Chair Hammock CA702PP1 CA702MP1 CA702SP1 CA702PP2 CA702MP2 CA702SP2 CA702PP3 CA702MP3 CA702SP3 CA702PP4 CA702MP4 CA702SP4 CA702PP5 CA702MP5 CA702SP5 X Small CA702PXS...
-
Page 25: Connecting The Handset To The Hoist
Connecting the Handset to the Hoist A sturdy ladder or steps may be required in order to access the underside of the Hoist to attach the hand controller. Caution should be used when this is required. Should the grey rubber airline that connects the handset to the Hoist become disengaged from the underside of the Hoist it must be re-connected in order for the Hoist to work. -
Page 26: Hoist Operation
6.0 Hoist Operation Turning the Hoist ON and OFF To operate the Hoist, it must first be turned ON via the toggle switch on the Hoist itself (see figure 16). This toggle switch has three states, On, Off and E-Lower. To turn the Hoist on, the Toggle Switch must be pressed vertically into the slot. -
Page 27: Moving The Hoist Along The Track System
Moving the Hoist along the track system Always use extreme care when moving the Hoist along the track. Watch out for and avoid any obstructions that may cause injury to the individual in the sling, damage to the Hoist and/or to the obstruction. After use, the Hoist should be located at the correct end of the track system for re-charging. -
Page 28: Charging The Hoist
Charging the Hoist The Hoist will indicate when charging is required. The light will turn ORANGE on the hoist control panel and a slow beeping audible alarm will sound if the batteries are low and require charging. The display screen will also indicate low battery (Figure 26). -
Page 29: Emergency Operation
Emergency Operation The Hoist unit has an emergency shut-off feature that allows the operator to completely stop power to the Hoist. By pulling down ONCE on the emergency red cord, located underside of the Hoist unit, the powered functions will stop working immediately (Figure 37). Beeping once, the display and the LED indicator light will turn off. -
Page 30: Manual Emergency Lowering
The manual emergency lowering should only be used if when the emergency lowering cord fails, due to total power loss. The manual E-Lower is a last resort safety feature for when a patient is suspended and cannot be lowered. To operate, remove the Cap from the side cover of the Hoist (Figure 38). Insert the Emergency lowing wind down that is provided with the Hoist, into the Motor unit inside the cover (Figure 39). -
Page 31: Lcd Display Screen Functionality
LCD Display Screen Functionality The table below includes the details on all user display messages, it also includes the LED colour, the audible beeping and instructions on what actions to take when each message appears. This table may help for troubleshooting. Display Message Beep sound... -
Page 32: Technical Specification
7.0 Technical Specification Hoist Dimensions and Lifting Range All dimensions are shown in millimetres Figure 44 The diagram above (Figure 44) shows the relevant lifting ranges and dimensional sizes of the Hoist. The direction of travel can only be made within the boundaries of where the Hoist is in the track system. There are no necessary modifications required for the device to perform its intended use. -
Page 33: Specifications
Specifications Technical specifications Hoist Motor 24VDC Traverse Motor (optional at time of purchase) 24VDC Charger Input 100-240V AC 50/60Hz 1.5A Charger Output 24VDC/1.0A Batteries (sealed lead acid) 24VDC (2x 12VDC) 5.0 AH Hoist Case Flame Retardant ABS Hoist Case Degree of Protection IP20 Handset Degree of Protection IP67... -
Page 34: Expected Product Lifetime
Weights Safe Working Load (SWL) 130kg / 160kg / 200kg /270kg Hoist 10 kg (22 lb) Battery charger 0.8kg (1.76 lb) Carry bar 2 kg (4.4 lb) Handset 0.2kg (0.44 lb) Table 12 Operational Forces Handset Emergency cord Spring clips on carry bar Manually traversing fully loaded hoist (SWL) Manually traversing unloaded hoist (No weight) Table 13... -
Page 35: Environmental - Storage And Operating Conditions
8.0 Environmental - Storage and Operating Conditions The Hoist is intended for internal use within normal environmental conditions. It is not intended to be used in environments where there are rapid changes in the environmental temperature and humidity during intended use. •... -
Page 36: Disposal
Disposal When the Hoist has completed its life cycle and can no longer perform to its intended use safely the Hoist must be decommissioned by an approved Service Engineer. The following specifies the importance of correct disposal procedure including local laws and being environmentally friendly. Please observe the local laws on recycling and respect the current laws for disposal within the community the device is being used within. -
Page 37: Fault Finding
10.0 Fault Finding If a problem arises with the Hoist, the Table below will hopefully assists in determining the fault and what actions you can take. If the fault cannot be found or the fault is found and the action guide does not provide a fix (e.g. – a damaged wire would need replacement), contact your local Prism Medical UK authorized dealer immediately, a service engineer will be required to repair the Hoist. -
Page 38: Inspection
Do not attempt to service the product yourself, or warranty is void. To ensure the safety and continued good function of your Hoist, routine service must be performed on your Freeway Transactive Xtra Ceiling Track Hoist. Service should be completed by a Prism Medical UK approved service engineer every 6 months to ensure the products required standard is maintained. -
Page 39: Lift Tape Caution
Inspect the QRS for damage such as cracking. And ensure that the locking device is functioning correctly. LED’s Ensure that the LED’s are all working correctly prior to use. LCD Display Screen Ensure that the LCD is working correctly and the messages can be read. Wheels Ensure the wheels are traversing smoothly in the track before traversing a patient along the system. -
Page 40: Disinfecting (If Necessary)
Should the Hoist require a more thorough clean, the use of the Actichlor™ disinfectant product (which is widely available in tablet form and used throughout the health care industry) is recommended. Follow the manufacturer’s safety instructions for the use of the cleaning product before use to ensure safe use for the operator and the patient. -
Page 41: Warranty
Handling and storage safety precautions when using this cleaning agent: Advice on Safe Handling Avoid contact with skin and eyes. Do not breathe dust/fumes/gas/mist/vapours/spray. Use only with adequate ventilation. Wash hands thoroughly after handling. Mixing this product with acid or ammonia releases chlorine gas. Hygiene Measures Handle in accordance with good industrial hygiene and safety practice. -
Page 42: Service Record History
13.0 Service Record History Complete this section after each service, repair inspection and/or maintenance. 999075 – Revision B P a g e | 42 of 48... - Page 43 999075 – Revision B P a g e | 43 of 48...
- Page 44 999075 – Revision B P a g e | 44 of 48...
- Page 45 999075 – Revision B P a g e | 45 of 48...
- Page 46 User notes: 999075 – Revision B P a g e | 46 of 48...
- Page 47 User notes: 999075 – Revision B P a g e | 47 of 48...
- Page 48 Dealer contact details: Prism Medical UK Contact details: Address: Unit 1• Tir Llwyd Industrial Estate • St Asaph Avenue • Kinmel Bay • Conwy • LL18 5JZ Telephone Number: 01924 840 100 Disclaimer While every effort has been made to ensure the accuracy of information contained in this user manual, no liability can be accepted by Prism for any errors or omissions.
Need help?
Do you have a question about the Transactive Xtra 130 and is the answer not in the manual?
Questions and answers