
Related Manuals for Cooke WaterWitch


Summary of Contents for Cooke WaterWitch
- Page 1 Product Support Guide Full Electrical Certification Inside & Outside use (ESV160204) C-Tick Approval N11116...
- Page 2 For the same reasons I developed the Water Witch, my industry friends began installing them into their pools and water projects. Its popularity has since soared and Cooke Industries has evolved from its Cookes Pools & Spas heritage to become a strong, independent business.
-
Page 3: Table Of Contents
INDEX Compliance notice Page 02 Product applications and warnings Page 03 Product components and part numbers Page 04 Control box installation Page 05 Sensor installation Page 06 Solenoid installation Page 08 Alternative installation options Page 10 Start-up process Page 12 Test and time delay modes Page 13 Operation of indicator lights... -
Page 4: Compliance Notice
COMPLIANCE NOTICE The Water Witch is approved for use in all Australian states and territories. To comply with Western Australia Water Authority WaterMark Certificate regulations the water Of Conformity – Level 1 supply side must be installed as per this guide, with particular This is to certify that Nymet Australia Pty Ltd... -
Page 5: Product Applications And Warnings
PRODUCT APPLICATIONS AND WARNINGS The Water Witch is used in many different applications and projects to maintain a minimum water level. Some of the most popular applications include: • Swimming pools and spas • Balance tanks • Water features and ponds •... -
Page 6: Product Components And Part Numbers
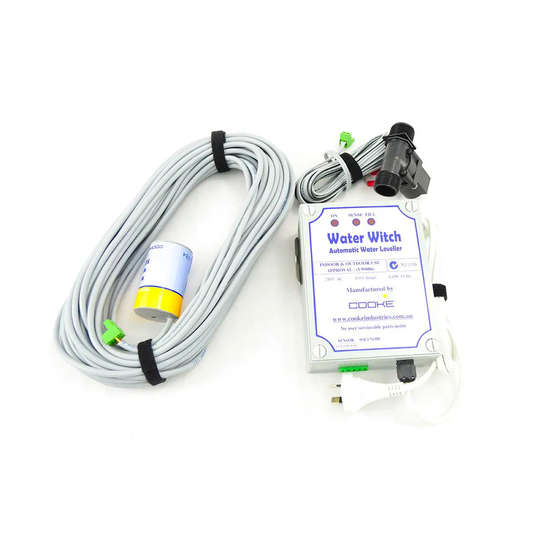
PRODUCT COMPONENTS AND PART NUMBERS The reliability and durability of the Water Witch is founded on its simplicity – there are just three main components and the unit will work well if all components are functioning correctly and site conditions are suitable. CONTROL BOX WS345 Water Witch Control Box SENSOR... -
Page 7: Control Box Installation
CONTROL BOX INSTALLATION The Control Box is the brain of the operation. A circuit board within the Control Box continually receives signals from the Sensor to confirm whether the body of water is at the required level or if water needs to be added to the project. INSTALLATION PROCESS AND CONSIDERATIONS: •... -
Page 8: Sensor Installation
SENSOR INSTALLATION The Sensor sits in a balance line, tank or trough to monitor the project’s water level. A ball float inside the Sensor lowers as the water level drops, in turn connecting a light beam between two LED lights in the top of the Sensor. These lights complete an electrical circuit and the Control Box opens the Solenoid to add water to the project. - Page 9 INSTALLATION PROCESS AND CONSIDERATIONS: • Two 50mm class 9 or class 12 PVC pipes are required as balance lines from the project’s wall to the pump and filter area. One pipe is for the sensor and the second is required for the fill line back to the pool.
-
Page 10: Solenoid Installation
SOLENOID INSTALLATION The Solenoid is regulated by the Control Box. When the water level is low the Control Box sends a 22V DC current to open the Solenoid so water flows in to the project. The Solenoid will close when the water level is restored to the correct level. Solenoid cables up to 100m long are available by special order. - Page 11 • A TAP OR TWO-WAY VALVE MUST BE PLACED BEFORE THE SOLENOID TO ENABLE THE WATER SOURCE TO BE TURNED OFF AT ANY TIME. • Standard installation positions the supply line 20mm above the fill balance line without a hard connection (An air gap is required to ensure the water from the project cannot contaminate the water source).
-
Page 12: Alternative Installation Options
ALTERNATIVE INSTALLATION OPTIONS BALANCE TANK Control The Water Witch is the most effective auto leveller for Cable gland to adjust sensor height balance tank installations. DO NOT GLUE 50mm END CAP Maintaining a minimum water level in the balance 50mm PVC pipe Inflow to house sensor tank will ensure the pump... - Page 13 INFINITY EDGE TROUGH An infinity edge provides pool projects with additional design flexibility and creativity. However, such designs pose additional challenges to ensure the pool operates effectively and equipment is protected. There are two crucial design factors to consider in relation to the required water level within an infinity edge trough: •...
-
Page 14: Start-Up Process
START-UP PROCESS t’s now time to start your Water Witch. Complete the following process to test your unit and confirm all components are operating correctly: STEP 1: Ensure the project is filled to the required water level. STEP 2: Ensure the sensor and solenoid plugs are connected to the correct ports of the Control Box (Sensor on the left and Solenoid on the right). -
Page 15: Test And Time Delay Modes
TEST AND TIME DELAY MODES The Water Witch features four time delay settings that control the length of the FILL cycle. The time delay slightly fills the pool with additional water to prevent the Water Witch from continually engaging and disengaging the FILL cycle. The four time delay settings are controlled by the position of dip switches inside the bottom right corner of the Control Box. -
Page 16: Operation Of Indicator Lights
OPERATION OF INDICATOR LIGHTS Signal lights on the Control Box confirm its operational status and illuminate as per the following three sequences: • ON and SENSE lights are flashing in unison every 2-4 seconds – The Water Witch is sensing the water level and believes it is at the correct height. •... -
Page 17: Troubleshooting Process
TROUBLESHOOTING PROCESS f your Water Witch is not operating correctly upon installation or you suspect a fault after years of reliable service, follow the steps outlined below then refer to the table of faults to identify the issue: Return the Control Box settings to Test Mode as per the instructions on Page 13. ENSURE THE POWER SUPPLY IS TURNED OFF AND THE WATER WITCH POWER LEAD IS REMOVED FROM THE POWER SUPPLY WHEN REMOVING THE CONTROL BOX COVER. - Page 18 TROUBLESHOOTING PROCESS (CONTINUED) WATER WILL NOT TURN ON: Light Display Possible Fault Remedy ON & FILL Water supply is not turned on Turn water supply on Water pressure is too high Install a Pressure Limiting Valve between supply tap & Solenoid to reduce pressure Solenoid has been installed Ensure the flow directional...
- Page 19 WATER WILL NOT TURN OFF: Light Display Possible Fault Remedy ON & SENSE Solenoid – debris may be inside Unscrew the four screws on the solenoid the Solenoid. Remove the body and diaphragm and inspect for debris. Clean if necessary Split diaphragm Open Solenoid and inspect diaphragm for a split.
- Page 20 TROUBLESHOOTING PROCESS (CONTINUED) WATER WILL NOT TURN OFF (CONTINUED): Light Display Possible Fault Remedy ON & FILL Sensor plug inserted backwards Ensure sensor plug is inserted or wire in plug is connected into correct port at base of backwards (new installs Control Box and check wires are generally) connected as follows:...
-
Page 21: Other Faults
OTHER FAULTS Most of the faults identified in the TROUBLESHOOTING PROCESS section relate to the Sensor, the Solenoid or onsite/environmental conditions. These faults represent more than 80% of faults experienced in the field, however, they do not cover all fault scenarios. Potentially, the Control Box could be damaged and this is often not identifiable as a single, consistent error. -
Page 22: Maintenance & Specifications
MAINTENANCE AND SPECIFICATIONS Most Water Witches operate reliably for at least 5-10 years under normal operating conditions. The following maintenance schedule should be adopted to optimise the unit’s serviceable life: • Monthly – Observe and inspect all components to ensure the unit is operating correctly. Particular care should be taken during the first month after installation to ensure the system is operating correctly. -
Page 23: Warranty Notice
WARRANTY NOTICE Cooke Industries will provide a new or repaired part or component at its discretion in place of any part or component, which is found upon inspection, to be defective in material or workmanship during the warranty period. Said part or component will be repaired or replaced without charge to the initial user during normal working hours at the place of business of Cooke Industries or a Cooke Industries nominated distributor upon the consent of Cooke Industries. - Page 24 Cooke Industries P: 1300 652 076 E: info@cookeindustries.com.au cookeindustries.com.au...
Need help?
Do you have a question about the WaterWitch and is the answer not in the manual?
Questions and answers