Table of Contents
Advertisement
Quick Links
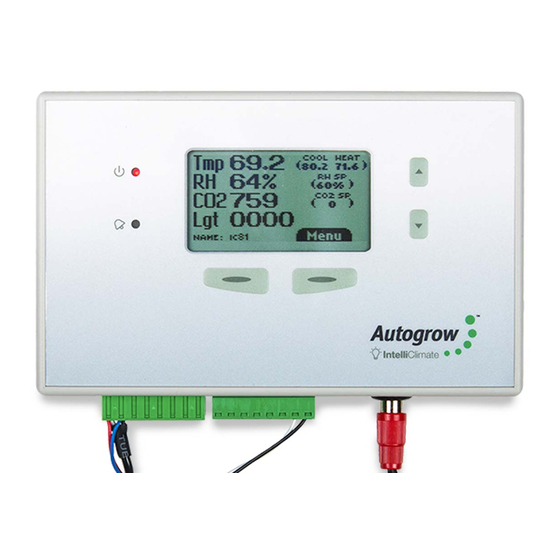
IntelliClimate
Installation and User Guide
• Monitors temperature, relative humidity, CO
• Controls fans, air conditioners, heaters, dehumidifiers, humidifiers, CO
injection/extraction, two light banks
• Additional sensor available for larger growing areas
• Extensive fail-safe features
• Settings can be scheduled to automatically change to match plant growth
stage
• Auto-learn – self learning automatically adjust CO
wastage
• Connect to the cloud via IntelliGrow (subscription required)
Ver 6.0 IntelliClimate Installation Guide (21 August 2020)
and light levels
2
cycle times to minimise
2
Copyright©2020 Autogrow Systems Ltd
2
1
Advertisement
Table of Contents

Related Manuals for Autogrow IntelliClimate


Summary of Contents for Autogrow IntelliClimate
- Page 1 • Settings can be scheduled to automatically change to match plant growth stage • Auto-learn – self learning automatically adjust CO cycle times to minimise wastage • Connect to the cloud via IntelliGrow (subscription required) Ver 6.0 IntelliClimate Installation Guide (21 August 2020) Copyright©2020 Autogrow Systems Ltd...
- Page 2 Compliance Declaration Disclaimer: Suggested settings are made in good faith, care and consideration. However, Autogrow can accept no responsibility for the accuracy or appropriateness of suggestions or the outcome resulting from their use. Ver 6.0 IntelliClimate Installation Guide (21 August 2020)
-
Page 3: Quick Start
Data cable such as CAT5 computer network cable should be used in this situation This should be Stranded cable to avoid breakages. The IntelliClimate Kit comes with one EnviroSensor unit (measuring temperature, relative humidity, light and CO ). - Page 4 • Scheduling • Advanced Settings • History To access the latest version of your IntelliGrow Quick Start Guide, please head to: https://knowledge.autogrow.com/articles/intellilink-quick-start-guide Please visit https://autogrow.com/our-products-solutions/intelligrow for more information. Ver 6.0 IntelliClimate Installation Guide (21 August 2020) Copyright©2020 Autogrow Systems Ltd...
- Page 5 Lighting The IntelliClimate can control two light banks. It is a good idea to split your lights into two groups. Firstly, when using both banks together, it allows the controller to stagger the switch on times, so the power surge from the first bank has subsided by the time the second bank comes on.
- Page 6 If this situation is not controlled, it will stop injecting CO and will revert to maximum venting (within temperature limits) to bring in as much ambient CO as possible. This will reset every new day period. *On IntelliGrow Ver 6.0 IntelliClimate Installation Guide (21 August 2020) Copyright©2020 Autogrow Systems Ltd...
-
Page 7: Selection Of Units
Note: the advanced settings are only accessible via IntelliGrow and are not available from the controller LCD menu system. Ver 6.0 IntelliClimate Installation Guide (21 August 2020) Copyright©2020 Autogrow Systems Ltd... -
Page 8: Fail Safe Operation
Power Supply & Outputs The outputs voltages are all dependent on the power supply adapter used. The IntelliClimate is supplied with a 24VDC power supply. Note: The outputs are limited to a current of 1.2A inductive load and 3A resistive load. -
Page 9: Getting Started
• Navigate to the Overrides menu and Force ON each piece of equipment to confirm your wiring is correct Connect IntelliClimate to the cloud Connecting your IntelliClimate to IntelliGrow will allow for remote access, data logging, text/email alerts and remote tech support. In addition, you will have access to the Advanced Settings. - Page 10 Connect via PC: Please visit this page https://knowledge.autogrow.com/articles/connecting-with-windows download the IntelliGrow gateway software. Confirm your IntelliClimate is connected to your PC via USB cable. If you experience any issues, please contact support@autogrow.com. Here are the instructions to activate your IntelliGrow Subscription •...
- Page 11 Connect your IntelliClimate to your gateway (computer or IntelliLink) Ensure your IntelliClimate shows as connected to your IntelliGrow account Set the configuration of the controller to match the physical equipment Check the time/date on the controller...
- Page 12 CO is switched off. The IntelliClimate has standard offsets as a default, but after observing your growroom, you can alter these offsets to achieve your perfect environment conditions. *On IntelliGrow Rules Each rule is listed below with a brief description and a suggested initial value.
-
Page 13: Setpoint Ramping
If the air con is forced on for the day period you can also force it on before the day period starts, typically 2-10 minutes. This cools the room down in anticipation of the lights coming *On IntelliGrow Ver 6.0 IntelliClimate Installation Guide (21 August 2020) Copyright©2020 Autogrow Systems Ltd... - Page 14 Fan 1 is running. This is useful if your Fan 1 is an HAF (air flow) fan. If your Fan 1 is an exhaust fan, tick the box to allow the IntelliClimate to reduce CO injection to avoid wastage.
- Page 15 Certain growing environments may require that CO is extracted from the growroom. You can choose CO Extraction under the Functions tab. The IntelliClimate will run fans to bring levels to your desired set point. Humidification As the room cools down the RH will automatically rise. You can choose to allow humidification during the night period, or have it disabled.
- Page 16 • Dehumidifier override - If the RH becomes excessive, the AC will come ON. If the RH continues to rise, the fans will come ON. *On IntelliGrow Ver 6.0 IntelliClimate Installation Guide (21 August 2020) Copyright©2020 Autogrow Systems Ltd...
- Page 17 Forcing on a function is an easy way to test your outputs. Functions with a green icon are currently running, while those greyed out are not. Ver 6.0 IntelliClimate Installation Guide (21 August 2020) Copyright©2020 Autogrow Systems Ltd...
- Page 18 New lines are easily added using the + button and lines are deleted by clicking the X button. The scheduling feature is only available while using IntelliGrow. If the IntelliClimate loses connection to IntelliGrow, it will continue with the current set points until it is reconnected to the cloud.
- Page 19 You can have multiple presets saved. Hovering your mouse over any point on the history graph will give you exact details about that single moment: Ver 6.0 IntelliClimate Installation Guide (21 August 2020) Copyright©2020 Autogrow Systems Ltd...
- Page 20 Set points are user-defined. You can set your desired temperature, humidity & CO maintain an ideal growing environment. The IntelliClimate will “learn” how to use your installed equipment to be the most effective. The targets you see displayed on the controller are constantly changing as the IntelliClimate evaluates the most efficient way to control your room.
- Page 21 This is done automatically as the IntelliClimate adjusts set points. You can set the target to a desired value and it will force the setting one time and then revert back to original set point.
- Page 22 This feature can be enabled or disabled. CO targets are continually adjusting to meet the demands of the growroom. This is done automatically as the IntelliClimate adjusts set points. *On IntelliGrow...
- Page 23 We suggest you use Section B (pages 11-16) on IntelliGrow settings to guide you through the setting procedure. Ver 6.0 IntelliClimate Installation Guide (21 August 2020) Copyright©2020 Autogrow Systems Ltd...
-
Page 24: Installation
Section C - Installation The IntelliClimate controller should be installed in a cool, dry place out of direct sunlight. Remove the screws holding the back, fit the mounting feet, then screw to the wall. If using the dry wall (plaster board) anchors, use the longer screws supplied. If fixing to a plywood... - Page 25 Connection to EnviroSensor A single cable is run from the IntelliClimate to the first enviro sensor which loops from the first enviro sensor to the second sensor (if fitted). Power +ve Power –ve GND (Black) ASL Signal (White) IntelliClimate Environment Sensor Ver 6.0 IntelliClimate Installation Guide (21 August 2020)
- Page 26 The black wire is the common, the red is for the upper socket outlet and the white is for the lower socket outlet. Ver 6.0 IntelliClimate Installation Guide (21 August 2020) Copyright©2020 Autogrow Systems Ltd...
- Page 27 Example connection of a relay box to operate Light1 and Fan1 Ver 6.0 IntelliClimate Installation Guide (21 August 2020) Copyright©2020 Autogrow Systems Ltd...
-
Page 28: Maintenance
As this is less convenient than the SOFT calibration mentioned above, it is suggested that this is carried out only once per year. Place the sensor box outside in fresh air and connect to an IntelliClimate controller. On the IntelliClimate: Menu >... -
Page 29: Fault Finding
If there is not 24V on the relevant pin, then recheck all settings starting with configuration. Double check all other settings and readings to be sure that the peripheral in question should be ON. Ver 6.0 IntelliClimate Installation Guide (21 August 2020) Copyright©2020 Autogrow Systems Ltd... - Page 30 If the lights are functioning, gently remove the gold CO sensor from the PCB and reseat it, ensuring all the pins are aligned correctly. Ver 6.0 IntelliClimate Installation Guide (21 August 2020) Copyright©2020 Autogrow Systems Ltd...
- Page 31 By default, CO2 will not inject if Fan 1 is running. You can tick this box on IntelliGrow to allow CO2 to inject while Fan 1 is running: *On IntelliGrow Ver 6.0 IntelliClimate Installation Guide (21 August 2020) Copyright©2020 Autogrow Systems Ltd...
-
Page 32: Specification
Outputs will have the same voltage as the supplied voltage from the power pack • Supplied with 3m USB cable Twin Relay Boxes • USA 110V 15A total draw • UK 240V 13A total draw • AUS/NZ 240V 10A total draw Ver 6.0 IntelliClimate Installation Guide (21 August 2020) Copyright©2020 Autogrow Systems Ltd... - Page 33 Thank you for your purchase. Get the most out of your IntelliDose or IntelliClimate control systems with IntelliGrow. IntelliGrow is a cloud-based solution allowing you to access, set, monitor and manage your growing operation - anywhere, anytime. IntelliGrow Apps are available for download from both...
- Page 34 3 x Twin Relay Box Warranty and Replacements If you have equipment purchased from Autogrow and it has developed a fault, please complete this form so that our support staff can diagnose the problem. Visit this page for Terms and Conditions https://autogrow.com/terms-conditions...
-
Page 35: Compliance Declaration
Autogrow Systems Ltd, could result in the product not meeting the Class A limits, in which the FCC could void the user's authority to operate the equipment.
Need help?
Do you have a question about the IntelliClimate and is the answer not in the manual?
Questions and answers