Advertisement
Available languages
Available languages
Quick Links
Overview
The system uses biometric technology that enables an
authorized user to gain access by scanning their fingerprint.
The sensor strip on the unit makes a numeric template of the
fingerprint that is unique to that user. The unit's memory can
store up to four fingerprints.
• The term "enroll" refers to scanning the fingerprint so the
device will recognize the user.
• The term "swipe" refers to the movement of the finger across
the sensor strip.
• The term "LED" stands for Light Emitting Diode. There are
6 LEDs located on the Fingerprint Keyless Entry.
When unit is on, it is programmed to shut off after a short
period of time. The unit's sensor strip is sensitive so it is
important to read the Tips for Success before attempting to
use the Fingerprint Keyless Entry.
Carton Inventory
Receiver
Step 1 Install the Receiver
1. Unplug the opener before proceeding.
2. OPEN RECEIVER: Insert a small screwdriver in slot on
receiver front panel as shown. Twist up actuator cover.
3. CONNECT RECEIVER AND OPENER: Remove about 1/4"
(6 mm) of insulation from each end of the 2-strand bell wire.
Connect one end to the receiver screw terminals (polarity is
NOT required). Route wire along the channels and out the
bottom as shown.
4. Connect the other end of the bell wire to the two opener
terminals labeled "2" (white) and "1" (red), "common" and
"command" or the terminals used for the push button control.
5. Use insulated staples to secure bell wire between receiver
and opener. Length of bell wire depends on where the
receiver will be installed. Replace actuator cover.
6. Choose a 120Vac polarized outlet for the receiver which is
OUT OF THE REACH OF CHILDREN. Plug receiver into
selected outlet. Return power to the opener.
Actuator Cover
Terminals
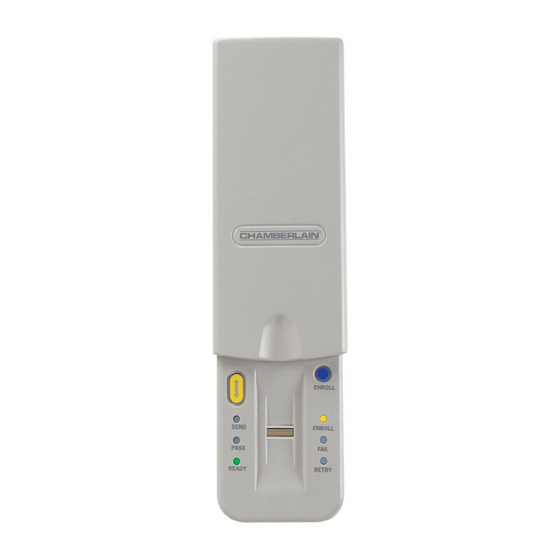
Fingerprint Keyless
Entry
SEND
PASS
READY
Power Indicator Light
Bell Wire
Channels
"SMART"
Indicator
Light
Connect Bell Wire
To Garage Door
Opener Terminals
"SMART"
Bell Wire
Actuator
®
To prevent possible SERIOUS INJURY or DEATH from electrocution:
• Be sure power is not connected BEFORE installing the receiver.
To prevent possible SERIOUS INJURY or DEATH from a moving
gate or garage door:
• Install Keyless Entry Control within sight of the garage door, out of
reach of children at a minimum height of 5 feet (1.5 m), and away
from all moving parts of door.
• ALWAYS keep remote controls out of reach of children. NEVER
permit children to operate, or play with remote control
transmitters.
• Activate gate or door ONLY when it can be seen clearly, is properly
adjusted, and there are no obstructions to door travel.
• ALWAYS keep gate or garage door in sight until completely closed.
NEVER permit anyone to cross path of moving gate or door.
Some states prohibit the service or repair of garage door openers which
cannot be made to comply with the safety standards contained in UL 325
(1988 revision). In order to comply with both the letter and the spirit of
these laws, this universal radio control should not be used with any
LiftMaster
®
manufactured prior to April 1, 1982. To find out if your Chamberlain-
made garage door opener was manufactured prior to or after April 1,
1982, please call 1-800-528-9131 before installing this universal radio
control.
ENROLL
ENROLL
FAIL
RETRY
Step 2 Install the Keyless Entry
1. Remove cover.
2. Fasten bottom screw to mounting surface. Allow 1/8"
(3 mm) to protrude above surface. Position unit on screw
head and adjust for snug fit.
3. Fasten top screw. Replace cover.
1
Fingerprint Keyless Entry
WARNING
WARNING
NOTICE TO U. S. CONSUMERS:
, Chamberlain
®
, or Sears Craftsman
1
3
Model 942FP
®
garage door opener
2
Advertisement

Related Manuals for Chamberlain 942FP


Summary of Contents for Chamberlain 942FP
- Page 1 LiftMaster manufactured prior to April 1, 1982. To find out if your Chamberlain- made garage door opener was manufactured prior to or after April 1, 1982, please call 1-800-528-9131 before installing this universal radio control.
- Page 2 Tips for Success CORRECT 1. Make sure finger is clean and dry. Place finger flat above the sensor strip with the top knuckle above the sensor. 2. Swipe finger straight down keeping firm contact with the sensor. The swipe should be a slow, constant speed.
-
Page 3: Step 6 Operation
Step 5 Programming NOTE: The unit must have an enrolled user before it can be programmed to the receiver. Due to the 30 second time interval, a second person may be needed to press the “SMART” actuator. 1. Remove the front panel of the receiver case. -
Page 4: Troubleshooting
(1) this device may not cause harmful interference, and (2) this device must accept any interference received, including interference that may cause undesired operation. FOR SERVICE DIAL OUR TOLL FREE NUMBER: 1-800-528-9131 © 2007, The Chamberlain Group, Inc. All Rights Reserved WARNING WARNING... - Page 5 Master Mechanic Lift-Master abril de 1982. Para saber si el abridor de puerta de cochera Chamberlain fue fabricado antes o después del 1 de abril de 1982, ENROLL llamar al 1-800-528-9131 antes de instalar este control de radio...
- Page 6 Recomendaciones CORRECTO 1. Asegúrese de que el dedo esté limpio y seco. Ponga el dedo plano encima del sensor con el nudillo superior por encima del sensor. 2. Pase el dedo recto hacia abajo manteniendo un contacto firme con el sensor.
- Page 7 Paso 5 Programación NOTA: La unidad debe tener un usuario registrado antes de que pueda programarse el receptor. Debido al intervalo de 30 segundos, tal vez sea necesaria una segunda persona para oprimir el botón de “SMART”. 1. Quite el panel delantro de la caja del receptor con un destornillador.
-
Page 8: Resolución De Problemas
(2) este dispositivo debe aceptar cualquier interferencia recibida, incluyendo la interferencia que puede causar una operación no deseable. PARA SERVICIO, LLAME NOSOTROS SIN COSTO: 1-800-528-9131 ©2007, The Chamberlain Group, Inc. Todos los Derechos Reservados ADVERTENCIA ADVERTENCIA Tapa Tapa de batería...
Need help?
Do you have a question about the 942FP and is the answer not in the manual?
Questions and answers