Advertisement
Available languages
Available languages
Quick Links
Advertisement

Related Manuals for CPS Leak-Seeker I


Summary of Contents for CPS Leak-Seeker I
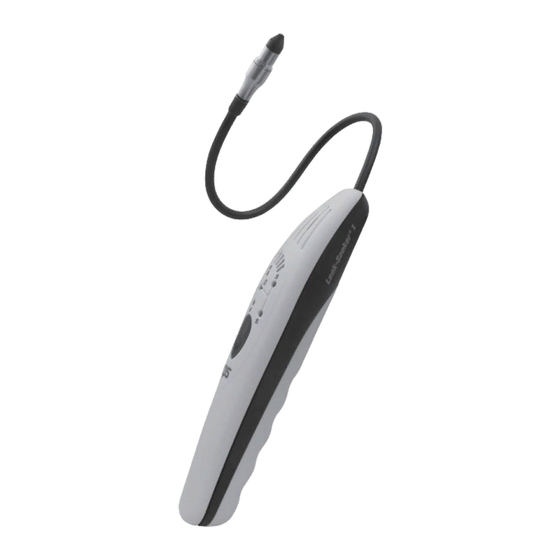
- Page 1 Leak-Seeker I ® Refrigerant Leak Detector US Patent 8,555,701 OPERATION MANUAL...
- Page 2 GENERAL INFORMATION Table of Contents General Information Introduction Leak-Seeker I Specifications ® Leak-Seeker I Overview ® Operation Modes of Operation Using the Leak-Seeker ® Leak Searching Tips Maintenance Sensor Replacement Diagram Warranty Introduction Flexible metal probe: 15" (380mm) long, .25" (6.4mm) diameter High output alarm speaker...
- Page 3 GENERAL INFORMATION Leak-Seeker I Specifications ® Sensor: State of the art E_MOS technology ® Gases: Sensitive to CFC, HCFC, HFC and HFO refrigerants. Sensitive to Hydrogen trace gas in 95% N2, 5% H2 mixture. Sensitive to NH3 and HC refrigerants. CAUTION: This leak detector is not intrinsically safe.
- Page 4 Leak-Seeker I Overview ® Combining outstanding ease of use and the sophisticated leak sensing E_MOS technology exclusive to CPS Products, the ® Leak-Seeker I opens a new era in electronic leak detection. ® Advanced software algorithms control the operation of this in- strument to achieve efficient control of the power to the sensor...
- Page 5 OPERATION Modes of Operation Progressive Alarm Mode: The audible alarm increases in pitch as the concentration of re- frigerant gas seen by the sensor increases. The number of lit LED's in the bar graph indicator increases with the refrigerant concentration. Three blue LED's indicate the current setting. Large Leak Setting (L): Alarm begins to indicate at about 0.5 oz / year (14 g / yr.) depending on the refrigerant.
- Page 6 OPERATION Using the Leak-Seeker ® SMART-BUTTON Operation: • Press the START button to turn the instrument ON. • While in any mode, press and hold the START button for three seconds to turn the instrument OFF. • Press and hold the START button to change sensitivity settings.
- Page 7 OPERATION Leak Searching Tips 1. Take care not to plug the sensor housing tip by dragging it over dirty or wet surfaces. If the area is particularly dirty, or condensate (moisture) is present, it should be wiped off with a dry shop towel. No cleaners or solvents should be used, since the detector may be sensitive to their ingredients.
- Page 8 OPERATION Maintenance With a sensor life of more than 500 hours and a battery life of over 50 hours, very little maintenance is required to keep the Leak-Seeker I in top operating conditions. Below are the proper ® procedures to follow when changing batteries and sensors. Low battery indication: When the batteries reach approximately 10% of capacity, the rightmost LED of the tachometer indicator (above the LO BAT...
- Page 9 OPERATION Sensor Replacement Diagram Replacement Parts EMOS2 Replacement EMOS sensor LS2XF Replacement filters LS2XVF Replacement water vapor filter...
- Page 10 CPS Products, Inc. CPS Products, Inc. U.S.A. (Headquarters) 1010 East 31st Street, Hialeah, Florida 33013, USA Tel: 305-687-4121, 1-800-277-3808, Fax: 305-687-3743 E-mail: info@cpsproducts.com...
- Page 11 Leak-Seeker I ® Détecteur de Fuite de Gaz Réfrigérant US Brevet 8,555,701 MANUEL D’UTILISATION...
- Page 12 INFORMATIONS GÉNÉRALES Table des matières Informations générales Introduction Spécifications du Leak-Seeker ® Presentations du Leak-Seeker ® Operation Mode d'emploi Utilisation du Leak-Seeker ® Chercher de fuites Entretien Schéma de remplacement du capteur Garantie Introduction Sonde en métal flexible: 15" (380mm) longueur, .25"...
- Page 13 INFORMATIONS GÉNÉRALES Spécifications du Leak-Seeker ® Capteur: Technologie de pointe E_MOS ® Gaz: Sensible aux réfrigerants CFC, HCFC, HFC et HFO. Sensible au gaz traceur hydrogène mélange de 95% N2 et 5% H2. Sensible à NH3 et HC réfrigérants. ATTENTION: Ce détecteur de fuite n'a pas de sécurité...
- Page 14 Combinant la facilité exceptionnelle d’utilisation et la technolo- gie sophistiquée E-MOS de détection de fuite exclusive aux ® Produits CPS, le Leak-Seeker I ouvre une nouvelle ère dans ® la détection de fuite électronique. Les algorithmes de logiciels avancés contrôlent le fonctionnement de cet instrument pour réaliser un contrôle efficace de l’alimentation du capteur procur-...
- Page 15 FONCTIONNEMENT Modes de Fonctionnement Mode d’alarme progressive: L’alarme sonore augmente en tonalité lorsque la concentration des gaz réfrigérants détectée par le capteur augmente. Le nombre de LED allumées dans l’indicateur graphique augmente avec la concentration des réfrigérants. Trois LED bleus indiquent le mode actif.
- Page 16 FONCTIONNEMENT Utilisation du Leak-Seeker ® Fonctionnement du SMART-BUTTON : • Appuyez sur le bouton START pour allumer l’appareil. • Quelque soit le mode activé, pressez et maintenez le bouton START enfoncé pendant trois secondes pour éteindre l’appareil. • Pressez et maintenez le bouton START enfoncé pour changer le réglage de la sensibilité.
- Page 17 FONCTIONNEMENT Conseils pour la recherche de fuite 1. Veillez à ne pas boucher l'extrémité du logement du capteur en le faisant glisser sur des surfaces sales ou humides. Si la zone est particulièrement sale, ou présente de la condensation (humidité), elle doit être essuyée avec un chiffon sec. Aucun nettoyant ou solvant ne doit être utilisé, car le détecteur peut être sensible à...
- Page 18 FONCTIONNEMENT Entretien Avec une durée de vie du capteur de plus de 500 heures et une autonomie de plus de 50 heures, très peu d’entretien est nécessaire pour garder le Leak-Seeker I dans des conditions de ® fonctionnement optimales. Ci-dessous se trouvent les procédures à...
- Page 19 FONCTIONNEMENT Schéma de remplacement du capteur Extrémité du logement Filtre du capteur Capteur E_MOS Practique Languette du recommandée: capteur pinces à épiler ou pince à bec effilé Fente du pour extraire le logement capteur. Logement du capteur Pièces de rechange EMOS2 Capteur de rechange EMOS LS2XF...
- Page 20 Tous les produits sous garantie retournés pour réparation doivent être accompagnés de la facture d'achat originale et des coordonnées du client. CPS Products, Inc. CPS Products, Inc. U.S.A. (siège) 1010 East 31st Street, Hialeah, Florida 33013, USA Tél.: 305-687-4121, 1-800-277-3808, Fax: 305-687-3743 Courrier électronique: info@cpsproducts.com Site Internet: www.cpsproducts.com...
- Page 21 Leak-Seeker I ® Detector de fugas de refrigerante US Patente 8,555,701 MANUAL DE FUNCIONAMIENTO...
- Page 22 Información general Tabla de Contenido Información general Introducción Especificaciones de Leak-Seeker ® Generalidades de Leak-Seeker ® Funcionamiento Maneras de Operar Uso del Leak-Seeker ® Búsqueda de fugas Mantenimiento Diagrama de reemplazo del sensor Garantía Introducción Sonda metálica flexible: 15" (380 mm) de longitud, 0,25"...
- Page 23 Información general Especificaciones de Leak-Seeker ® Sensor: Tecnología E_MOS de última generación ® Gases: Sensible a los CFC, HCFC, HFC y refrigerantes HFO. Sensible a la rastor de gas de hidrógeno en el 95% de N2, 5% de mezcla de H2. Sensible a NH3 y HC refrigerantes.
- Page 24 ® En una combinación de una sorprendente facilidad de uso y la sofisticada tecnología E_MOS para detección de fugas exclu- ® siva de CPS Products, el Leak-Seeker I abre una nueva era ® ® en la detección electrónica de fugas. Algoritmos de software avanzado controlan el funcionamiento de este instrumento para lograr un control eficiente de la alimentación al sensor, lo que...
- Page 25 Funcionamiento Modos de funcionamiento Modo Progressive Alarm (Alarma progresiva): La alarma sonora sube de tono a medida que aumenta la con- centración de gas refrigerante que detecta. El número de LED encendidos en el indicador de gráfico de barras aumenta con la concentración de refrigerante.
- Page 26 Funcionamiento Uso del Leak-Seeker ® Funcionamiento del SMART-BUTTON: • Presione el botón START para encender el instrumento. • En cualquier modo, presione y mantenga presionado el botón START durante tres segundos para apagar el instrumento. • Presione y mantenga presionado el botón START para cambiar el parámetro de sensibilidad.
- Page 27 Funcionamiento Consejos para buscar fugas 1. Tenga cuidado de no taponar la punta del protector del sensor al arrastrarla por superficies sucias o mojadas. Si el área está particularmente sucia, o hay agua condensada (humedad) presente, debe limpiarse con una toalla para uso industrial seca.
- Page 28 Funcionamiento Mantenimiento Con una duración del sensor de más de 500 horas y una dura- ción de las baterías de más de 50 horas, se necesita de muy poco mantenimiento para mantener al Leak-Seeker I en las mejores ® condiciones de funcionamiento. A continuación aparecen los procedimientos correctos a seguir cuando cambia las baterías y los sensores.
- Page 29 Funcionamiento Diagrama de reemplazo del sensor Protector de la punta Filtro del sensor Sensor Uso recomendado: Pestaña del pinzas o alicate sensor de punta fina para extraer Ranura del el sensor. protector Protector del sensor Replacement Parts EMOS2 Reemplazo del sensor EMOS LS2XF Filtros de repuesto LS2XVF...
- Page 30 CPS Products, Inc. CPS Products, Inc. U.S.A. (Oficinas Centrales) 1010 East 31st Street, Hialeah, Florida 33013, USA Tél.: 305-687-4121, 1-800-277-3808, Fax: 305-687-3743 Correo Électrónico: info@cpsproducts.com...
- Page 31 Leak-Seeker I ® Kühlmittellecksuchgerät US-Patent 8,555,701 BEDIENUNGSANLEITUNG...
- Page 32 ALLGEMEINE INFORMATIONEN Inhaltsverzeichnis Allgemeine Informationen Einführung Leak-Seeker I Technische Daten ® Leak-Seeker I Übersicht ® Anwendung Betriebsanweisungen Benutzung des Leak-Seeker ® Nach Lecks suchen Wartung Abbildung: Sensoraustausch Garantie Einführung Flexible Sonde aus Metall: 15" (380 mm) lang, 0,25" (6,4 mm) Durchmesser Hochleistungslautsprecher für Warnton Balkenanzeige für...
- Page 33 ALLGEMEINE INFORMATIONEN Leak-Seeker I Technische Daten ® Sensor: Moderne E_MOS -Technologie ® Gase: Detektiert sicher CFC, HCFC, HFC and HFO Kältemittel. Detektiert Formiergas 95% N2, 5% H2. Kann auch eingesetzt werden zum Detektieren von NH3 und HC- Kältemitteln. ACHTUNG: Diese Gerät ist nicht elecktrisch abgeschirmt.
- Page 34 Leak-Seeker I Übersicht ® Der Leak-Seeker I vereint in sich eine hervorragende Einfach- ® heit der Verwendung und eine nur die Produkte von CPS kenn- ® zeichnende hoch entwickelte Lecksuch-E_MOS Technologie ® womit er eine neue Ära in der elektronischen Suche nach Lecks eröffnet.
- Page 35 ANWENDUNG Anwendungsmodi Progressiver Alarm-Modus: Die Tonhöhe des Warntons steigt an, wenn die Konzentration des vom Sensor detektierten Kühlmittelgases zunimmt. Die Anzahl der leuchtenden LEDs auf der Balkensichtanzeige steigt mit der Kühlmittelkonzentration an. Drei blaue LEDs geben die aktuelle Einstellung an. Einstellung für große Lecks (L): Abhängig von der Art des Kühlmittels, gibt das Gerät ab ca.
- Page 36 ANWENDUNG Benutzung des Leak-Seeker ® SMART-BUTTON-Anwendung: • Drücken Sie die Taste START, um das Gerät einzuschalten. • In beliebigem Modus drücken Sie und halten Sie die Taste START drei Sekunden lang, um das Gerät auszuschalten. • Drücken Sie und halten Sie die Taste START, um Empfindlichkeitseinstellungen zu ändern.
- Page 37 ANWENDUNG Hinweise zum Suchen nach Lecks 1. Achten Sie darauf, dass Sie die Sensorgehäusespitze nicht über verschmutzte oder nasse Oberflächen ziehen. Falls der Bereich verschmutzt ist oder Kondenswasser (Nässe) vorhanden ist, muss er mit einem trockenen Putzlappen abgewischt werden. Es darf kein Reinigungs- oder Lösungsmittel verwendet werden, weil das Suchgerät darauf empfindlich reagieren kann.
- Page 38 ANWENDUNG Wartung Mit einer Lebensdauer des Sensors von über 500 Stunden und der Batterie von über 50 Stunden ist nur ein geringer Wartungsaufwand erforderlich, um den Leak-Seeker I in ® einwandfreiem Zustand zu halten. Nachfolgend wird beschrieben, wie die Batterien und Sensoren ausgetauscht werden. Anzeige für schwache Batterie: Wenn die Batterie ca.
- Page 39 ANWENDUNG Abbildung: Sensoraustausch Spitzengehäuse Sensorfilter Sensor Empfohlene Sensortab Verwendung: Pinzette oder Spitzzange zum Gehäuseschlitz Rausziehen des Sensors. Sensorgehäuse Ersatzteile EMOS2 Ersatz EMOS sensor LS2XF Ersatzfilter LS2XVF Wasserdampf-Filter...
- Page 40 Garantie eingeschickten Gerät sind die Rechnung über den Kauf im Original und die Kontaktinformationen des Kunden beizufügen. CPS Products, Inc. CPS Products, Inc. U.S.A. (Hauptverwaltung) 1010 East 31st Street, Hialeah, Florida 33013, USA Tel.: 305-687-4121, 1-800-277-3808, Fax: 305-687-3743 E-mail: info@cpsproducts.com Website: www.cpsproducts.com...
- Page 41 NOTES...
- Page 42 NOTES...
- Page 43 NOTES...
- Page 44 www.cpsproducts.com #73-010 Rev. D...
Need help?
Do you have a question about the Leak-Seeker I and is the answer not in the manual?
Questions and answers