
Related Manuals for Sol-Expert eMäxchen


Summary of Contents for Sol-Expert eMäxchen
- Page 1 Soldering Kit Instructions Mäxchen The popular game as a DIY PCB version Keep the address of the company. SOL-EXPERT SOL-EXPERT group group Not suitable for children under 3 group group years! - Contains small parts! Item No.: 76400...
-
Page 2: Safety Notes
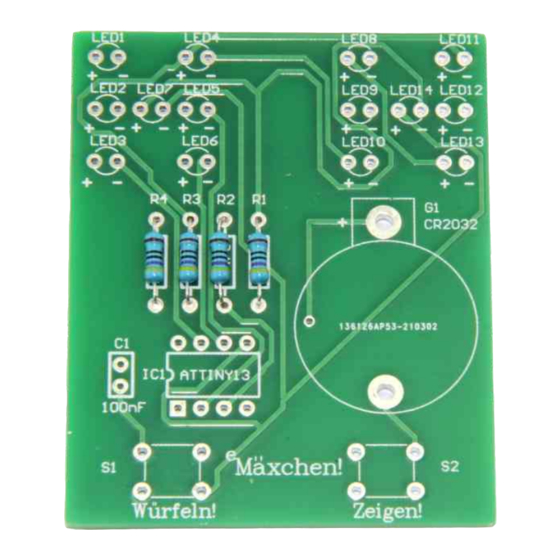
Important Information! For children and youngsters we recommend: Assembly and soldering should be supervised by an adult! SAFETY NOTES: Keep these instructions for future reference! They contain important information. This kit is only intended to be battery powered. The soldering iron, the solder and the soldered parts become very hot. Be very careful! Always use a soldering mat when soldering! It prevents parts and the PCB from slipping. - Page 3 soldering kit - the popular game to solder yourself Parts list Check the parts: Qty. Part Value / Designation 76400 3 mm LED (LED1-LED14) yellow Processor (IC1) ATTINY13A Resistor (R1-R4) 470 Ohm Push button (S1-S2) 3301 Capacitor (C1) 22 nF/10V Battery holder (G1) für Cr2032 Bending tool...
- Page 4 ASSEMBLY INSTRUCTIONS Preparation Presorted parts: Set out and sort all parts. This will make it easier for you to later identify the individual parts you will need during the steps. And it doesn't hurt to tidy up your work space so you can quickly find all parts.
- Page 5 Prepare resistors with the bending tool. In order for the resistors to fit properly between the eyelets, the leads must be bent exactly in the correct location. To make this easier, we have designed a simple yet functional bending tool. Simply place the resistors in the notch and bend the leads down straight along the wooden edge.
- Page 6 Solder on resistors..then trim the excess leads. You will now need these parts: After soldering, trim the excess leads on the back to approx. 2 mm with side cutters. 1 x PCB 4x 4 x bent resistors Trim here to 2 mm high: Soldering point Part lead Part...
- Page 7 ATTENTION! Solder on processor: You will now need this part: Note the polarity of the processor. It has a notch (curve), which must be on the left. 1 x processor ATTINY 13A EXTREMELY IMPORTANT Notch on this side!
- Page 8 ... then trim the excess leads. Solder on push button and capacitor: You will now need these parts: After soldering, trim the excess leads on the back to approx. 2 mm with side cutters. 2 x push button 1 x capacitor 22 nF Trim here to 2 mm high: Soldering point Part lead...
- Page 9 You will now need Solder on LEDs and be sure to note the polarity - polarity indicated on the PCB! these parts: The longer leg on the LED is always POSITIVE! After soldering, trim excess leads. TIP: When soldering on the LEDs, ensure they are properly seated on the PCB! LED polarity:...
-
Page 10: Troubleshooting
Insert and solder battery holder for Insert the Cr2032 You will now need this part: CR2032. Note the polarity! battery (not included) If you can see the positive from above, the battery is inserted correctly. Troubleshooting If you push a button and no LEDs light up: 1x battery holder Visually inspect all soldering points. - Page 11 Mäxchen - GAME INSTRUCTIONS eMäxchen is a game for two or more players in this version. The objective of the game is to always have a higher number than the number rolled by another player before. The lowest number is 31, followed by 32, 41, 42, 43, 51, 52, 53, 54, 61, 62, 63, 64, 65, then "doubles“ 11, 22, 33, 44, 55 and 66.
- Page 12 Other great SOL-EXPERT group soldering kits: Click here for the instructions: Hier geht es zur Anleitung: Binary Clock soldering kit TrainYourBrain soldering kit Cliquez ici pour les instructions: Klik hier voor de instructies: Shows the time digitally! Keep your brain fit! Item no.: 76334...
Need help?
Do you have a question about the eMäxchen and is the answer not in the manual?
Questions and answers