Table of Contents
Advertisement
Quick Links
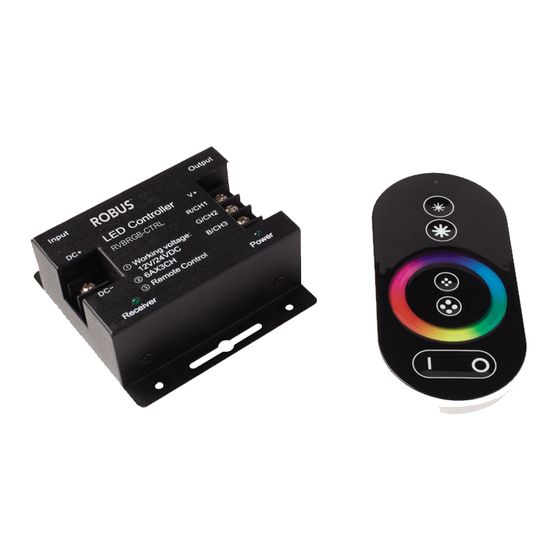
VEGAS 768W CONTROLLER, IP20, RGBW, WITH REMOTE
RVARGBW-CRTL
PLEASE READ INSTRUCTION BEFORE COMMENCING INSTALLATION AND RETAIN FOR FUTURE REFERENCES.
! Electrical products can cause death or injury, or damage to property. If in any doubt about the installation or use
of this product, consult a competent electrician
Product technical information and specification may change over time without prior notification. For the latest
technical information please visit our web site www.robus.com or robusdirect.com
-20°C < Ta < +40°C, DC12-24V, Out Power: 12V:<384W, 24V:<768W, Class III, IP20
Suitable for mounting on a normally flammable surface.
Warning! To prevent overheating, the fitting or driver must not be covered by thermal insulation.
Installation
1. If products are used outdoors please use IP enclosure RVBIP2.
2. Connect 12/ 24 V Supply to input terminals DC+ & DC-.
3. LED Strip connection: Positives Black "+" to V+.Connect Channel 1 Red to 1st R, connect Channel 2Green to 2nd .
G, Connect Channel 3 Blue to 3rd B,Connect Channel 4 White to 4th W.
Match code operation:
The RF touch remoter by default is matched to the controller. If multiple controllers are to be controlled by the one RF touch
remoter, it is possible to pair the controller to the RF touch remoter.
Pairing:
1. Turn off power supply to the controllers.
2. On the RF touch remoter press and hold the "Mode" key.
3. Turn on power supply to the controllers. Then releasethe key "Mode". The LED load will be at 50% output.
4. On the RF touch remoter press the "White colour" key 3 times within 5s. The LED load will dim down further.
5. When the LED load flashes 3 times and goes to the previous status before power off, pairing is successful .
6. If pairing is unsuccessful, repeat the above steps.
Clear pairing
Return to factor default
1. Turn power supply to controllers off.
2. On the RF touch remoter press and hold the "Mode" key.
3. Turn on power supply to the controllers. Then releasethe key "Mode". The load LEDs will be 50% brightnessas responding.
4. On RF touch remoter press the Speed/ Brightness " -" key 3 times within 5s.The LED load will dim down further from
25%-10%.
5. When the LED load flashes 3 times and goes to the previous status before power off, clear pairing is successful.
6. If clear pairing is unsuccessful, repeat the above steps.
Information for the Product user:
1. Please note the requirement to dispose of Waste Electrical & Electronic Equipment separately from household waste (WEEE marked with
crossed out wheelie bin symbol).
2. Please consider your role in contributing to re-use and recycling by returning this product at end of life to a collection centre for waste
electrical equipment or a Civic Amenity site, or to a retail outlet from which you are purchasing a replacement.
3. This equipment may contain substances that are hazardous to health and the environment if disposed of carelessly. It is important that it is
separated from normal household waste and recycled in the WEEE chain
4. The "crossed out wheelie bin symbol" on a product indicates this equipment must not be disposed of in normal household waste, but should
be disposed of according to local WEEE regulations
The Installation must be carried out by a qualified electrician
Issue 2 290121
Note:
VEGAS 768W CONTROLLER, IP20, RGBW, MET AFSTANDSBEDIENING
EN
RVARGBW-CRTL
LEES DE INSTRUCTIES VOORDAT U BEGINT MET DE INSTALLATIE EN HOU ZE BIJ VOOR LATER.
! Elektrische producten kunnen de dood of letsel veroorzaken of eigendommen beschadigen. Als u twijfelt over
de installatie of het gebruik van dit product, raadpleeg dan een erkende elektricien
Technische gegevens en specificaties van dit product kunnen zonder voorafgaande kennisgeving wijzigen. Ga
voor de meest recente technische gegevens naar onze website www.robus.com of robusdirect.com
-20°C < Ta < +40°C, DC 12-24V, Out Power: 12V:<384W, 24V:<768W, Classe III IP20,
Geschikt voor montage op een normaal ontvlambare oppervlake.
Waarschuwing! Om oververhitting te voorkomen, mag de bestuurder niet worden bedekt door thermische isolatie.
Installatie
1. Als de producten buiten worden gebruikt, moet een RVBIP2 behuizing met gepaste IP-klasse worden gebruikt.
2. Sluit de 12/ 24 V stroomvoorziening aan op de ingangsaansluitklemmen DC+ en DC-.
3. Aansluiting LED-strip: Positieve Zwart "+" op V+. Sluit Kanaal 1 Rood aan op 1ste R, sluit Kanaal 2 Groen aan op
2de G, Sluit Kanaal 3 Blauw aan op 3de B, Sluit Kanaal 4 Wit aan op 4de W.
Bediening met gekoppelde codes:
Het RF touch-afstandsbediening is standaard gekoppeld aan de controller. Als er meerdere controllers moeten worden
aangestuurd via hetzelfde RF touch-afstandsbediening, is het mogelijk de controllers te koppelen aan de RF touch-af-
standsbediening
Koppeling:
1. Schakel de stroomvoorziening naar de controllers uit.
2. Houd op het RF touch-afstandsbediening de toets "Mode" ingedrukt.
3. Schakel de stroomvoorziening naar de controllers in. Laat dan de toets "Mode" los. De LED-belasting zal 50% van de
afgifte bedragen.
4. Druk op het RF touch-afstandsbediening binnen de 5s 3 keer op de toets "witte kleur". De LED-belasting wordt verder
gedimd.
5. Wanneer de LED-belasting 3 keer knippert en gaat naar de vorige status voordat het apparaat wordt uitgeschakeld, is het
koppelen gelukt .
6. Als het koppelen niet lukt, herhaalt u de bovenstaande stappen.
Koppelen ongedaan maken
Terugkeren naar fabrieksinstellingen.
1. Schakel de stroomvoorziening naar de controllers uit.
2. Houd op het RF touch-afstandsbediening de toets "Mode" ingedrukt.
3. Schakel de stroomvoorziening naar de controllers in. Laat dan de toets "Mode" los. De LED-belasting zal 50% van de
helderheid.
4. Druk op het RF touch-afstandsbediening binnen de 5s 3 keer op de toets Snelheid/ Helderheid "-". De LED-belasting wordt
verder gedimd van 25%-10%.
5. Wanneer de LED-belasting 3 keer knippert en gaat naar de vorige status voordat het apparaat wordt uitgeschakeld, is het
koppelen gelukt.
6. Als het koppelen niet lukt, herhaalt u de bovenstaande stappen.
Informatie voor de gebruiker van het product:
1. Hou bij het verwijderen van afval rekening met de regeling voor afgedankte elektrische en elektronische apparatuur, gescheiden van
gewoon huishoudelijk afval (AEEA, pictogram van een kliko met een kruis erdoorheen).
2. Neem uw verantwoordelijkheid op het vlak van hergebruik en recycling door dit product aan het einde van zijn levenscyclus in te leveren bij
een inleverpunt voor elektronisch afval, een milieupark of een winkel waar u een nieuw product koopt.
3. Deze apparatuur kan stoffen bevatten die gevaarlijk zijn voor de gezondheid en het milieu indien ze onachtzaam wordt weggegooid. Het is
belangrijk dat ze gescheiden gehouden wordt van het normaal huishoudelijk afval en gerecycled wordt in het netwerk voor AEEA.
4. Het pictogram van een kliko met een kruis erdoorheen op een product betekent dat dit apparaat niet samen met het gewone huishoudelijk
afval mag worden weggegooid, maar dat het dient te worden verwijderd in overeenstemming met de lokale regelgeving voor AEEA
(afgedankte elektrische en elektronische apparatuur).
Opmerkingen:
De installatie dient te worden uitgevoerd door een elektricien
NL
Page 1
Advertisement
Table of Contents

Related Manuals for Robus VEGAS RVARGBW-CRTL


Summary of Contents for Robus VEGAS RVARGBW-CRTL
- Page 1 Technische gegevens en specificaties van dit product kunnen zonder voorafgaande kennisgeving wijzigen. Ga Product technical information and specification may change over time without prior notification. For the latest voor de meest recente technische gegevens naar onze website www.robus.com of robusdirect.com technical information please visit our web site www.robus.com or robusdirect.com -20°C <...
- Page 2 Les informations techniques et caractéristiques peuvent changer au fil du temps sans notification préalable. Pour rester Besuchen Sie unsere Webseite www.robus.com oder robusdirect.com für aktuelle technische Informationen. informé de ces possibles modifications, veuillez consulter le site internet www.robus.com ou robusdirect.com. -20°C < UT < +40°C, DC12-24V, Out Power: 12V:<384W, 24V:<768W, Klasse III, IP20,...
- Page 3 Signal Power 220-240V LED Sync Controller ~50/60Hz Input/Out Voltage: DC12-24V R (CH1) 114mm Total Output of G (CH2) Current: 4*8A B (CH3) W (CH4) RVARGBW-CRTL (Slave) 55mm 22mm 220-240V ~50/60Hz R (CH1) G (CH2) B (CH3) W (CH4) 91mm 89mm RVARGBW-CRTL (Master) Patterns...
Need help?
Do you have a question about the VEGAS RVARGBW-CRTL and is the answer not in the manual?
Questions and answers