
Subscribe to Our Youtube Channel
Related Manuals for pro.point 8896235


Summary of Contents for pro.point 8896235
- Page 1 V1.0 8896235 METAL CUTTING SCROLL SAW Please read and understand all instructions before use. Retain this manual for future reference.
-
Page 2: Specifications
8896235 Metal Cutting Scroll Saw V1.0 SPECIFICATIONS Voltage Rating 120VAC Amperage Rating 1.2A Blade Length 5 in. Blade Stroke 1/2 in. Cutting Capacity 2-1/16 in. Throat Depth 15-1/2 in. Table Size 9-3/4 x 16-1/2 in. Power Cord Length 6 ft... -
Page 3: Work Area
V1.0 Metal Cutting Scroll Saw 8896235 INTRODUCTION The Metal Cutting Scroll Saw is ideal for cutting metal pipes and bars. It includes a foot pedal control and flexible arm LED light. SAFETY WARNING! Read and understand all instructions before using this tool. -
Page 4: Personal Precautions
8896235 Metal Cutting Scroll Saw V1.0 3.1 Do not wear gloves when operating a tool that can snag the material and pull the hand into the tool. Wear protective clothing designed for the work environment and tool. Non-skid footwear is recommended to maintain footing and balance in the work environment. - Page 5 V1.0 Metal Cutting Scroll Saw 8896235 Use the correct tool for the job. This tool was designed for a specific function. Do not modify or alter this tool or use it for an unintended purpose. Do not use the tool if any parts are damaged, broken or misplaced.
- Page 6 8896235 Metal Cutting Scroll Saw V1.0 POWER TOOL PRECAUTIONS DO NOT use any power tool with a malfunctioning power switch or control. A power tool that fails to respond to the controls is dangerous and could cause an injury. A qualified technician must repair and verify the power tool is operating correctly before it can be used.
-
Page 7: Electrical Safety
V1.0 Metal Cutting Scroll Saw 8896235 Use special care when working on corners, sharp edges or flexible material. These workpieces have a tendency to snag the cutting accessory. Only use cutting accessories designed for the tool. ELECTRICAL SAFETY WARNING! Do not touch or handle a live tool with any part of your body that is wet or damp. -
Page 8: Power Cord
8896235 Metal Cutting Scroll Saw V1.0 7.1 Never remove the grounding prong or modify the plug in any way, as this will render the tool unsafe. 7.2 Do not use any adapter plugs. POWER CORD Insert the power cord plug directly to the power supply whenever possible. -
Page 9: Low Voltage
V1.0 Metal Cutting Scroll Saw 8896235 Do not wrap cord around the tool as sharp edges may cut insulation or cause cracks if wound too tight. Gently coil cord and either hang on a hook or fasten with a device to keep cord together during storage. -
Page 10: Assembly And Installation
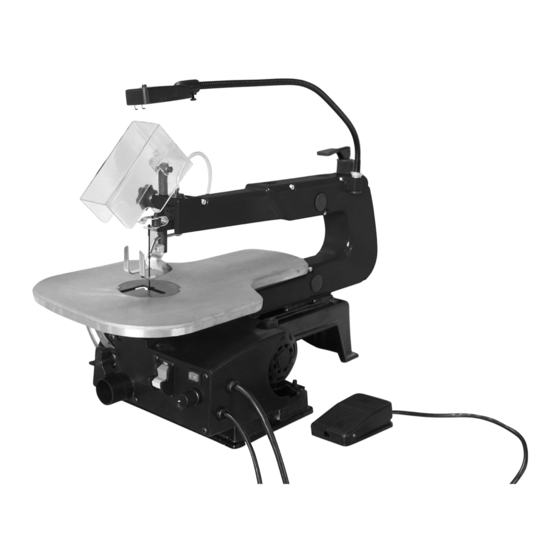
8896235 Metal Cutting Scroll Saw V1.0 IDENTIFICATION KEY Battery Operated LED Lamp Saw Blade Guard Upper Mounting Arm Hold-Down Shoe Table Table Tilt Locking Knob Dust Port ON/OFF Switch with Key Speed Control Knob and Power Indicator Fig. 1 Foot Pedal Switch... -
Page 11: Removing And Installing Blades
V1.0 Metal Cutting Scroll Saw 8896235 MOUNT TOOL ON A WOOD WORKBENCH The hardware to mount the tool is not included. If securing with bolts instead of screws, follow the Mount Tool on a Pedestal. When drilling the mounting holes in the workbench use a 5/16 in. bit. -
Page 12: Tilt Angle Adjustment
8896235 Metal Cutting Scroll Saw V1.0 9.2 Place both plain end blade adapters in the depressions on the upper rocker arm. Tighten the set screws (Fig. 3-4) in each adapter with a hex key to secure the saw blade. Tighten the screw on each side of the adapter to keep the blade centered. -
Page 13: Operation
V1.0 Metal Cutting Scroll Saw 8896235 INSTALLING BATTERIES IN LED LIGHT Remove the screws from the LED lamp’s (A) battery cover. Set the cover aside. Align each AA battery’s polarity correctly and insert both into lamp. Reattach the battery cover and secure with the screws. -
Page 14: Tilting The Table
8896235 Metal Cutting Scroll Saw V1.0 TILTING THE TABLE The user may change the table (E) angle up to 45º to the left. Loosen the table tilt locking knob (Fig. 4-2). Push the table (E) down or lift it up while watching the tilt indicator (Fig. - Page 15 V1.0 Metal Cutting Scroll Saw 8896235 CUTTING THE WORKPIECE WARNING! Keep hands away from the saw blade to avoid a serious injury or amputation. WARNING! Do not cut round stock on this machine without using a device to support the stock.
-
Page 16: Care And Maintenance
8896235 Metal Cutting Scroll Saw V1.0 10.2 Turn the scroll saw off and wait for the saw blade to stop before backing the blade out of a cut. 11. Remove your foot from the pedal and press the foot pedal switch to the OFF position, once the cut is complete. -
Page 17: Troubleshooting
V1.0 Metal Cutting Scroll Saw 8896235 Maintain the tool’s labels and name plates. These carry important information. If unreadable or missing, contact Princess Auto Ltd. for replacements. WARNING! Only qualified service personnel should repair the tool. An improperly repaired tool may present a hazard to the user and/or others. - Page 18 8896235 Metal Cutting Scroll Saw V1.0 PROBLEM(S) POSSIBLE CAUSE(S) SUGGESTED SOLUTION(S) Machine 1. Faulty variable speed 1. Repair and test. doesn’t start or potentiometer. 2 Install Disabling Key. fuse/ breaker 2. ON/OFF key removed. 3 Ensure circuit is correct and free trips 3.
- Page 19 V1.0 Metal Cutting Scroll Saw 8896235 PROBLEM(S) POSSIBLE CAUSE(S) SUGGESTED SOLUTION(S) Excessive blade Blade not tensioned Re-tension the blade. breakage correctly. Let the blade to do the Not using relief cuts in work. Use more relief cuts tight curves, or blade for tight turns;...
-
Page 20: Parts Breakdown
8896235 Metal Cutting Scroll Saw V1.0 PARTS BREAKDOWN For technical questions call 1-800-665-8685... -
Page 21: Parts List
V1.0 Metal Cutting Scroll Saw 8896235 PARTS LIST Star washer, Ø4 DESCRIPTION Philips screw, M5X8 Hex socket screw, M4X20 Hex nut, M4 Support cushion Side cover Blade guard, 15T Hex nut, M6 Hex socket screw, Spring washer, Ø6 M5X25 Base... - Page 22 8896235 Metal Cutting Scroll Saw V1.0 Work table support Potentiometer Pointer PC Board Scale Work table lock knob Work table Switch box cover Table insert ON/OFF Switch Power light, 230V Variable knob Switcher hex socket screw, M5x6 Flat washer, Ø4...
- Page 23 V1,0 8896235 SCIE À VOLUTES DÉCOUPAGE DU MÉTAL Vous devez lire et comprendre toutes les instructions avant d'utiliser l'appareil. Conservez ce manuel afin de pouvoir le consulter plus tard.
-
Page 24: Spécifications
8896235 Scie à volutes pour découpage du métal V1,0 SPÉCIFICATIONS Tension nominale 120 V c.a. Intensité de courant nominale 1,2 A Longueur de lame 5 po Course de lame 1/2 po Capacité de coupe 2 1/16 po Profondeur du col de cygne... -
Page 25: Aire De Travail
V1,0 Scie à volutes pour découpage du métal 8896235 INTRODUCTION Cette scie à volutes pour métaux est idéale pour couper les tuyaux et les barres en métal. Elle comprend une commande à pédale et un bras flexible avec lampe à DEL. -
Page 26: Précautions Personnelles
8896235 Scie à volutes pour découpage du métal V1,0 Portez des gants qui protègent en fonction des matériaux de travail et pour réduire les effets des vibrations de l'outil. 3.1 Ne portez pas de gants lorsque vous utilisez un outil dans lequel le tissu pourrait demeurer coincé, entraînant ainsi la main. - Page 27 V1,0 Scie à volutes pour découpage du métal 8896235 AVERTISSEMENT ! Ne permettez PAS au confort ou à votre familiarisation avec l'outil (obtenus après un emploi répété) de se substituer à une adhésion stricte aux règles de sécurité de l'outil. Si vous utilisez cet outil de façon dangereuse ou incorrecte, vous pouvez subir des blessures corporelles graves.
- Page 28 8896235 Scie à volutes pour découpage du métal V1,0 6.1 Utilisez toujours des lames dont la taille et la forme conviennent aux outil. Les lames qui ne correspondent pas bien aux fixations de montage de l'outil tourneront de façon irrégulière, causant une perte de maîtrise de l'outil.
- Page 29 V1,0 Scie à volutes pour découpage du métal 8896235 Après avoir procédé aux ajustements, assurez-vous que tous les dispositifs d'ajustement sont bien serrés. Ne forcez jamais l'outil. Ce faisant, vous ralentirez la vitesse de la lame de scie, provoquant ainsi son grippage ou un effet de rebond.
- Page 30 8896235 Scie à volutes pour découpage du métal V1,0 SÉCURITÉ EN ÉLECTRICITÉ AVERTISSEMENT ! Ne touchez et ne manipulez pas un outil sous tension avec une partie du corps qui est mouillée ou humide. La peau humide réduit la résistance au courant électrique, augmentant ainsi le risque de choc grave ou mortel.
-
Page 31: Cordon D'alimentation
V1,0 Scie à volutes pour découpage du métal 8896235 trois broches avec mise à la terre. Consultez un électricien qualifié si vous doutez de la mise à la masse appropriée d'une prise. En cas de défaillance électronique ou de bris de l'outil, la mise à la masse procure un trajet de faible résistance pour éloigner... -
Page 32: Tension Basse
8896235 Scie à volutes pour découpage du métal V1,0 Pour éviter tout dommage au cordon d'alimentation, observez les précautions suivantes : 4.1 Ne tirez jamais sur le cordon d'alimentation pour déconnecter la fiche de la prise. 4.2 Tenez le cordon à l'écart de la chaleur, de l'huile, des rebords coupants ou des pièces mobiles. - Page 33 V1,0 Scie à volutes pour découpage du métal 8896235 L'outil peut surchauffer, pouvant ainsi provoquer un incendie. Vérifiez l'outil en le branchant directement à la source d'alimentation. S'il se met sous tension, remplacez la rallonge par une rallonge de la puissance prescrite et aussi courte que nécessaire, au besoin.
-
Page 34: Assemblage Et Installation
8896235 Scie à volutes pour découpage du métal V1,0 ASSEMBLAGE ET INSTALLATION Les lettres de référence entre parenthèses (A) se rapportent à la clé d'identification comprise. Les numéros entrecoupés entre parenthèses (Fig. 1-1) se rapportent à un point précis d'une illustration ou d'une image. -
Page 35: Retrait Et Installation Des Lames
V1,0 Scie à volutes pour découpage du métal 8896235 Glissez une rondelle plate sur une vis à bois de 5/16 x 1 po et fixez la meuleuse en place. Procédez de la même façon avec trois autres vis. Serrez toutes les vis jusqu’à... -
Page 36: Réglage De L'angle D'inclinaison
8896235 Scie à volutes pour découpage du métal V1,0 Lame de scie à extrémité à goupille – Insérez l’extrémité à goupille de la lame de scie dans la fente de la rainure en V de la lame dans le dispositif de retenue inférieur de la lame. Insérez ensuite l’extrémité... - Page 37 V1,0 Scie à volutes pour découpage du métal 8896235 Poussez la table vers le bas ou levez-la jusqu’à ce que la table soit à angle droit avec la lame de scie. Serrez le bouton de verrouillage. Desserrez la vis sur l’indicateur d’inclinaison (fig. 4-1).
-
Page 38: Réglage De La Tension De La Lame
8896235 Scie à volutes pour découpage du métal V1,0 Assurez-vous que la clé est retirée de l’interrupteur de marche/arrêt (H) afin d’éviter tout risque d’une mise en marche accidentelle lors du réglage ou du repositionnement de toute pièce de la scie à volutes. - Page 39 V1,0 Scie à volutes pour découpage du métal 8896235 PLACER LE PATIN DE MAINTIEN EN ANGLE L’angle de patin doit correspondre à l’angle de la table afin de contrôler le matériau pendant la coupe. Lorsque vous changez l’angle de la table, vous devez aussi changer l’angle de patin.
- Page 40 8896235 Scie à volutes pour découpage du métal V1,0 Appuyez sur la pédale pour démarrer la lame de scie. Réglez la vitesse de la lame de scie en tournant le bouton de réglage de vitesse (I) dans le sens horaire pour l’augmenter ou dans le sens antihoraire pour la diminuer.
-
Page 41: Soin Et Entretien
V1,0 Scie à volutes pour découpage du métal 8896235 Percez un trou de 1/4 po à l’intérieur de la limite de la ligne de coupe aux points de départ et de fin de chaque coupe. Retirez la plaque amovible et la lame de scie. -
Page 42: Mise Au Rebut
8896235 Scie à volutes pour découpage du métal V1,0 NETTOYAGE Nettoyez les particules de l’outil avec un chiffon propre. Appliquez une légère couche de cire sur le dessus de la table pour maintenir une surface lisse si vous le désirez. - Page 43 V1,0 Scie à volutes pour découpage du métal 8896235 PROBLÈME(S) CAUSE(S) POSSIBLE(S) SOLUTION(S) PROPOSÉE(S) L’appareil ne 1. Potentiomètre à 1. Réparez et essayez. démarre pas ou vitesse variable 2 Installez la clé de mise hors le fusible/ défectueux fonction. disjoncteur se 2.
- Page 44 8896235 Scie à volutes pour découpage du métal V1,0 PROBLÈME(S) CAUSE(S) POSSIBLE(S) SOLUTION(S) PROPOSÉE(S) La lame ne reste 1. La tension de la lame 1. Rétablissez la tension de la pas sur la ligne ne se règle pas lame. de coupe.
- Page 45 V1,0 Scie à volutes pour découpage du métal 8896235 RÉPARTITION DES PIÈCES Visitez www.princessauto.com pour plus d'informations...
-
Page 46: Liste Des Pièces
8896235 Scie à volutes pour découpage du métal V1,0 LISTE DES PIÈCES Vis de dôme M6 x 20 DESCRIPTION QTÉ Vis cruciforme M5X8 Support de lame supérieur Écrou hexagonal M4 Rondelle étoile Ø4 Couvercle latéral Vis à tête creuse Écrou hexagonal M6 hexagonale M4X20 Rondelle à... - Page 47 V1,0 Scie à volutes pour découpage du métal 8896235 Boulon hexagonal Vis cruciforme M4X10 M6X20 Potentiomètre Gros coussin Ø6 Carte de circuit imprimé Compresion spring Bouton de verrouillage Vis à tête creuse d’établi hexagonale M6X40 Couvercle de boîte de Support de table d’établi...
- Page 48 8896235 Scie à volutes pour découpage du métal V1,0 En cas de questions techniques, appelez le 1-800-665-8685...
Need help?
Do you have a question about the 8896235 and is the answer not in the manual?
Questions and answers